

How to Ship a Weekly Article in One Day
The $2 agentic pipeline that automates 91% of my writing


I publish one in-depth technical article every week on Decoding AI. That cadence sounds simple until you live it. The article itself eats up the time I should be digging into the Claude Code leak to understand how it works under the hood.
I am a builder first, not a writer. Most weeks, the writing strangles the building. This is the exact trap most weekly writers fall into.
When the writing eats the week, the next article has nothing real underneath it. So writers fill the gap with generics, surface-level takes, or invented examples that add noise to an already noisy internet.
The default fix most people reach for is to let AI write it. That fails for the opposite reason. When you put zero thought into the process, AI just industrializes the noise.
The whole point of writing is to share something you actually thought through, built, and learned. If AI writes for you, you publish nothing of value. If you write everything by hand, you don’t have enough time to build something worth publishing.
Both ends starve the loop that actually feeds the business: research, build, and teach.
What I built instead is an agentic AI workflow that automates ~90% of the manual writing pipeline while keeping me as the irreplaceable seed at the top. I provide the research direction and the brain dump that reflects my personal experience.
AI handles distribution speed. I handle thought, taste, and direction. By the end of this article, you will see exactly how the system works.

We will cover my deep research agent, writing workflow with its evaluator-optimizer loop, image style-transfer step, and title & SEO generator. And for the most important part, you will learn where the human-in-the-loop is irreplaceable.
My Workflow: What Stays Human, What Gets Automated
Before showing any architecture, I want to walk you through the manual workflow exactly as I used to run it. This is the boring, honest version. This is what every weekly technical writer secretly does, even if they pretend otherwise.
I used to research the topic for hours or days while taking notes. Then, I would write a high-level outline of the piece. Next, I sketched the first high-level diagram that helped me better visualize the narrative of the piece.
I expanded each outline section into bullet points, creating what I call the article guideline. After that, I wrote the article, edited it, and created the rest of the visuals. Finally, I wrote the title and SEO and copy-pasted everything into Substack.

Now, everything gets automated except two things. I still do an in-depth round of research to understand the topic and collect a few high-quality golden source seeds. This is the fun part. These are mostly pulled from my Readwise reading list, which acts as a curated library I built over time while browsing Substack, YouTube, LinkedIn, X, and more. Then, I use this as a high-quality seed for my deep research agent to expand it and fill any potential gaps.
Second, while researching I do a brain dump of everything I consider relevant on the topic. After wrapping up the research, I refactor the brain dump into an outline that follows an engaging narrative. Then, I do a combination of manual and Claude Code work to expand it with bullet points, creating the article guideline.
Together, those two steps are the seed that makes everything downstream mine. Without them, the pipeline produces generic AI mush.
Before the automated pipeline existed, a 3,000-word article like one of my latest pieces, Agentic Harness Engineering, would eat two to three days of my week running this exact nine-step grind by hand. Now, the same piece takes about a day.
Why this works
Writing prose is a translation step. It turns thoughts into words on a page or boxes in a diagram. Translation is exactly the kind of work LLMs excel at, if you already did the thinking.
If you haven’t, no amount of agent orchestration saves you. AI as a writing tool fails when you put zero thought into your process. It becomes a force multiplier when you use it to distribute your thoughts.
Now, let’s look at how the actual system works.
Understanding The System Architecture
The architecture has five big components plus a memory layer. The contract between them is the artifact each one writes to disk, such as the research markdown, the article guideline, the final article, branded image PNGs, and the final HTML bundle.
Here are the five components at a glance:
Deep Research agent (we call it Nova): Takes a topic and golden sources, returning a ranked, structured research file.
Writing Workflow (Brown): Takes the article guideline and research, returning the full styled article via an evaluator-optimizer loop.
Media style transfer: Because the article contains raw Mermaid diagrams, we apply the Decoding AI brand style.
Title and SEO generator: Runs an expand-and-narrow loop to produce the title, subtitle, SEO title, and SEO description.
HTML exporter: Converts the final markdown into platform-ready HTML for Substack, Medium, X, or LinkedIn to easily copy-paste the piece.
The handoff contract between components is the filesystem. Each stage reads and writes plain files in a working directory. Internal per-component state lives in databases: PostgreSQL for Nova, and an SQLite checkpointer for Brown.
The artifacts make the pipeline debuggable, resumable, and human-in-the-loop friendly across stages. The databases make each stage individually resumable mid-run. For example, if the writing workflow fails after generating the first draft, we can easily resume without having to spend tokens on rerunning from scratch.
Also, because everything is managed through files, I can open any artifact at any key step, inspect it, edit it, and re-run downstream.
We will show you how we used this system to write one of our latest popular pieces: Agentic Harness Engineering.
I’ve also used the same process to research and write professional lessons for other educational projects, such as our latest Agentic AI Engineering course, as the pipeline adapts to any type of educational business.

Each component is explained in depth in the sections below. Two are MCP servers (Nova and Brown) and three are skills (media style transfer, title & SEO, HTML export).
In terms of concrete economics, the whole process runs at roughly ~$0.30 to $1 per image, mostly in Gemini credits, with the rest of the pipeline costing cents. This article, with 9 images, landed closer to $6, while a leaner piece with a single diagram sits around $1.
Build This Exact Stack Yourself (Product)

Reading about a pipeline is one thing. Building one is another. In my Agentic AI Engineering Course, built with Towards AI, I walk you through this exact stack from scratch.
Nova’s deep research loop, Brown’s evaluator-optimizer built on LangGraph, both served via FastMCP, plus the style-transfer skill, evaluation with Opik, and deployment on Docker, GCP, and GitHub Actions.
34 lessons. Three end-to-end portfolio projects. A certificate. And a Discord community with direct access to industry experts and me.
Rated 5/5 by 300+ students. The first 6 lessons are free:
Walkthrough: The Artifacts of One Article
Before diving into each component, let’s take a look at the input and output artifacts the pipeline produced while generating the Agentic Harness Engineering article. Here are some trimmed versions of each, as they get pretty large.
outline.md: the hand-written seed, Nova’s input (88 lines)
## Outline
1. Introduction - Why Do We Need a Harness?
	1. Personal story: To be researched
	2. Problem + Agitation: ...
	3. Transformation + Solution: ...
	4. Intuitively, Mitchell Hashimoto has the best definition of a harness: "the idea that anytime you find an agent makes a mistake, you take the time to engineer a solution such that the agent never makes that mistake again."
	5. 200 words
2. What the Hell Is A Harness?
    ...
3. How does a Harness Look?
	1. Key components: LLM, tools, planning loop, context engineering, sandbox, memory, orchestration layer, serving layer, interfaces
	2. The agent loop: Powered by planning techniques like ReAct
    ...
4. Planning & Orchestration
    ...
	4. 200 words
5. Key Tools
    ...
6. Sandbox Environment
    ...
7. Memory
    ...
8. Conclusion - The Future of Harness
    ...

# Resources

1. [My AI Adoption Journey](https://mitchellh.com/writing/my-ai-adoption-journey)
2. ...
The seed is deliberately rough. It contains placeholders like “To be researched”, section blocks that will later be restructured, and hand-picked golden sources that anchor Nova’s first round of research. The idea is to dump ideas without thinking too much about structure while you are in your creative mindset.
research.md: Nova’s output (1377 lines)

article_guideline.md: Expanded outline, Brown’s input (201 lines, 8 sections).
## What We Are Planning to Share

...

## Why We Think It's Valuable

...

## Point of View

I write the article, Paul Iusztin. I am part of a bigger team known as Decoding AI....

----

## Article Outline

1. Why Do We Need a Harness?
2. What the Hell Is a Harness?
3. The Anatomy of a Harness
4. How the Agent Decides What to Do Next
5. The Tools That Let Agents Act
6. Where Agents Run
7. Memory Is Just the Filesystem
8. What's Next

## Section 1 - Why Do We Need a Harness?

...

## Section 2 - What the Hell Is a Harness?

...

- **Hook:** Start with the horse analogy. A horse is powerful on its own, but useless for farming without a harness — the straps, reins, and attachments that let you direct its strength toward useful work (inspiration from Jonathan Gimick from Manning). Same with LLMs: the model has the intelligence, but without tools, memory, state, guardrails, and orchestration, you can't put it to work reliably.
- **The clean definition:** LangChain's formulation is the clearest — **Agent = Model + Harness**. The harness is "every piece of code, configuration, and execution logic that isn't the model itself." The model provides intelligence. The harness makes that intelligence useful.
...

[GENERATE_DIAGRAM] Three levels of engineering: prompt, context, and harness engineering.
...

- **Transition:** Now that you know what a harness is, let's look at all its components and how they fit together at a high level — before diving deeper into each one.

- **Section length:** 300 words

## Section 3 - The Anatomy of a Harness

...

## Section 8 - What's Next

...
The article guideline is deliberately as structured and detailed as possible. The idea is to have enough or even more detail about each section to fill in the requested word budget to ensure the LLM doesn’t fill in any gaps with generalities or, worse, with hallucinations.
article.md: Brown’s final prose (~3,000 published words, 8 sections)
See the Agentic Harness Engineering article we posted a few weeks ago on Substack.
Now let’s see how Nova, the deep research agent, turns the outline and its golden sources into a structured research file.
Deep Research: How Nova Builds the Knowledge Base
Nova is an MCP server exposing ten specialized tools, orchestrated by the client, which is often a harness such as Claude Code or Cursor.
Here is how the overall deep research architecture works:
Query generation loop: Nova takes the topic and golden sources, runs gap analysis between the outline and the provided sources with Gemini Pro, and generates the next round of research queries based on what is missing. Three rounds hits the cost-versus-coverage sweet spot.
Concurrent retrieval: Each round fans out concurrent Perplexity calls that return only metadata and a summary of each new source.
Two-stage filtering: We full-scrape only the top five by a four-dimensional rubric evaluating trustworthiness, authority, relevance, and quality. For the rest of the sources we keep only the summary, which is enough for providing examples such as
Anthropic is implementing compaction in Claude Code.

Nova ships one purpose-built tool per source family. We scrape web URLs using Firecrawl, while we ingest GitHub repos through gitingest. We ingest YouTube videos using Gemini Pro directly on the URL without a local download.
For example, this is how I used Nova when writing my harness article. I started with a vague topic about what an agent harness is and why it matters. I handed Nova a seed set of golden-source URLs inside the guideline, including the LangChain harness post, the Anthropic long-running agents piece, and Mitchell Hashimoto’s AI adoption journey. Nova extracted these, scraped each one, and wrote the cleaned content into its working memory.
Nova then ran the three-round gap-analysis loop, fanning out concurrent Perplexity queries aimed at topics the seed sources had not covered. Every raw result was appended to the log. Ultimately, each source is filtered using a set of heuristics and LLMs to ensure we keep only high-quality results.

Finally, Nova compiles everything into the collapsible HTML research file.
The client knows how to leverage all of Nova’s MCP tools through a skill that glues together the ingestion, search, and all the other utility tools into the unified deep research algorithm that takes as input the outline.md file and outputs research.md.
Writing Workflow: How Brown Turns an Idea Into an Article
Brown picks up where Nova left off. Brown is a workflow, not an agent, implemented with LangGraph. We chose a workflow over an agent deliberately: prose generation rewards predictability over exploration.
First, we generate all the required Mermaid diagrams for the article using the orchestrator-worker pattern that looks around the article and spins up a specialized Mermaid-diagram agent based on all the user requests found within the article. These are usually flagged within the article guideline explicitly by stating “generate diagram”, “create a diagram”, or [GENERATE_DIAGRAM]. Next, these diagrams are passed downwards through the generation process. We’ll come back to how they get styled in the Branded Images section. The orchestrator-worker pattern can easily be extended to generate other types of media such as images, videos, or audio.
Next, we control Brown’s voice via the system prompt through three large tricks.
The first one is based on defining a set of six profile classes, each targeting a different family of rules. There are four generic profiles, which are static and agnostic to who is using the tool and what they are doing:
Structure Profile: How the prose is physically laid out on the page such as sentence, paragraph, list, and subheading shape.
Mechanics Profile: The grammatical scaffolding the writing must respect such as active voice, point of view, and punctuation rules.
Terminology Profile: What vocabulary is allowed and what filler is banned such as word choice, sentence phrasing, and descriptive language.
Tonality Profile: How the article should feel to the reader such as formality level, voice characteristics, and emotional register.
And two customizable:
Character Profile: Who is writing. For example, I added here my biography. This should be adapted per user.
Article Profile: Special article characteristics such as the structure, referencing, and citations. This can be swapped to a LinkedIn, Reddit, or X profile to adapt the system to different formats.
The second trick is to force the LLM to respect the article guideline and research over anything else, to ensure the user gets what they expect and that Brown adheres only to the research to avoid hallucinations.
The third trick is to add a set of few-shot examples, which beats anything else because showing works better than telling. For the best quality this should be changed when switching article formats and especially when switching content formats.
After we compile our system prompt, we call Gemini at a 0.7 temperature to produce a first draft with more randomness.

After the first generation pass, we start an evaluator-optimizer loop running a Reviewer node with 0.0 temperature against the guideline, research, and profiles to ensure the draft respects all the expected requirements. The Reviewer node returns a list of structured review objects via Pydantic. If issues are found, we run an Editor node at a 0.1 temperature that applies all these fixes.
The evaluator-optimizer loop runs for a fixed iteration count, not until a quality score is good enough. Because writing, like any creative work, is highly subjective, a single quality score becomes noisy and unpredictable. Empirically, running the loop for a fixed number of iterations yields better results and gives us more control over cost and latency.
Because the article might not be polished enough, we expose editing tools through the MCP server so the user can kick off another review-edit iteration on demand.
Now let’s see how we transform raw Mermaid output into branded diagrams.
Generating Branded Images
Brown produces Mermaid source for every diagram in the article. Mermaid is fast and predictable to generate with LLMs but visually generic. In theory you can customize them. But let’s be honest. They are ugly. Thus, the job of this stage is to keep the structure of the Mermaid diagrams Brown produced while applying a styling layer on top of them.
We use a skill that leverages Gemini’s Nano Banana for the style transfer. The skill takes a file as input and detects all the Mermaid diagrams in it. Then, for each diagram, it runs parallel subagents. Each invokes the Gemini script on the raw Mermaid text and outputs a styled PNG.
Here is the prompt engineering behind the styling:
The branding is referenced both through a written file with color codes, fonts, and general guidelines, plus a representative image.
2 positive examples containing both the Mermaid inputs and positive styled outputs.


2 negative examples also containing the Mermaid inputs and faulty styled outputs.
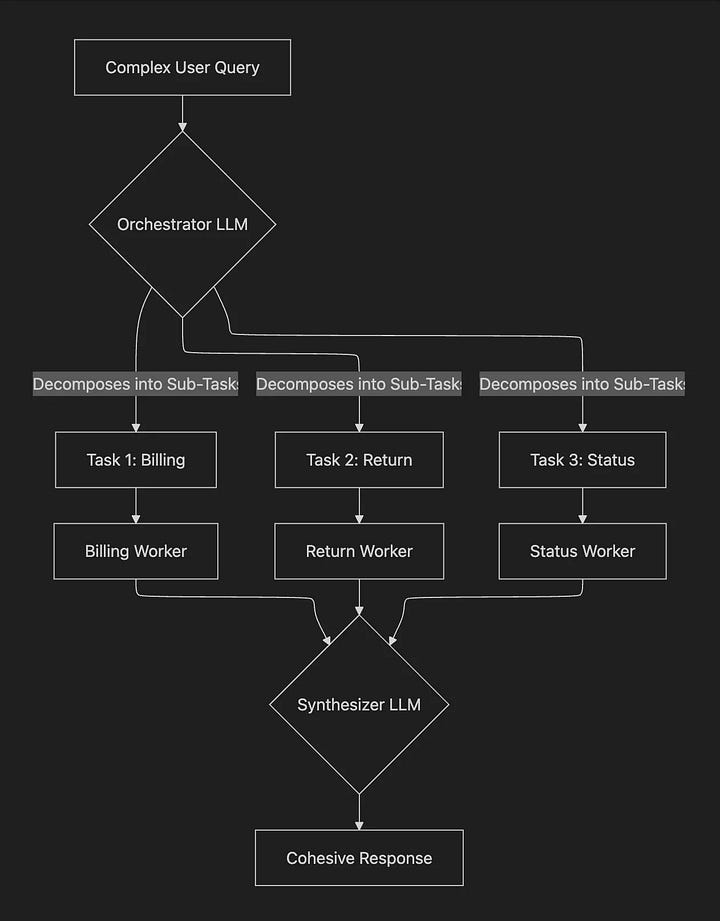
Image 9: Negative few-shot example


When using images as few-shot examples, you should be really careful not to go overboard with them, as they add up in tokens quickly. Also, adding the positive and negative examples on top of just random style images and files was the special sauce for us that made everything work, as it clearly shows Nano Banana how to make the mapping between the two.
Now, let’s see how we generate punchy titles and relevant SEO.
Generating Title & SEO
Title and SEO are the most important components. They decide whether the article gets read at all. Doing it by gut on a Friday night is the worst possible workflow.
The pipeline replaces gut with an expand-and-narrow loop. We generate nine versions from many angles, score ruthlessly, and keep only the top four. Then we repeat this process three times.
The generator creates nine candidate title, subtitle, SEO title, and SEO description packages per round, each from a different angle like personal transformation, curiosity, making bold claims, showing proof of work, and more. The idea is to have a lot of diversity during the expansion round.
The validator scores every candidate on six rubric-anchored dimensions: title, subtitle, SEO title, and SEO description quality, article alignment, and cohesion across the four pieces. It uses hybrid scoring, combining an LLM-judge for the qualitative rubrics and heuristic penalties for the hard constraints such as character count. For example, shorter titles score higher.
Then, based on the scores generated by the validator, we pick the top four winners and use them as seeds for the next round of generation.
The key here is to make the validator a subagent that doesn’t share the same context window as the generator to avoid any type of bias. Fresh eyes prevent self-confirmation bias. This is the same principle Brown uses for its evaluator-optimizer split and Nova uses for its filter step.

So why pick the top four, and not three? When scheduling on Substack, we pick the top four for A/B testing rather than committing to the single highest-scored one. The validator is good but not omniscient, so we let real readers settle close calls.
Exporting to HTML
The last step is to compile the Markdown article into HTML so we can easily copy-paste everything into Substack. Boring, but necessary.
For this step, we created a skill that wraps Tivadar Danka’s nb2wb CLI tool that does all the heavy lifting. The tool supports most popular formats such as Substack, Medium, X, and LinkedIn.
Initially, it was built to map Jupyter Notebooks to these formats, but it works amazingly for Markdown files too.
What Stays Irreplaceable
It is not 100% automated. I still follow the original research direction. I still write the outline brain dump. I still validate every artifact. I still write the code that runs the pipeline.
The 90% automation is real, but the 10% is the part that matters most. It’s the part that makes this article stand out as human: the seed, the taste, and the validation are irreplaceable.
What’s Next
You might wonder how well this works. Well... You just read an article created by this exact workflow. In other words, this is an article that talks about itself. It’s not yet perfect, but it will get there.
End-to-end, it took about a day of my time. Without the pipeline, this same article would have taken three days of mostly translation work.
💡 Want to build this exact stack yourself? Nova and Brown built with FastMCP & LangGraph, the style-transfer skill, human-in-the-loop orchestration, evaluation with Opik, and deployment on Docker, GCP, and GitHub Actions. Every line walked through with me and the Towards AI team. That’s exactly what we teach in our Agentic AI Engineering Course.

Otherwise, here is what I’m wondering:
Which step of your own writing workflow do you think is the most dangerous to automate, and which one have you been avoiding automating because you weren’t sure how?
Click the button below and tell me. I read every response.
Enjoyed the article? The most sincere compliment is to restack this for your readers.
Further Reading
LangChain. The Anatomy of an Agent Harness
Anthropic. Effective Harnesses for Long-Running Agents
Mitchell Hashimoto. My AI Adoption Journey
The Agent Stack. OpenClaw Architecture Part 1
Images
If not otherwise stated, all images are created by the author.
Fascinating article. It would be useful to know how you got to this architecture. Where did you start first, what prompted you to add more complexity, and which parts of the architecture added most bang for the buck.
Sorry for asking, but what’s the current price for running this loop per article? An estimate or range is fine.