

How to Design Python AI Projects That Don't Fall Apart
Applying the pragmatic clean architecture to design AI agents, workflows and LLM apps.

I was a true believer in the Clean Architecture, thinking that would help me figure out how to structure Python AI projects. I spent countless hours obsessively dividing my projects into domain, application, infrastructure, and interface folders. I forced every single piece of code to fit into these four buckets. It felt “correct.” But in reality, it was a nightmare to maintain. It wasn’t until I realized that these layers should be virtual concepts that I finally cracked it.
Because Python is incredibly flexible, it allows you to build anything. That’s why it’s so confusing on how to properly design and structure your Python code. All the responsibility is on the developer. But that flexibility often leads to “spaghetti code” when building complex AI apps such as agents and workflows.
Most recommendations on how to design Python projects fall into two extremes. They are either highly specific to a tool, such as a FastAPI template or a LangGraph starter kit. Or they follow the Clean Architecture pattern too rigidly (which was originally developed for Java and doesn’t map one-to-one to Python). I have been a victim of this dogmatism as well.
Still, we need a middle ground to avoid spaghetti code while keeping our code simple. We need a tool- and framework-agnostic approach that provides structure without bloat. Even in a world where the code is purely generated by AI, understanding how to design your code base is probably one of the most important skills.
In this article, I presented a pragmatic, “loose” version of Clean Architecture applied to building AI projects, such as AI agents, workflows, or LLM apps. We won’t follow the book letter-by-letter. Instead, we will inherit only the principles that make code modular, flexible, testable, and maintainable.
Also known as the pragmatic clean architecture.
Here is what we will cover:
Define the four virtual layers required for modularity.
Structure an AI project to separate business logic from infrastructure and serving layers.
Implement a scalable folder structure.
Avoid the three biggest mistakes engineers make when structuring Python apps.
But first, a quick word from our sponsor, Opik ↓
AI Agents Virtual Hackathon With $30,000 in Prizes (Sponsored)

Want to get motivated to build that AI agent you had in mind in the past 12 months while having fun, meeting cool people and potentially earning up to $10,000 (in cash per team)?
Hackathons are the best way to do that.
Opik is hosting a free one, together with Google DeepMind and Vercel, offering $30,000 in prizes with a single goal: building and shipping AI agents.
But wait. That sounds like a scam. Not really. The catch is that you have to put in the work during the hackathon to convince the judge that your AI app is worth the prize.
The worst that can happen? You have the chance, for free, to access:
Expert Workshops: Learn observability, evaluation, and agent optimization from Comet’s team
Premium Tools: Credits and support from Google, Vercel, and other partners
Direct Mentorship: Technical support throughout the hackathon via Discord
Prizes will be awarded based on the 6 challenges below. You can win one category plus the best use of Opik, totaling $10,000.
Sounds like this is for you? Then register here:
Be quick! Registration opens on Jan 13 (Today!), and the project submission is on Feb 9. You can register at any time during the event, up to Feb 9.
↓ Now, let’s move back to our article.
What You Need to Know From the Clean Architecture
Before we dive into folders and files, we need to understand the mental model. The Clean Architecture organizes a system into four concentric circles, or layers.
The Domain Layer (The “What”): This is the inner core. It defines your business objects and the specific units of work your AI performs. It doesn’t know about databases, Application Programming Interfaces (APIs), or LLMs.
The Application Layer (The “How”): This layer orchestrates the domain elements. It defines the workflows and use cases. It connects the steps required to achieve a business result.
The Infrastructure Layer (The “External Dependencies”): This contains the concrete implementations of your external dependencies. It includes the specific LLM providers like OpenAI or Gemini, database dependencies (Postgres, MongoDB, Qdrant), storage strategies (local, S3) or any other API or tooling that your system depends on.
The Serving Layer (The “Interface”): This is the outermost layer. It defines how the outside world interacts with your application. This could be through a Command Line Interface (CLI), a REST API, or a Model Context Protocol (MCP) server.
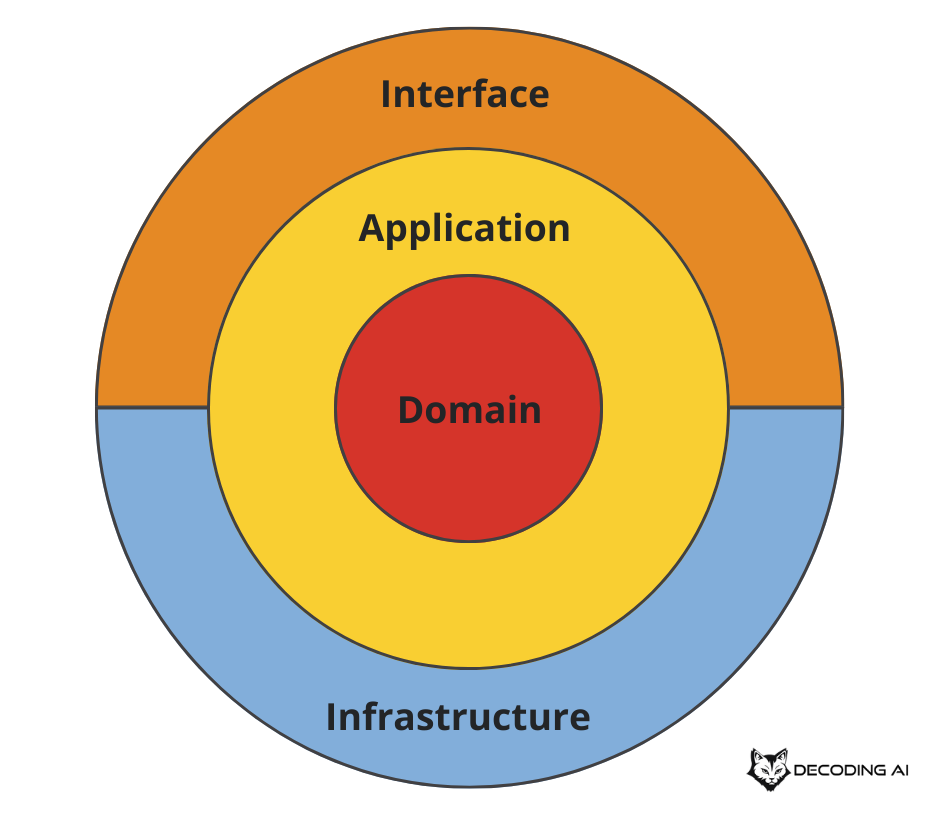
The most important rule to remember is the Dependency Rule: dependencies must always point inward.
The outer layers know about the inner layers. But the application and domain layers must never be aware of the infrastructure and serving layers.
This isolation is the key advantage. By keeping your core AI logic “pure” in the app and domain layers, you can reuse the exact same AI agent across different platforms. You can run it on a CLI, a web application, or a VS Code extension. Also, you can easily swap saving your documents from your local disk to S3 or your model from Gemini to a local model running on your device. You do this without changing a single line of business logic.
Another advantage is in properly separating your domain and application layers. Every class or function from your domain layer should work on its own. Should be a unit of “work”. In fancy words, it should be orthogonal. In the meantime, your app layer should compose components from your domain layer into different business use cases. In other words, your domain layer is your LEGO blocks, while your app layer sticks them together into real-world business problems.
I love comparing the clean architecture to running a professional kitchen. The domain represents your ingredients. The application layer is the recipe. It is the step-by-step process of cooking. The infrastructure is your equipment, like the stove or blender. Finally, the serving layer is how the customer gets the food. It could be plated in a dining room, packed in a takeout box, or served at a buffet. You can swap a gas stove for an electric one without changing the recipe. You can switch from dining in to takeout without changing how you cook the food.
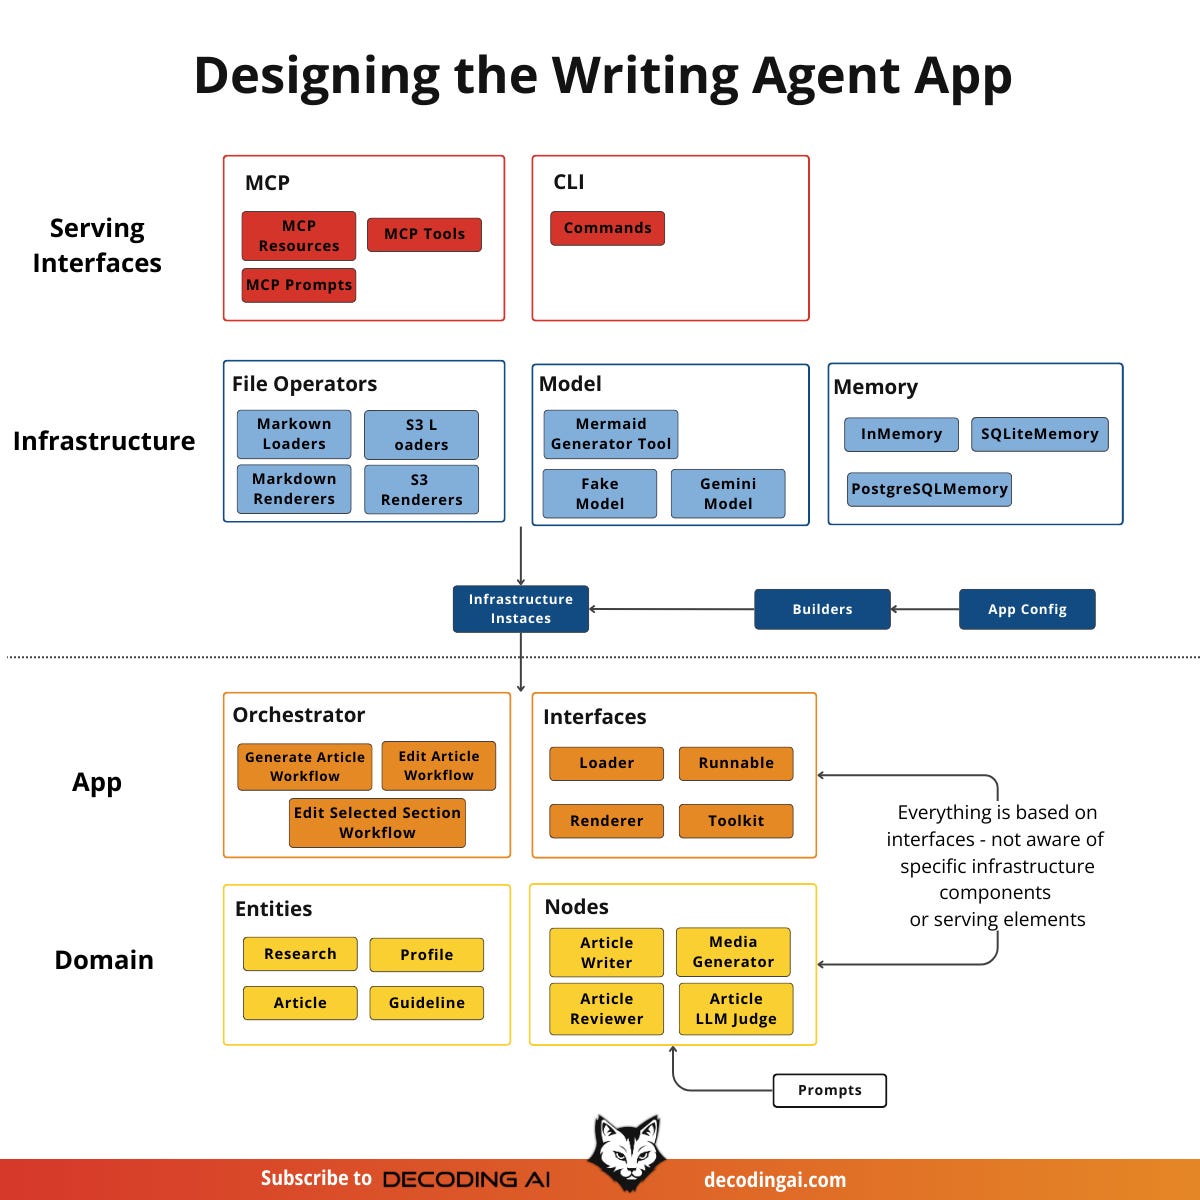
The Project Structure of an AI App
Now let’s apply these abstract layers to a concrete AI application.
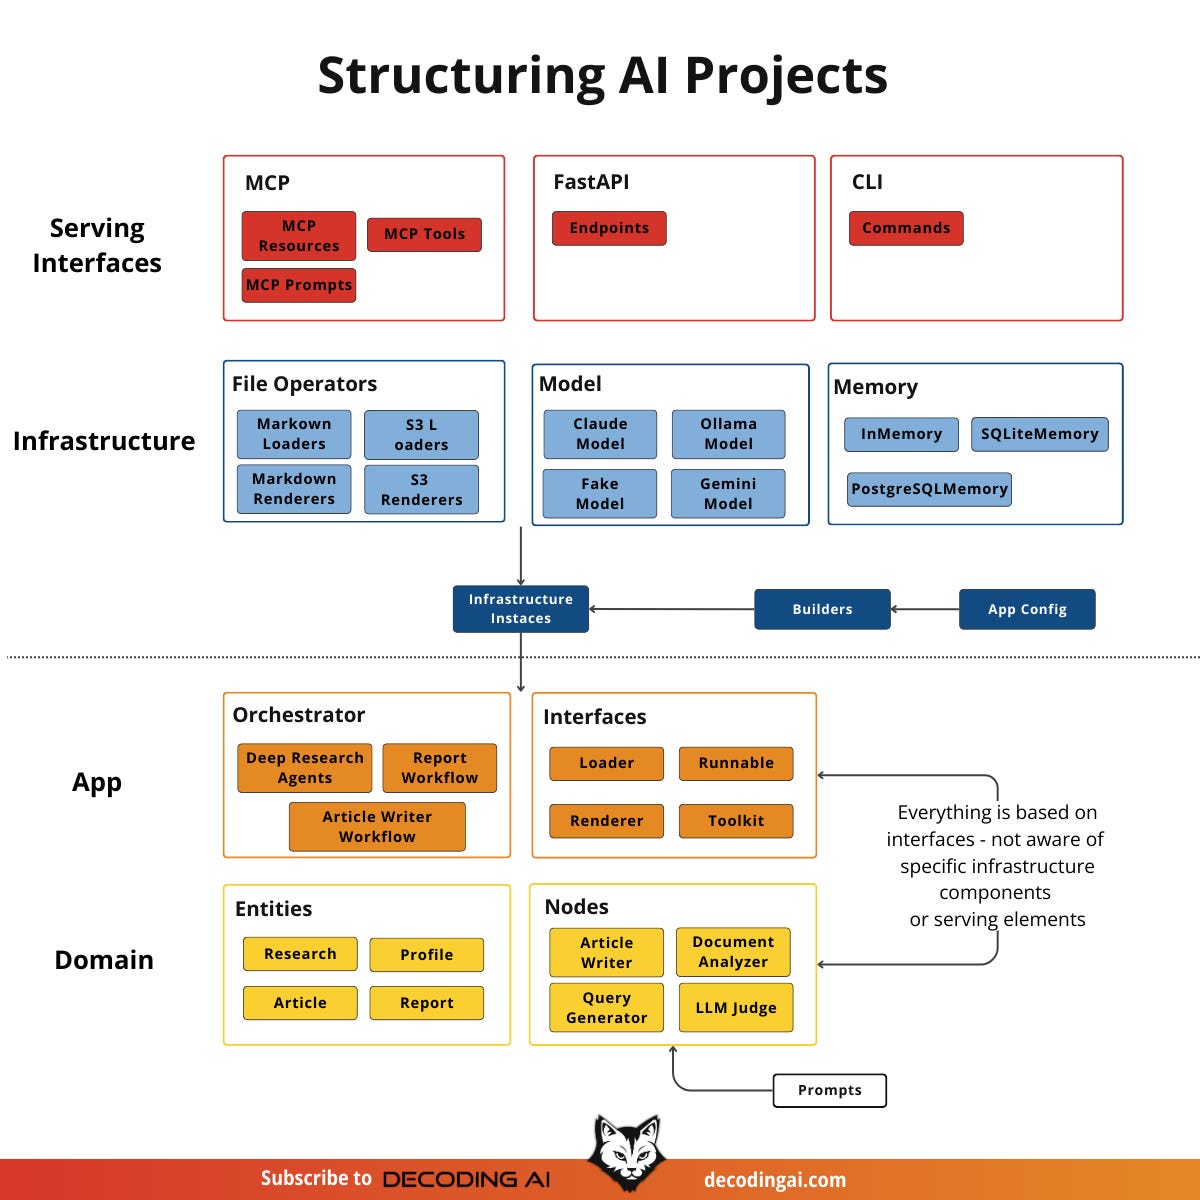
The Four-Layer Architectural Model in AI
The Domain Layer (The “What”): In an AI project, this layer holds your Entities and Nodes. We typically define Entities using Pydantic models, such as a
Contextor anArticle. Nodes are the specific units of AI logic. For example, anArticleWriterNodecontains the prompt and the logic required to generate text. AReviewerNodecontains the logic to evaluate a given piece of content. These nodes can be reused in different business use cases.The Application Layer (The “How”): Orchestration happens here. We use tools like LangGraph, DBOS, or Prefect to stitch the Nodes together into a coherent workflow. This layer dictates the sequence. For example: “First research, then write, then review.” We isolate this layer from how the data is stored or how the user triggers the workflow.
The Infrastructure Layer (The “External Dependencies”): This layer houses the External Dependencies. It contains the concrete code that talks to Gemini or OpenAI. It connects to SQLite or Postgres databases to store the memory. It also loads documents and images from local disks or S3 buckets.
The Serving Layer (The “Interface”): This exposes your AI logic to the world. In our writing workflow project, we serve it as both an MCP server and a CLI app. This allows the same backend to be used directly from the CLI or by MCP Clients like Cursor and Claude.
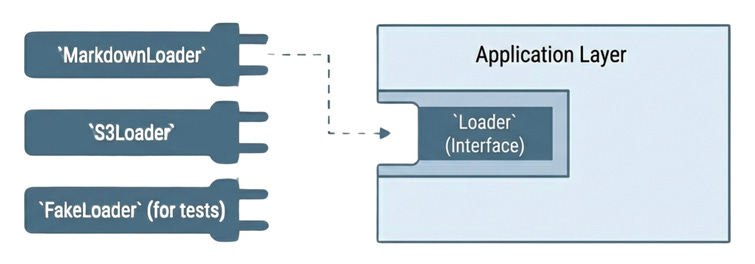
Polymorphism and Decoupling Infrastructure
The core benefit of this architecture is Polymorphism. Instead of hard-coding GeminiModel directly into your application layer, it should interact with an interface. This is an abstraction like BaseLLM.
This allows for effortless experimentation. You can switch from a live Gemini model to a “Fake Model” that returns static text for debugging. You do this simply by changing a configuration file. The core workflow code doesn’t know the difference. In our writing agent example, we use this to easily swap between:
A local markdown file loader and a cloud-based S3 loader.
An in-memory memory storage class to SQLite or PostgreSQL.
Calling Gemini or a fake model during testing.
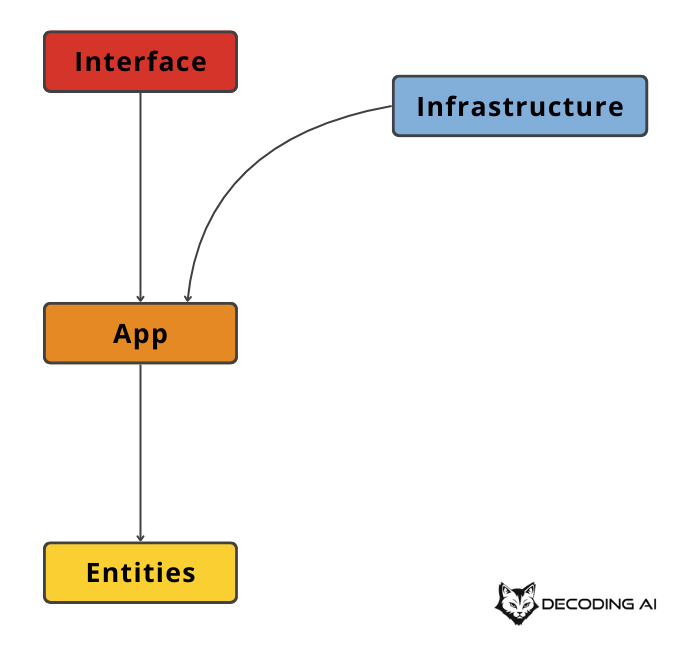
The Data Flow
To see how these layers communicate, let’s look at a single tool request. When a user in Cursor asks the AI to “generate a report,” the request hits the MCP Server (Serving Layer). The server triggers a Builder. This builder looks at the config and instantiates the necessary infrastructure components. This includes the Gemini model, Markdown loader and memory client. The builder injects these concrete tools into the Orchestrator (Application Layer). The Orchestrator then runs the workflow. It passes data through the Domain Nodes. These nodes use the injected infrastructure to do the work. Finally, the result bubbles back up to the user.
Now, let’s quickly see how this looks within a Python folder structure and then let’s design a concrete Python AI app using these principles.
The Folder Structure of an AI app
A clean architecture is useless if the folder structure is messy. We advocate for a structure that balances modern tooling with the separation of concerns we just discussed.
First, we use uv for managing virtual environments and dependencies. This keeps our environment definition clean and fast. We define this environment in pyproject.toml. We also use a Makefile for command shortcuts and a configs directory for YAML configurations. We place any documents and guidance files in inputs.
For the directory structure itself, we strongly recommend using the src/<package_name>/ layout. This ensures that we install the application code as a proper Python package. It prevents import errors and makes the code extensible. We place CLI entry points in scripts/ and experimentation files in notebooks/. We keep unit and integration tests in tests/. These folders import the core package but contain no business logic themselves.
Here is how the writing agent project implements this:
writing-agent/
├── pyproject.toml         # Dependency management (UV)
├── Makefile               # Command shortcuts (e.g., brown generate)
├── configs/               # YAML configurations for models/debug
├── inputs/                # Markdown research and guidance files
├── scripts/               # CLI entry points (import brown)
├── notebooks/             # Exploratory Notebooks (import brown)
├── tests/                 # Unit and integration tests
└── src/
    └── brown/             # Main Python package
        ├── entities/      # Domain: Pydantic data models
        ├── nodes/         # Domain: Actionable AI units (Prompt + Logic)
        ├── workflows/     # Application: Orchestrators (LangGraph logic)
        ├── models/        # Infrastructure: Gemini/OpenAI implementations
        ├── memory/        # Infrastructure: Memory/storage implementations
        ├── mcp/           # Serving: MCP server interface
        ├── evals/         # Application: Evaluation logic
        ├── observability/ # Infrastructure: Monitoring and tracing
        ├── utils/         # Shared utility functions
        ├── base.py        # Interfaces: Abstract base classes
        ├── builders.py    # Application: Dependency injection
        ├── loaders.py     # Infrastructure: File/data loaders
        ├── renderers.py   # Infrastructure: Content renderers
        ├── config.py      # Configuration
        └── config_app.py  # Application configuration
Now, let’s design a concrete Python app using the principles we have learnt so far.
Designing a Python AI App
To bring this all together, let’s look at the design of a concrete AI app, such as a writing agent. We want to build a system that takes a topic, researches it, and writes an article.
In the domain Layer, we define our Article and Research entities using Pydantic. We also define our ArticleWriterNode. This node is a self-contained unit. It holds the system prompt for the writer persona and the logic to call the LLM. It doesn’t know which LLM it is calling. It just knows it needs to generate text.
In the application Layer, we use LangGraph to define the generate_article workflow. This orchestrator connects the nodes. It says: “Take the output from the Loader, pass it to the Research Node, then pass that result to the Writer Node.” It expects an object that satisfies the LLM interface. But it doesn’t care if it’s Gemini or a mock.
In the infrastructure Layer, we implement a GeminiModel class that wraps the Google GenAI SDK. We also implement a MarkdownLoader that reads guidance files from the disk. These implementations adhere to interfaces defined in the application.
Finally, in the serving Layer, we build an MCP Server. This server imports the generate_article workflow. When a client connects, the server reads the configuration. It instantiates the GeminiModel and MarkdownLoader. Then it injects them into the workflow. This injection process connects the application's abstract needs with the infrastructure's concrete tools.
Here is the data flow of how a request travels through these layers in the writing agent example:
Client sends a request. The MCP Client sends a tool request (e.g.,
generate_article) to the MCP Server (Serving Layer).Serving Layer receives the request and builds the infrastructure. The MCP Server receives the request and triggers the Builders to instantiate the necessary infrastructure components (like the
GeminiModelandMarkdownLoader) based on the configuration.Serving instantiates Application. The Serving Layer instantiates the Application (specifically, the
GenerateArticleWorkflow) and injects the infrastructure instances built in step 2 into the Orchestrator.Application executes workflow. The Orchestrator (Application Layer) executes the workflow logic, which involves calling Domain Nodes in sequence.
Domain Nodes perform logic using infrastructure. The Domain Nodes perform their core logic, utilizing the injected infrastructure via interfaces (e.g.,
loader.load(),model.invoke()).Final Article returned to Client. The final Article (Entity) is returned up the stack: from Domain Nodes to the Orchestrator, then to the MCP Server, and finally back to the Client.
Before wrapping up, let’s look at the 3 biggest mistakes I’ve seen people keep making on the projects I’ve been working on and on social media.
The 3 Biggest Mistakes
Even with good intentions, it is easy to misapply these principles. Here are the three most common traps.
1. Keeping a Flat Hierarchy vs. Rigid Layers
The biggest mistake is interpreting the four layers as physical folders that you must create. I have seen projects where developers create top-level directories named domain, application, infrastructure, and interface. They force every file into one of them.
These layers are virtual concepts to help you manage dependencies. They are not a rigid filing system. Structuring your project this way often leads to circular imports. It also creates confusion about where a file belongs. For example, if you have a User object, does it go in domain? But if it has database annotations, does it go in infrastructure? This ambiguity slows you down. Instead, we should keep a flatter hierarchy scoped based on your app requirements.
Here is an example of a rigid, layer-based structure that we should avoid:
writing-agent/
├── domain/
│   ├── entities.py
│   └── nodes.py
├── application/
│   └── workflows.py
├── infrastructure/
│   ├── models.py
│   └── memory.py
└── interface/
    └── mcp.py
And here is a flatter structure that works better. Notice how each module sits at the same level, and we respect the layer boundaries only virtually, not through folder nesting:
writing-agent/
├── entities/       # Domain
├── nodes/          # Domain
├── workflows/      # Application
├── evals/          # Application
├── models/         # Infrastructure
├── memory/         # Infrastructure
├── observability/  # Infrastructure
├── mcp/            # Serving
└── utils/          # Shared utilities
2. Organizing by “Actionability”
Another common fallacy is the “Folder-per-Type” structure. This occurs when we create folders like /prompts, /nodes, and /chains. We then scatter the logic for a single feature across all of them.
code-agent/
├── prompts/
│   ├── code_reviewer.py
│   └── code_generator.py
├── nodes/
│   ├── code_reviewer.py
│   └── code_generator.py
└── chains/
    ├── code_reviewer.py
    └── code_generator.py
This makes the code hard to read and modify. If you want to change the CodeReviewer, you have to open three different files in three different folders. This increases cognitive load and makes debugging harder.
Instead, organize by Actionability. We keep everything related to a specific task in one place. This includes the class, the system prompt, and the utility methods. A good sanity check is: Can I copy-paste this module into another project and have it still make sense? If your CodeReviewer logic is self-contained in a single module or package, you have designed it well. This modularity allows you to treat your code like “Lego bricks” that can be reused across different agents.
src/
└── brown/
    └── chains/
        ├── code_reviewer/
        │   ├── prompts.py
        │   ├── nodes.py
        │   └── chain.py
        └── code_generator/
            ├── prompts.py
            ├── nodes.py
            └── chain.py
3. The “Pragmatic” Middle Ground
Finally, avoid over-engineering. Python is not Java. Strictly following Clean Architecture “by the book” can lead to a nightmare of duplicated code and unnecessary abstractions.
You need to find the wins that are worth it and add real value. For example, if you don’t plan to change your database, say from Postgres to MySQL, applying the clean architecture pattern to writing generic Object-Relational Mapping (ORM) abstractions will be a complete waste of time.
Engineers tend to write abstractions for “just in case” scenarios, anticipating future reuse. I am sure you often say to yourself, “What if I need to reuse this in the future? Let’s refactor it.” For sure I am.
In some big-tech environments, engineers even use Tags on large entities to handle different layer requirements and avoid duplicating their data structures by creating separate Data Transfer Objects (DTOs) for every layer. This keeps the layers tight together, but if you don’t plan to change them, it works!
Decouple only what is worth decoupling! For example, in your writing agent example, we knew we wanted to swap between multiple file operators that either write to disk or S3 buckets.
To conclude, if you never plan to swap a particular piece of infrastructure, don’t bother decoupling it and making your code more complicated than it should be. Be pragmatic. If an abstraction makes the code harder to read without adding immediate value, delete it.
Conclusion
Clean Architecture is a powerful mental model, but it makes for a terrible, rigid rulebook. If you try to force every Python script into a strict four-folder hierarchy, you will end up hating your codebase.
Instead, treat these patterns as a tool/framework agnostic mind map. Whether you are building with LangGraph, FastAPI, or vanilla Python, these principles provide a solid foundation that outlasts any specific library or trend.
Ultimately, the goal is not to have a “perfect” architecture. The goal is to have a system that is easy to change, easy to test, and easy to understand. Start with these principles, but always prioritize simplicity over purity.
See you next Tuesday.
What’s your opinion? Do you agree, disagree, or is there something I missed?
Enjoyed the article? The most sincere compliment is to share our work.
Whenever you’re ready, here is how I can help you
Go from agent user to agent builder. Master the foundations of AI agents and turn fragile demo code into reliable, production-ready systems with my course, Agent Engineering: Building Multi-Agent Systems (made with Towards AI).
35 lessons. Pure foundations from scratch. 4 mini-projects. 2 production systems. A certificate and direct access to me & industry experts in our Discord.
Built for software and data professionals transitioning into AI engineering. Rated 5/5 with 300+ students. The first 7 lessons are free:
Not ready to commit? Start with our free Agent AI Engineering Guide, a 6-day email course on the mistakes that silently break AI agents in production.
Thanks again to Opik (by Comet) for sponsoring the series and keeping it free!

If you want to monitor, evaluate and optimize your AI workflows and agents:
Images
If not otherwise stated, all images are created by the author.
This is a masterpiece. I'll suggest that a part 2 is done for this and this time a video explaining this with real-time production ready project is the central means of communicating this. I hope you subscribe to your YouTube channel if there's any too.
Thanks for the good 😊