

Stop Launching AI Apps Without This Framework
A practical guide to building an eval-driven loop for your LLM app using synthetic data, before you have users.

Paul: Today, the scene is owned by Hugo, a brilliant mind who advises and teaches teams building LLM-powered systems, including engineers from Netflix, Meta, and the U.S. Air Force.
Together with Stefan Krawczyk, he runs a course on the LLM software development lifecycle, covering everything from agent design to evaluation and all the steps in between.
They’ve already contributed to Decoding AI with a fundamental article on why building AI systems with Evaluation-Driven Development (EDD) is the only way to go.
Today, Hugo will push the EDD idea further with a hands-on example.
Enough chitchat. Let’s get into it 👀 ↓
The Core Idea: Evaluation-Driven Development
This year, I’ve been giving a talk on a simple but powerful idea: building a Minimum Viable Evaluation (MVE) framework alongside your MVP.
The goal is to use tools like synthetic data to catch failures, spot edge cases, and drive improvements before your product ever goes live.
Everything with the end goal of optimizing your AI system and making it more robust.
I wanted to share the practical insights from that talk in a more detailed format. This post will give you a clear, step-by-step process to do it yourself.
You can also watch the talk here:
What you’ll learn in this talk → 00:04
Note: This post was written with Gemini from the talk transcript… oh, and a human-in-the loop, of course!
The central theme is a shift in mindset from test-driven development to evaluation-driven development (EDD). For anyone who has built data-powered products, this isn’t a new concept. Think about Google Search. It’s impossible to imagine it was built without a robust evaluation framework from day one.
In this post, we’ll cover how to:
Use synthetic data to find failures before launch.
Build an evaluation harness to automate testing.
Create an evaluation-driven loop to turn feedback into structured improvements.
The All-Too-Common Story: “Does It Work?”
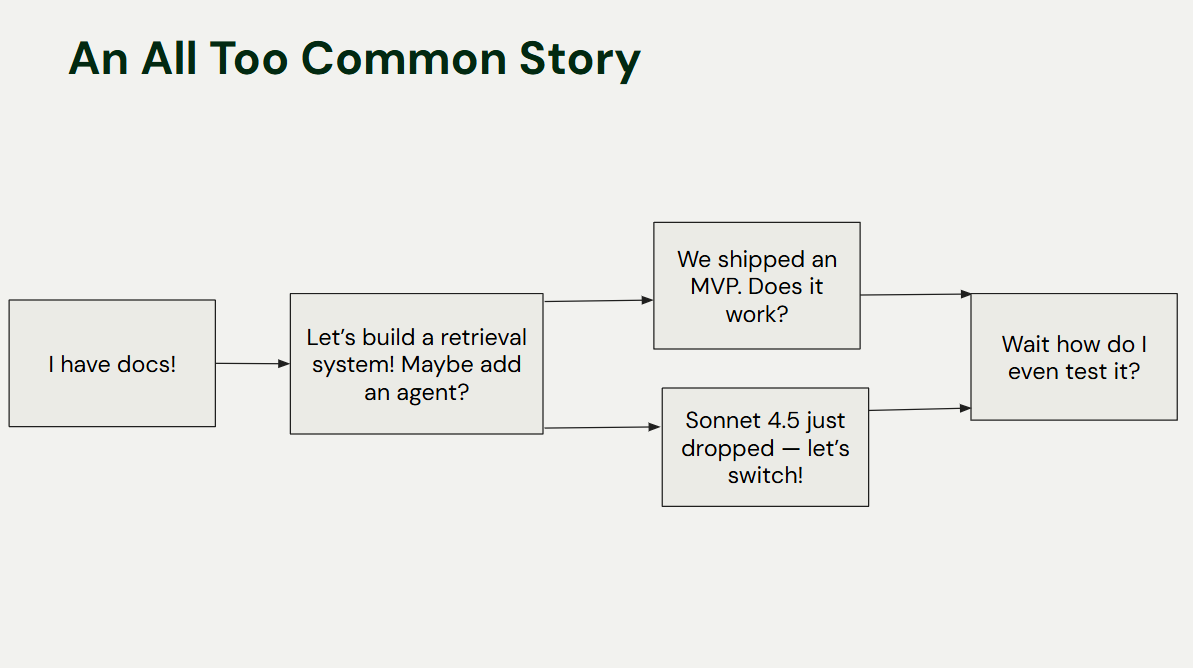
Builders often come to me with a familiar story. They have a corpus of documents and have built a cool RAG system, maybe with an agent. Then they ask, “Does it work?” Or, “Sonnet 4.5 is out, can I switch from my OpenAI model?”
These are impossible questions to answer without an evaluation framework. How can you know if a change made things better or worse?
Before You Build, Ask These Questions
The root of the problem is often a lack of product specification. Before writing a line of code, you need to answer these basic questions:
What is the goal of this product?
Who will be the user?
In what scenario will they use it?
The answers are often vague: “The goal is to surface information,” “The user is everyone,” “They’ll use it for everything.” My gentle encouragement is to get specific. Even brief, initial answers to these questions are enough to start your data flywheel.
The Pre-Launch Data Flywheel
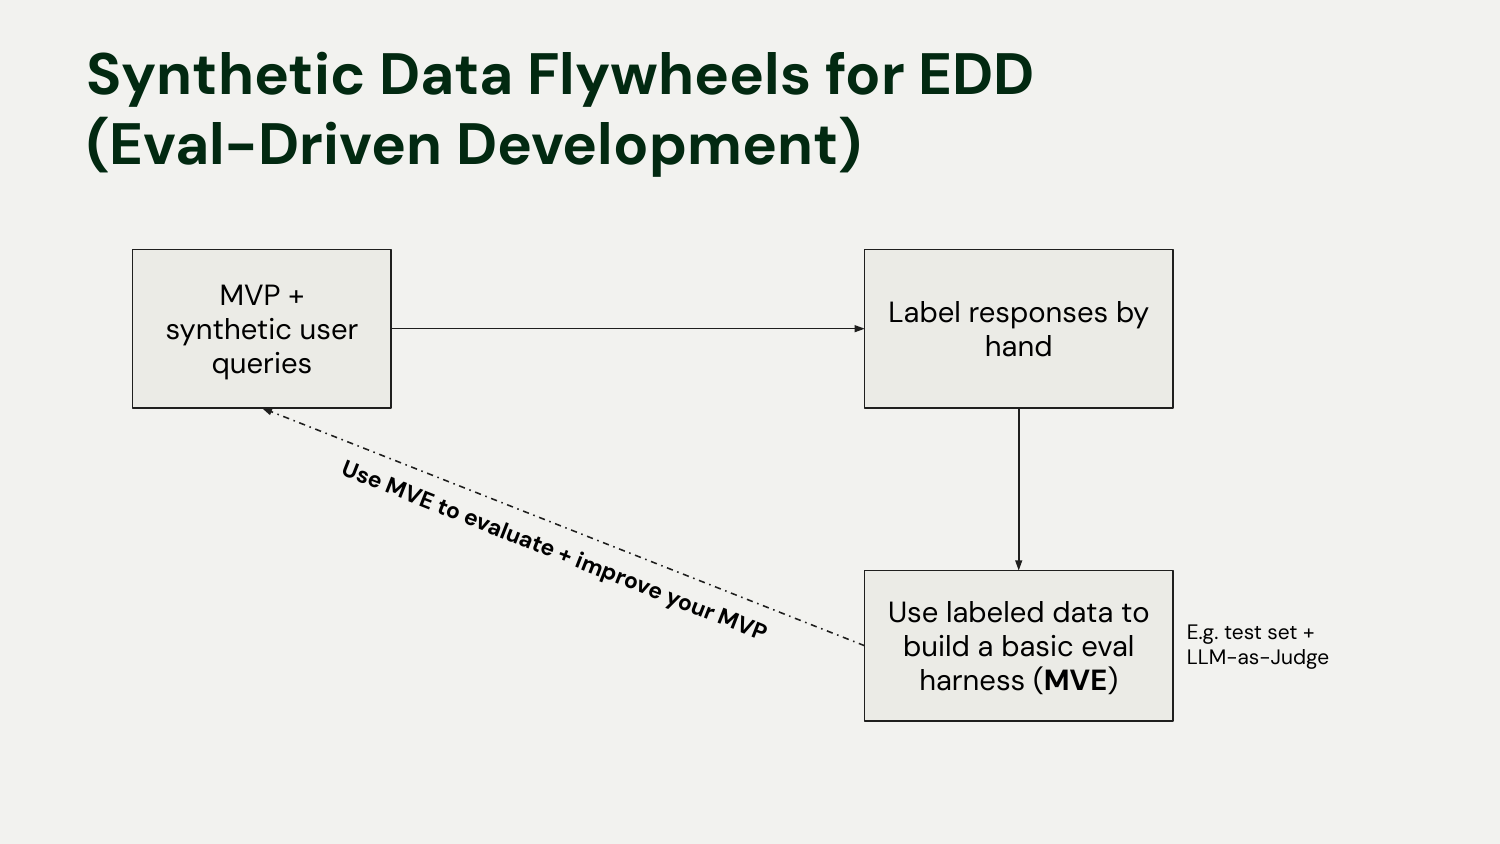
To make this concrete, I’ll use an example project: a simple RAG application built over the transcripts from our Building AI Applications course.
Here is the core loop you can build to evaluate your app before you have any real user data:
MVP: You have your initial app, like our RAG system.
Synthetic Queries: Based on your user personas and scenarios, generate synthetic user queries.
Label by Hand: Run the queries through the MVP and label the outputs. Don’t jump to automating this with an “LLM as judge” yet. Look at your data. Labeling 20-50 examples by hand builds intuition that is invaluable.
Build MVE: Use your hand-labeled data to create an evaluation harness. This could be a test set with golden answers or a simple “LLM as judge”.
Evaluate and Improve: Use the MVE to test changes to your MVP. Swap out a model, change a chunking strategy, or tweak a prompt, and measure the impact on performance.
Evaluation-Driven Development Isn’t New
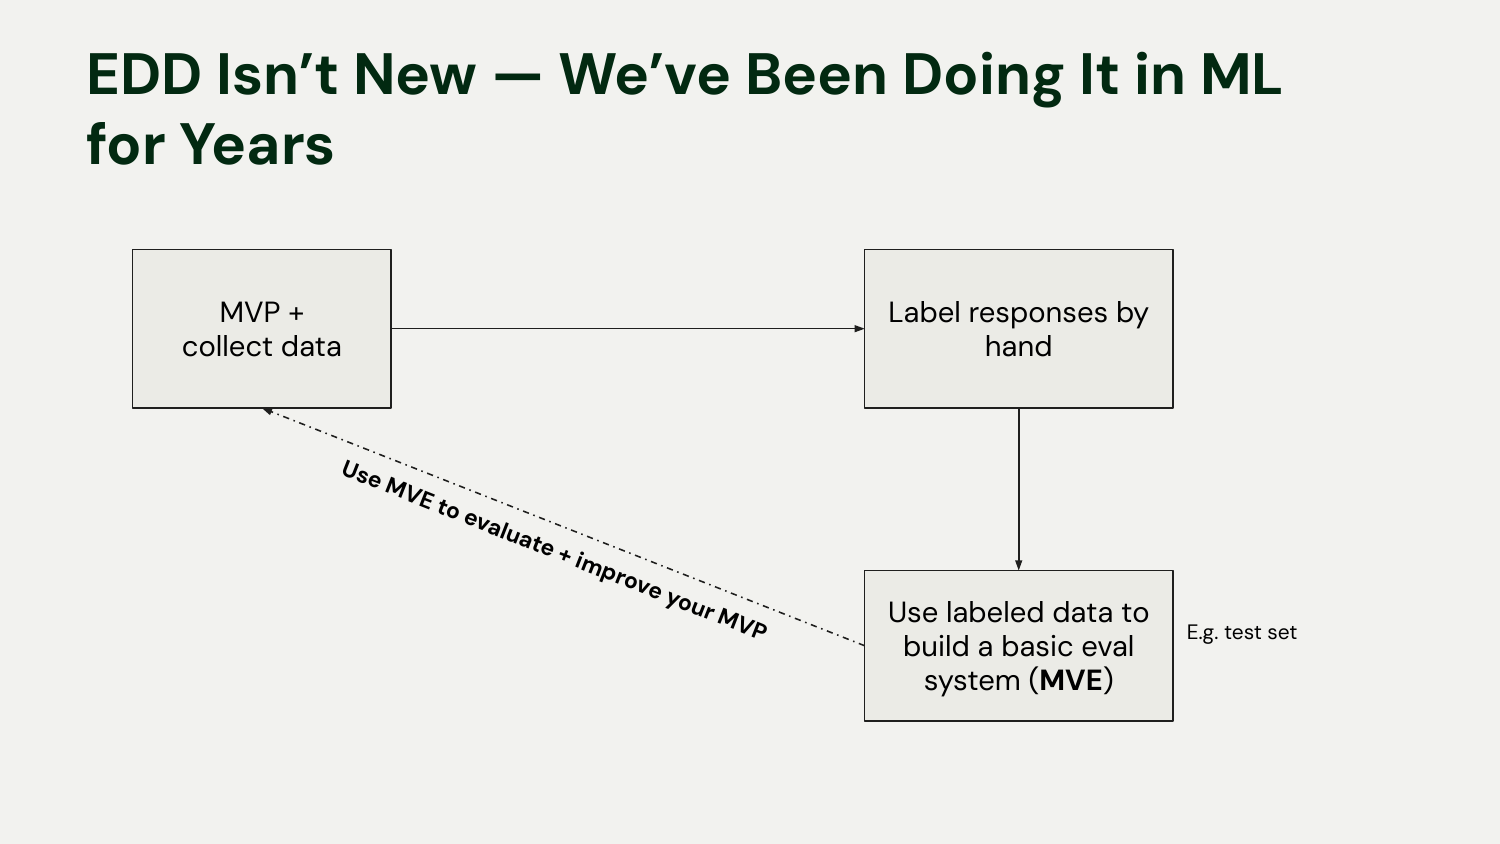
If you have a background in machine learning, this process should feel familiar. We have been doing EDD for years. The main difference with modern LLM apps is the speed at which you can get a flashy demo. In classic ML, getting an MVP often required significant upfront data collection and labeling just to train the first model. With LLMs, you can generate outputs on day one, which makes it tempting to skip the rigorous evaluation step.
The key takeaway is that both workflows are grounded in a hand-labeled test set that serves as your source of truth. This is your foundation for iteration and failure analysis.
Building the Loop: From “Vibes” to a Harness
When you first build an app, evaluation starts with “vibes.” You look at an output and think, “That’s cool,” or “That’s a weird hallucination.” Vibes are a great starting point, but they are subjective, inconsistent, and can’t be tracked over time.
To build reliable software, you need to move to a structured evaluation harness. This gives you:
Objective metrics: Measurable and repeatable.
Historical baselines: Track improvements and regressions.
Clear communication: Document and share results easily.
Consistency: Standardize evaluation across the team (and for your future self).
I’m not talking about building a massive, enterprise-grade system from the start. A minimal version is enough to bootstrap the process.
What to Cover in Your Evaluation Harness

Your harness should track metrics that connect technical performance to business goals. For an automated recruitment email outreach project discussed in the talk, you don’t only want to track LLM call correctness (precision, recall), but also how successfully the business could hire more candidates more efficiently. Always tie your micro-level technical metrics to macro-level business metrics.
Focus on four key areas:
User/Business Metrics: Is the app achieving its goal?
Accuracy: Is the output correct? (This can be measured in many ways, from string matching to LLM-judged correctness).
Cost: How much does each call or session cost?
Latency: How long does it take to get a response?
Time and money, people! These are critical resources: your evaluation harness must track them.
Step 1: Define Personas
.png")
This is where product thinking meets code. For our RAG app over course transcripts, we defined several personas, including a data scientist and a machine learning engineer. We gave them descriptions, goals, and a technical level. This context is crucial for generating realistic queries.
Implementation Detail: You can store these personas in a simple Python dictionary or a JSON file. The key is to be specific. A “data scientist who wants to incorporate LLMs into their workflows” will ask very different questions than a “beginner student trying to understand basic concepts.”
Step 2: Define Scenarios and Question Types
.png")
Next, layer scenarios on top of your personas. A student in the second cohort of a course trying to understand a concept from the first cohort is a great, specific scenario.
We also define different types of questions: general, technical, and factual. This helps ensure our synthetic data covers a wider surface area of potential user interactions. The ultimate goal is to model the data-generating process of your real users. As you get real user data, you can compare it to your synthetic set to check for input data drift.
Step 3: Generate Synthetic Questions
.png")
Now for the magic. You can loop through your personas and scenarios and use an LLM to generate as many questions as you need. This is surprisingly easy and effective. The code for this is a simple script that constructs a prompt with the persona and scenario context and asks an LLM to generate relevant questions.
Gotcha to Avoid: Watch out for “LLM-isms” in your synthetic data. I noticed one of my generated questions started with “Can you provide insights...” Real users don’t usually talk like that. While this might not drastically affect performance, it’s good to be aware of these patterns and refine your generation prompt to produce more natural-sounding queries.
Step 4: Label Outputs by Hand

With a set of synthetic queries, you run them through your app and start labeling. We built a simple JSON viewer to make this easy. For each question and response, I add a pass or fail label and a reason.
Practical Tip: You don’t need a fancy UI. You can do this in a spreadsheet. The important part is to be systematic. A simple example where you might not need an LLM judge is a factual question like, “Who were the instructors?” The check is simple: does the response contain the strings “Hugo Bowne” and “Stefan Krawczyk”? String matching or regex is often sufficient and more reliable for these cases.
Step 5: Turn Logs into Fixes with Failure Analysis

This is one of the most powerful and underrated steps. Once you have your labeled data in a spreadsheet (or similar format), you can perform failure analysis.
Log your traces: prompt, response, pass/fail, reason.
Add a column to classify the failure mode: Hallucination, Retrieval Error, Formatting Issue, etc.
Create a pivot table: This will help you rank failure modes by frequency.
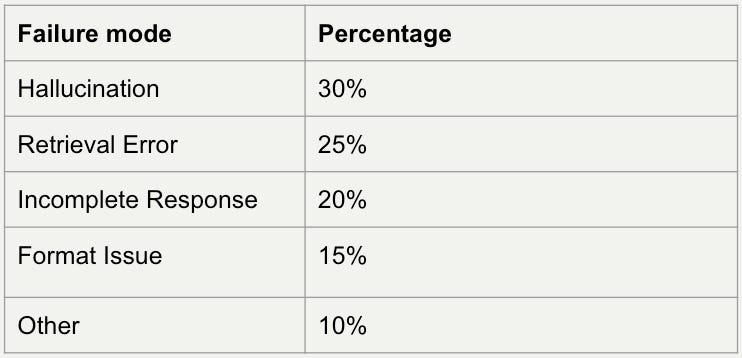
If hallucinations make up 40% of your failures and retrieval issues make up 50%, you know you should fix the retrieval system first. This simple analysis turns a messy log of failures into a prioritized roadmap for improvement.
Step 6: Build the Evaluation Harness (LLM as Judge)
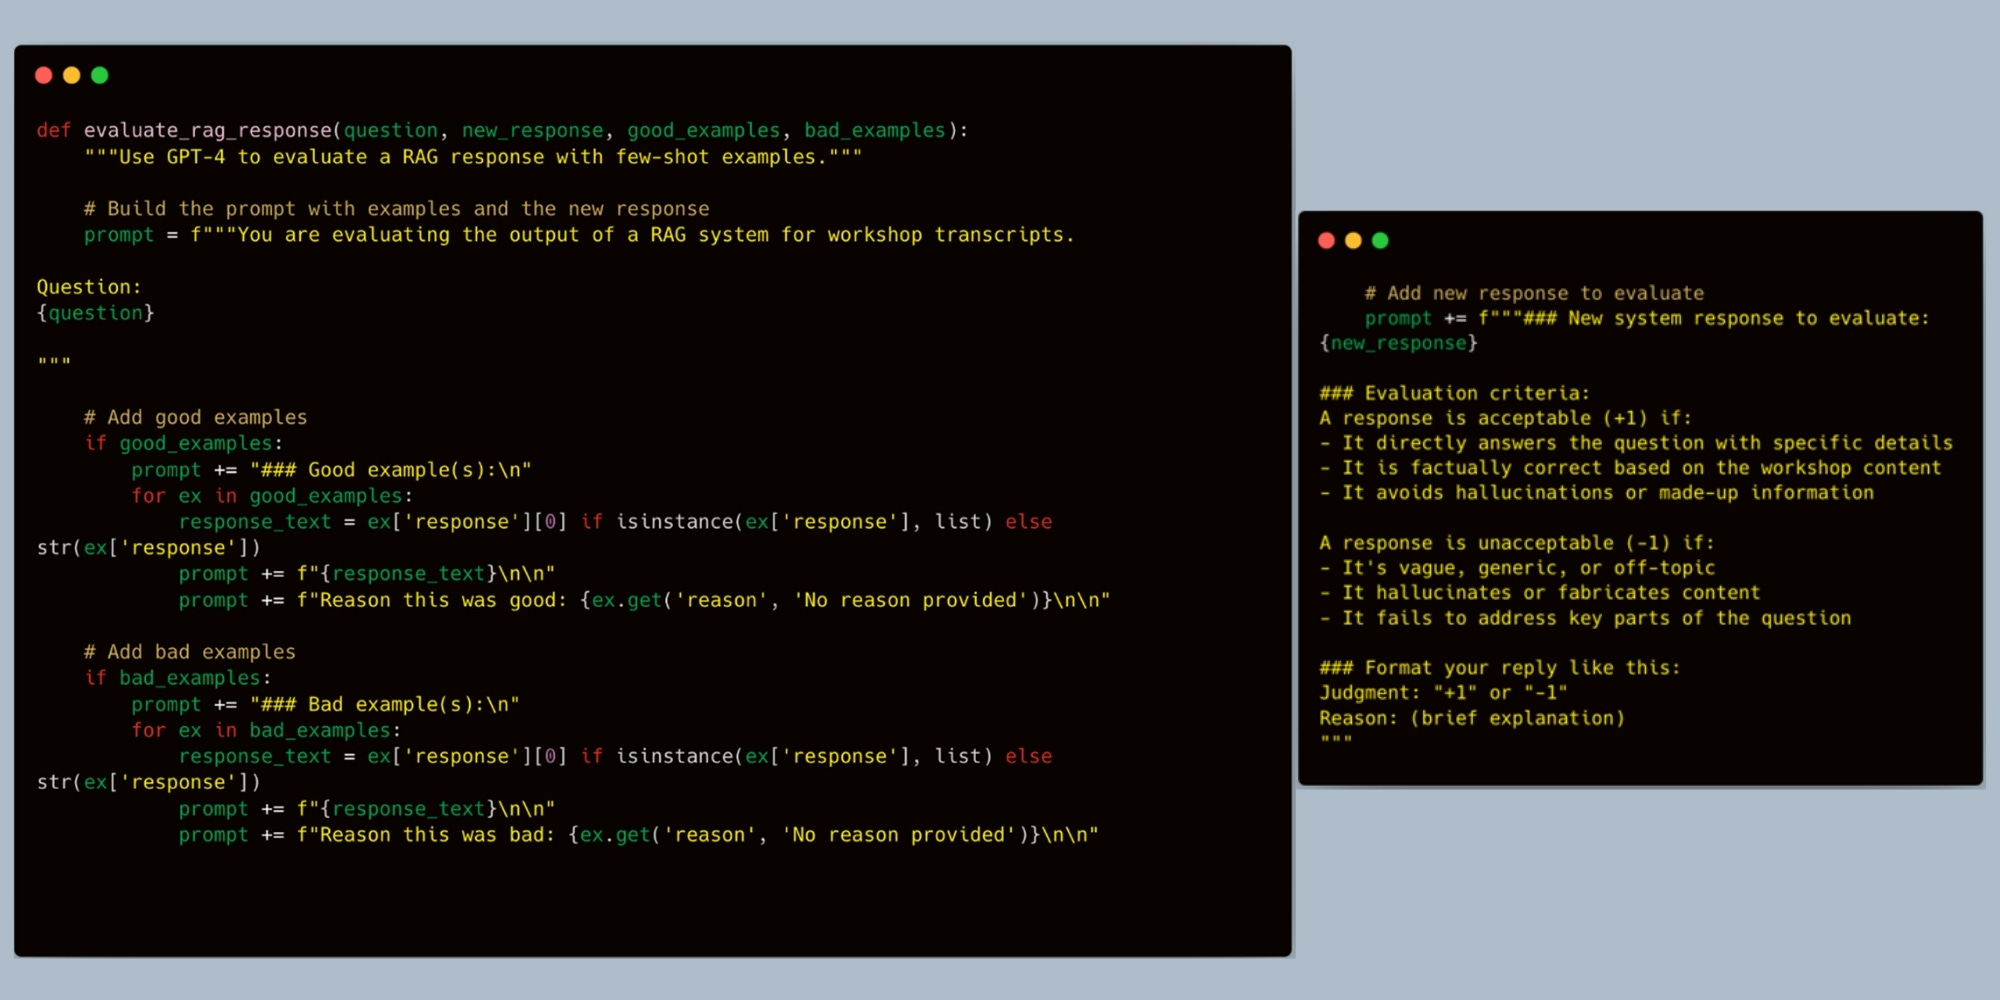
Now you can use your labeled data to build an automated harness. One common approach is an “LLM as a judge.” The first prompt we tried for instructive purposes had a few key components:
Role and Context: “You are evaluating the output of a RAG system for workshop transcripts.”
Few-shot Examples: I provide the question, along with good (pass) and bad (fail) examples from my hand-labeled data. This anchors the judge’s understanding of correctness.
Evaluation Criteria: I explicitly state what makes a response acceptable (e.g., “directly answers the question,” “is factually correct”).
Gotcha to Avoid: This first attempt was merely for instructive purposes. Note that we asked it to verify factual correctness based on the workshop content, but we didn’t actually provide the content in the prompt! This highlights an important step: you need to iterate on your evaluation harness just like you iterate on your app. So far, we’ve only evaluated the correctness of the final response, not whether it’s grounded in the retrieved documents. That would be a clear next step. And in retrieval, you actually want to decouple the performance of retrieval and generation.
Step 7: Compare, Iterate, and Improve
With the harness in place, you can now run experiments. We used my MVE to compare responses from OpenAI’s GPT-4o and Google’s Gemini. We spun up another simple viewer to compare the models side-by-side, along with the judge’s evaluation for each. This kind of systematic comparison gives you the data you need to make informed decisions about which model to use.
Aligning Your Judge with Human Evaluation
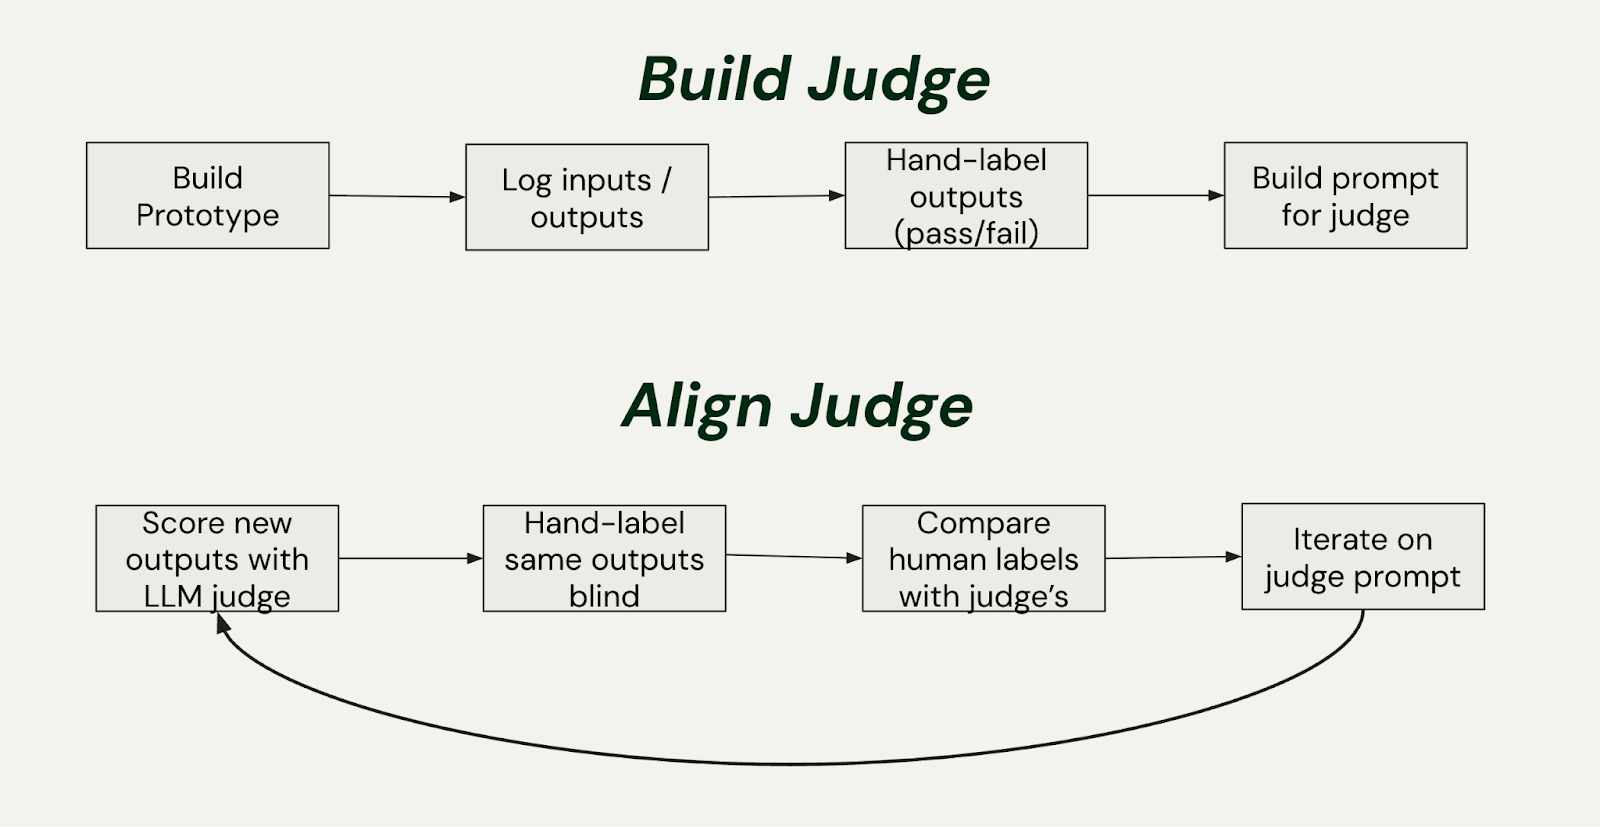
Aligning your LLM judge with your own human evaluations is a non-trivial but critical task. Philip Carter and Hamel Husain did some pioneering work on this at Honeycomb. They built a system to convert natural language into Honeycomb’s query language. To align their judge, Philip would manually review and critique the judge’s evaluations in a spreadsheet. They used his feedback to create a new, better-aligned judge. This iterative process of refining the judge is key to building a trustworthy evaluation system.
Make sure that you log and save everything: Save the synthetic data you generate, the model responses, and the judge’s outputs. As your product evolves, this historical data becomes an invaluable asset for refining your evaluations and catching new edge cases.
Observability in Development and Production
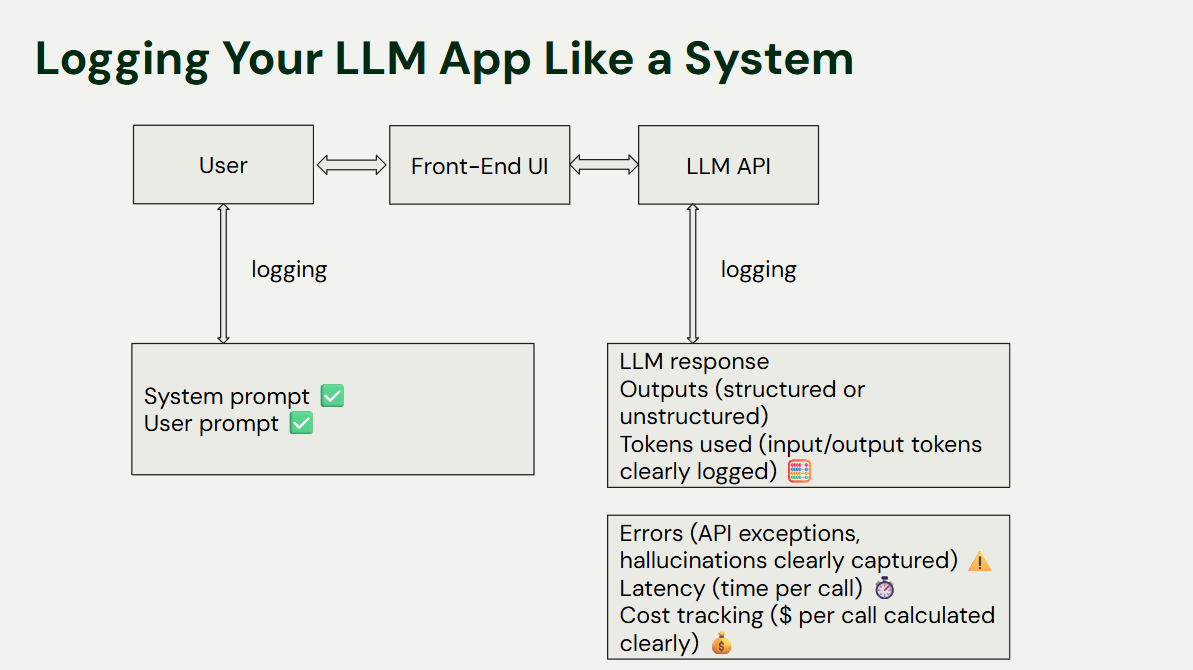
Your evaluation harness is the foundation for observability. You want to log everything: system prompts, user prompts, tool calls, LLM outputs, token usage, errors, latency, and cost.
Practical Tip: You don’t need a complex system to start. We begin by logging to JSON files. As the project grew, we moved to a SQLite database and used Simon Willison’s fantastic tool, Datasette, to quickly spin up a web interface for exploring the data. This simple stack allows you to monitor key metrics and turn your raw logs into actionable insights.
Recap: Your Path to a Minimum Viable Evaluation Framework
We’ve covered a complete, practical loop for building and evaluating your LLM app before launch.
We started with a simple RAG app.
We defined personas and scenarios to guide synthetic data generation.
We generated questions and model responses.
We manually labeled the outputs to create a ground truth dataset.
We used those labels to build an evaluation harness with an LLM as a judge.
We used the harness to compare models and used failure analysis to prioritize improvements.
More generally, we’ve shown you how to:
Use synthetic data to find failures before launch.
Build an evaluation harness to automate testing.
Create an evaluation-driven loop to turn feedback into structured improvements.
This entire process is about creating a fast, transparent loop that lets you build more reliable and effective applications.
Want to go deeper? We created a free 10-email course that walks through how to apply these principles, from user scenarios and logging to evaluation harnesses and production testing. And if you’re ready to get hands-on with guided projects and community support, the next cohort of our Maven course kicks off on November 3rd.
To celebrate our great collaboration with Hugo, we’re doing something special. Forget the standard $100 off—we’re offering a special 30% discount for everyone signing up for his latest cohort.

We also provide $2300 in AI credits on Modal, Pydantic, Baseten, Braintrust, Chroma Cloud, and LlamaCloud.
See you next time.
What’s your opinion? Do you agree, disagree, or is there something I missed?
Enjoyed the article? The most sincere compliment is to share our work.
Images
If not otherwise stated, all images are created by the author.
 | A guest post by
|
Thanks, Hugo, for contributing another amazing piece!
Great direction forward to think about the same for the good 😊