



The fastest way to learn harness engineering? Build Claude Code from scratch.
Why harness engineering? LangChain kept the same model and changed only the harness. Their coding agent went from 53% to 67% on Terminal-Bench, a top coding-agent benchmark. From outside the top 30 to the top 5. Same model. Better harness.
Over the past few months, I’ve taken apart Claude Code, OpenCode, and Pi to see how they work under the hood.
And you don’t need to ship a coding agent for this to pay off. The same foundations power any agent, in e-commerce, finance, or sales.
On top of that, people are increasingly realizing they need to build their own harness instead of relying on Claude Code or Codex. Ramp is a perfect example: roughly half of its merged PRs now come out of a custom harness.
So I turned what I learned, not into a scrapped roadmap, BUT into an in-depth course on harness engineering by building Claude Code from scratch. It’s free and open source: 8 articles, 6 videos, and one codebase. Each lesson is a new brick. Perfect for people who learn by building.
Builders love it! It already has 1078 ⭐️ on GitHub.
TL;DR: Here are the 8 steps that I think are core to building and maintaining any harness:
Design the harness
Build the bare-bones agent loop
Sandbox it, locally and remotely
Apply 4 essential context engineering techniques
Add subagents as a context engineering technique
Deploy it headless to the cloud: CLI, webhooks, cron
Build custom benchmarks to measure the agent
Replay failed runs to debug agents
All while building and evaluating Decode, the coding agent.
Before starting, a quick word from our sponsor ↓
Build for the long run (Sponsored)

You voted for the overnight agent (34%), and the comments kept asking one thing: “What happens when it dies at 3 a.m.?”
Does it resume from a checkpoint or start over? And in the morning, how do you tell what actually ran from what the agent says it did?
⚡️ That’s the problem Inngest solves. It makes long-running agents durable and observable.
Crash at 3 a.m.? It picks up from the last completed step, not from zero. Morning review? Every run is traced, so you see what actually ran, not the agent’s summary.
Free tier, plus a local dev server, so you can try it on your laptop tonight.
Now, let’s zoom in on each step.
Step 1: Design the harness
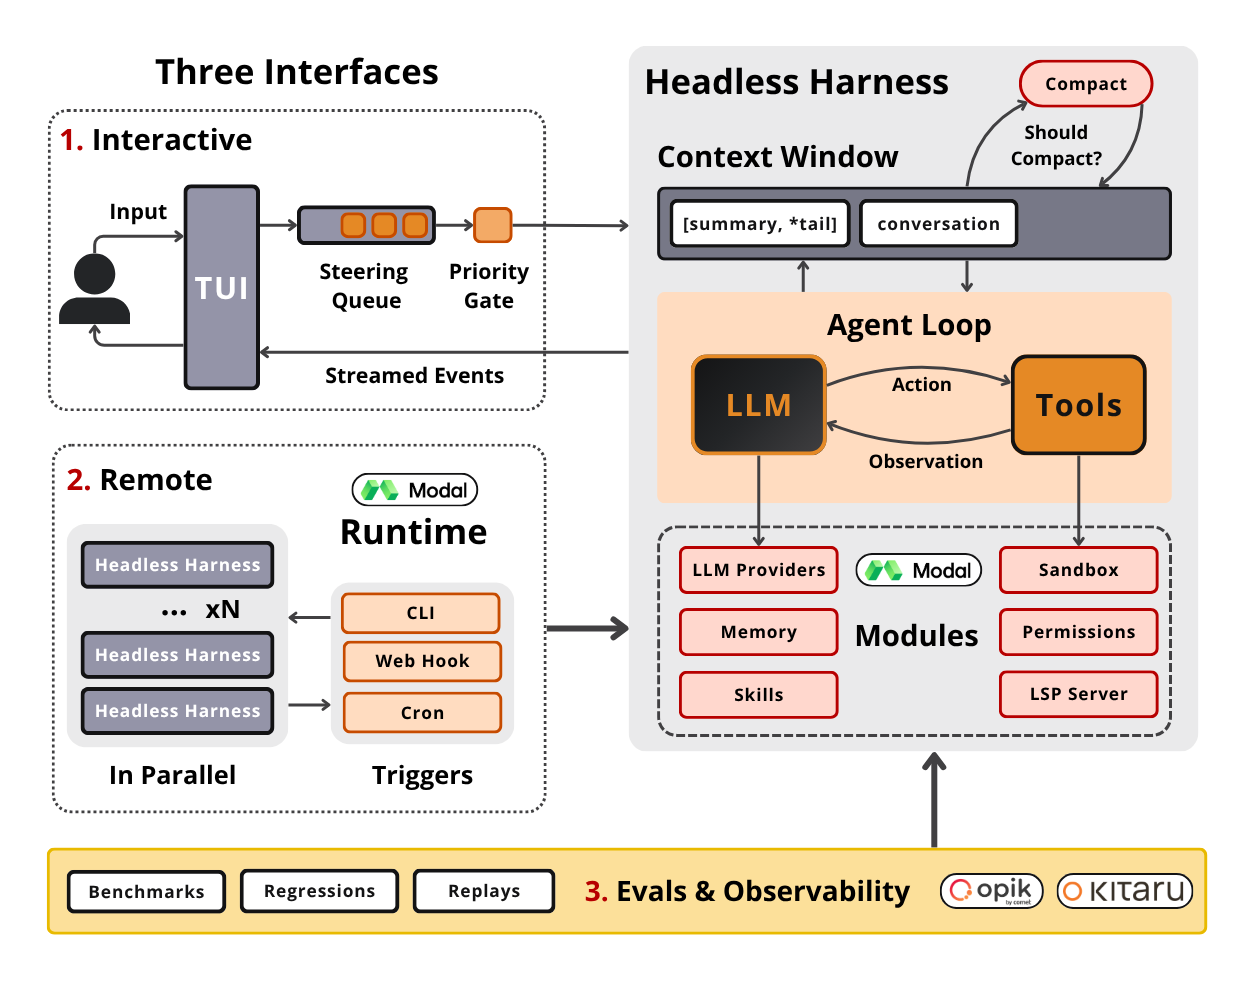
When I first started digging into coding agents, I couldn’t tell where the agent ended and the harness began.
So step 1 is to design the harness before you write any code. The agent itself is ~20 lines of Pydantic AI. Everything on top of it is the harness: 6 modules, 3 interfaces (a terminal UI, CLI (not in the diagram) and a remote mode on Modal), and an evals layer that answers whether it works, still works, and keeps working.
Or if you prefer video:
Step 2: Build the bare-bones agent loop
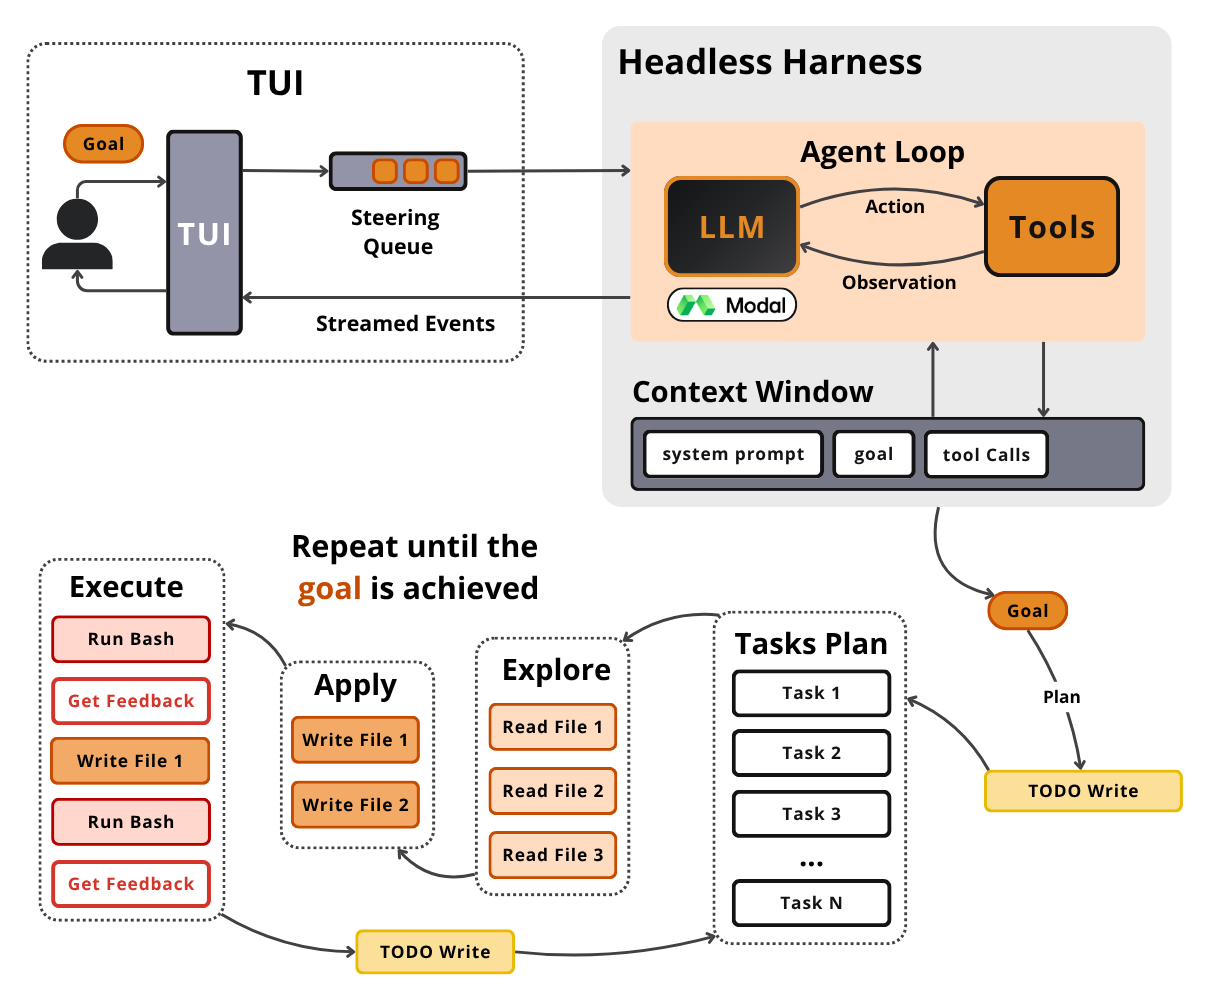
I got greedy. I tried to one-shot the harness in Python: a terminal UI (TUI), an agent, and a handful of tools. It worked, until I started adding skills, memory, and compaction. That’s when everything started to fall apart.
Step 2 builds the bare-bones loop at feature parity with Pi: one ReAct loop (Claude Code’s is ~150 lines) and 9 tools with read, write, edit, and bash at the core. A terminal UI with a steering queue lets you redirect the agent mid-turn.
The tools are 90% of why this is a coding agent and not any other kind of AI agent.
Step 3: Sandbox it, locally and remotely
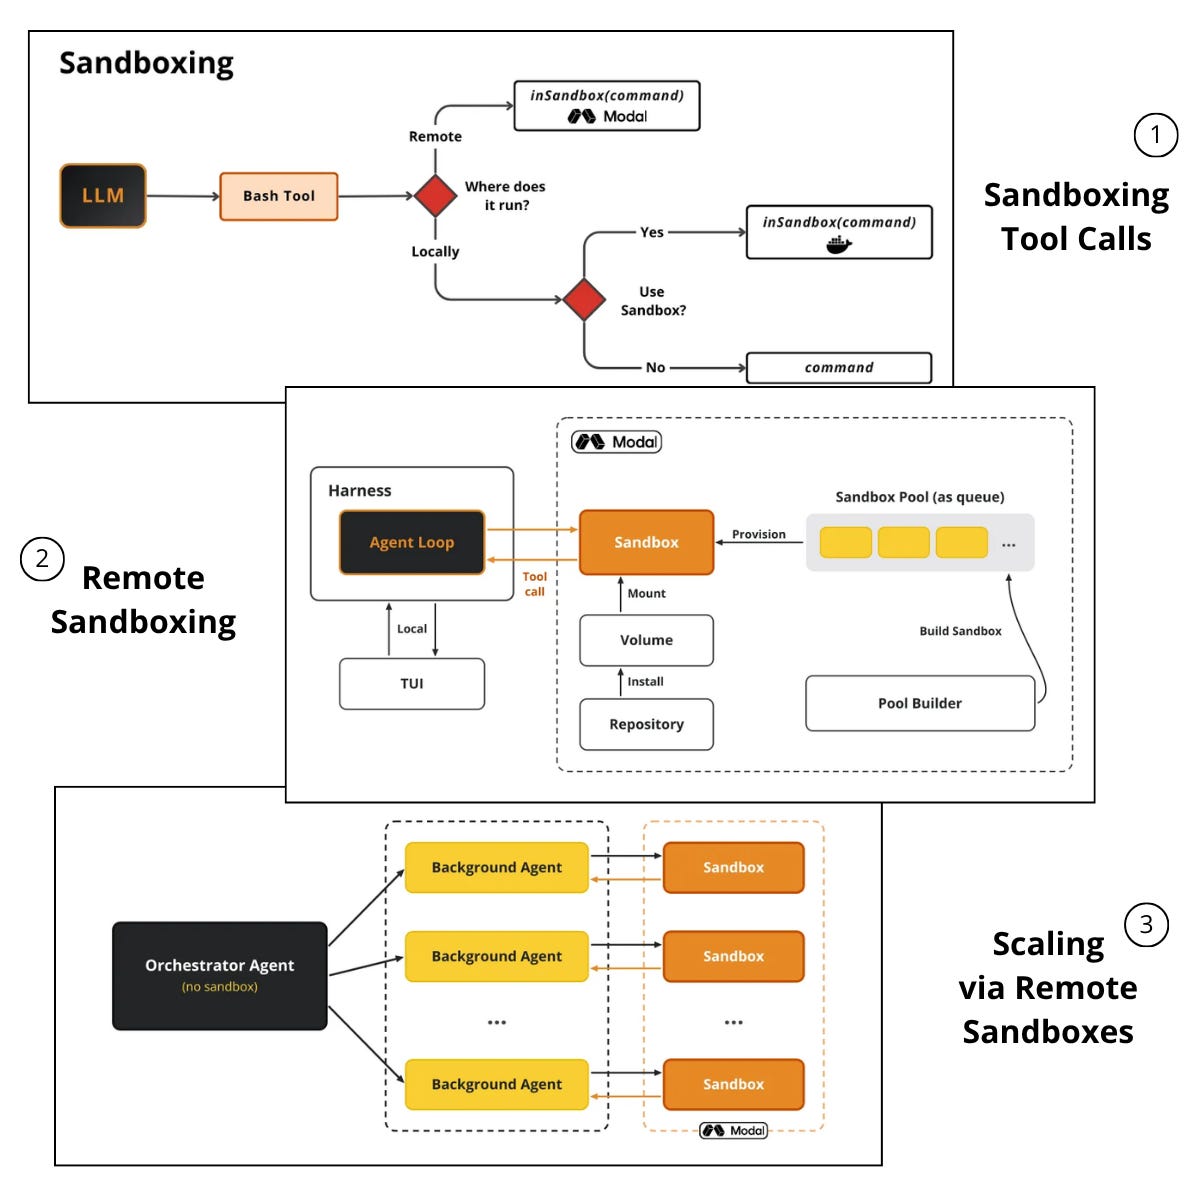
Claude Code was running inside my Obsidian Second Brain when it fired off a cleanup command that deleted half my notes. Or the popular example where, in July 2026, OpenAI’s agents hacked Hugging Face.
That’s why, in step 3, we will sandbox the agent locally (Docker) and remotely (Modal), where the agent’s tools run in an isolated container. One decision: put the whole harness in the sandbox, or keep it on the host and execute only the 4 computer-use tools within the sandbox.
Or if you prefer video:
Step 4: Apply 4 essential context engineering techniques
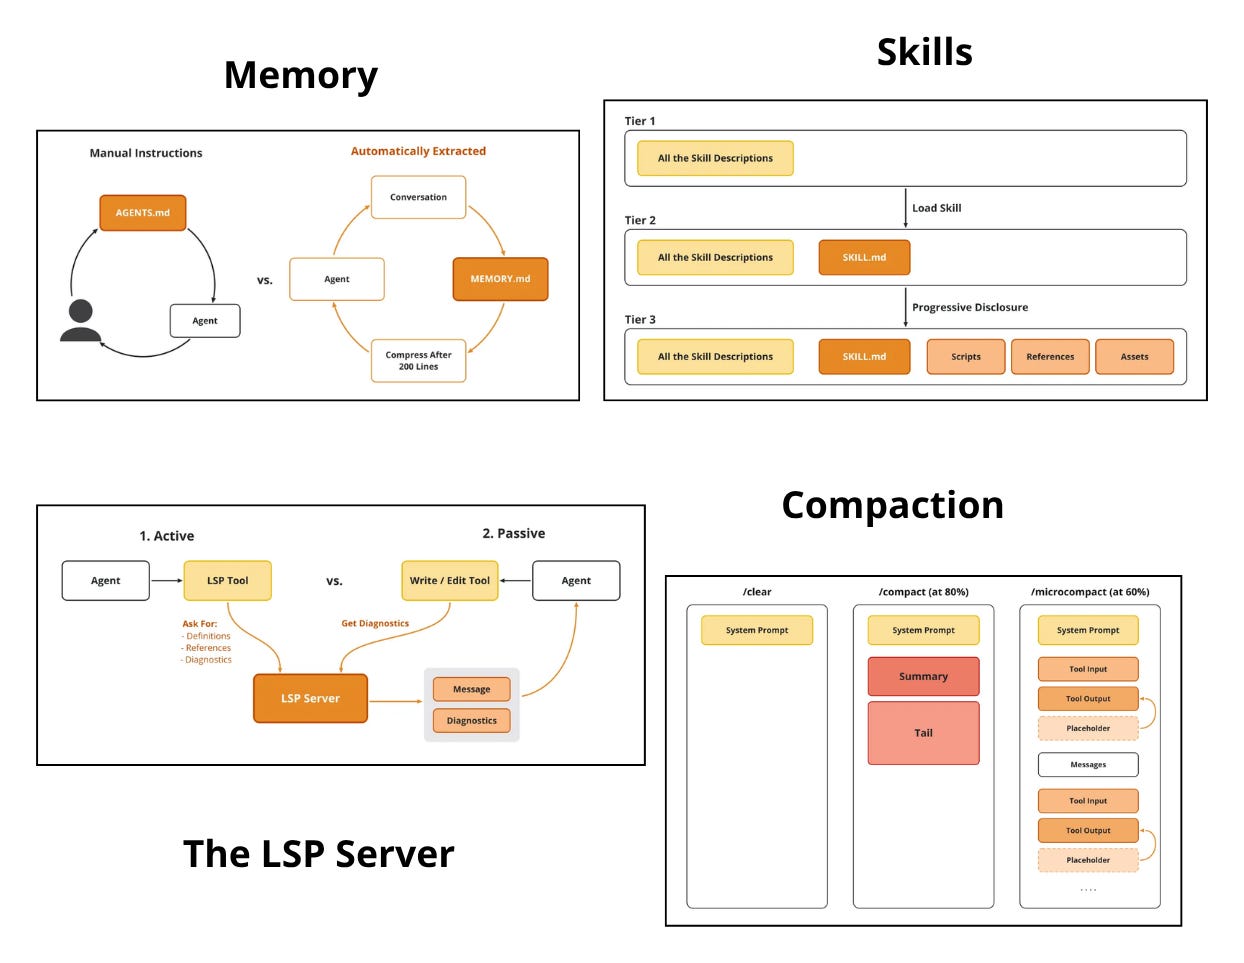
For a while, I got hooked on running Claude Code agents 24/7. Until my subscription maxed out mid-turn with the agent halfway through a feature. Throwing in more tokens only treats the symptom. The long-term solution is better context engineering.
In step 4, we will learn how to keep the context window (everything the model reads each turn) small and high-signal. There are 4 essential techniques to explore: memory (stop repeating your instructions), skills (never load what you can reference), the language-server (LSP) tool (to statically analyze the code), and compaction (delete before the window rots).
Anthropic frames the whole problem as “finding the smallest possible set of high-signal tokens”.
Or if you prefer video:
Step 5: Add subagents as a context engineering technique
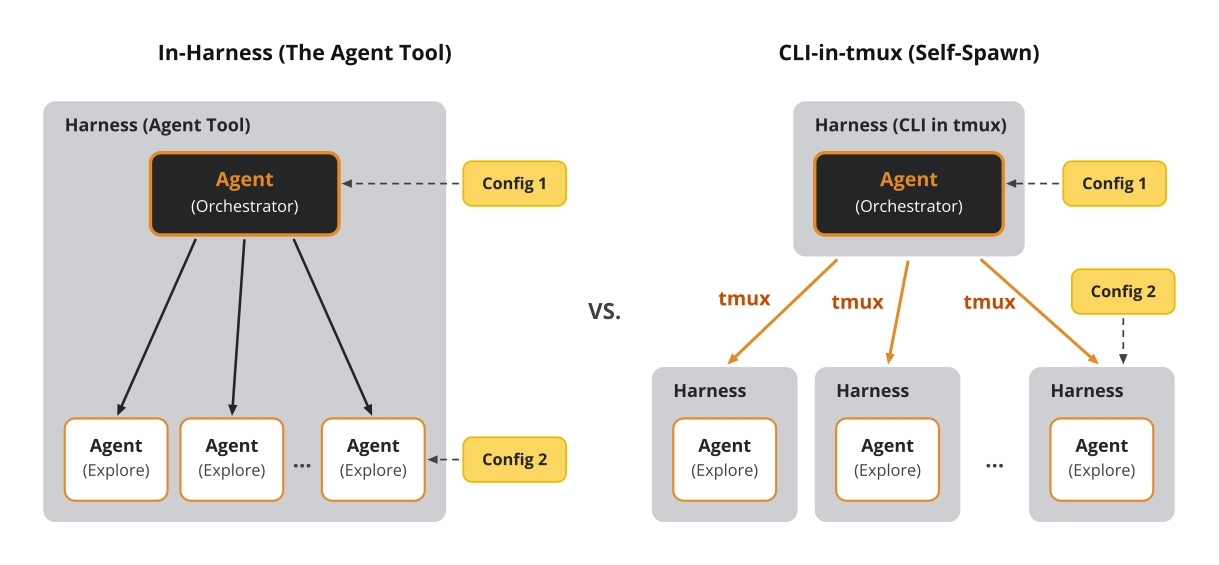
I was passing up to 200 notes, transcripts, and PDFs to a single Claude Code session. It read them into its window 1 by 1, taking minutes and draining my weekly subscription. The fix was 6 researcher subagents in parallel.
This lesson adds subagents (child agents with their own window) as a context engineering technique. We will explore the two main options to implement subagents. First is to build an agent tool directly into the harness that fans out up to 6 scoped children. The second, the Pi agent way, is to use the orchestrator agent to spawn new agents via the CLI and manage them directly or more professionally with tmux.
The in-harness tool is a context primitive, while tmux is a process primitive.
Step 6: Deploy it headless to the cloud: CLI, webhooks, cron
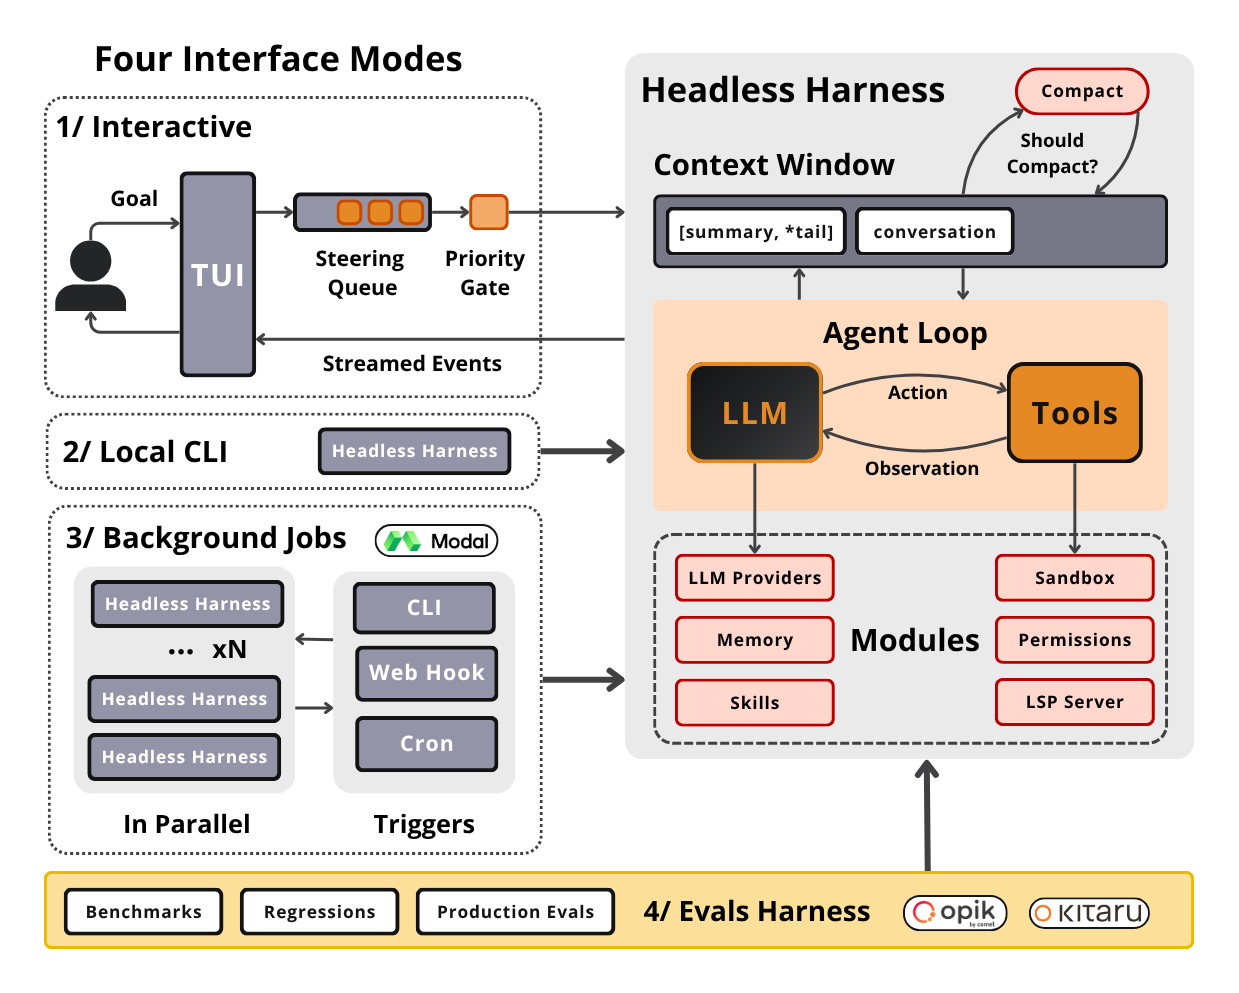
I ended up with five coding agents running in parallel. After three hours, I was completely exhausted. The real issue wasn’t running five agents. It was babysitting them, each needing me present in a terminal.
Step 6 deploys the harness headless, with no terminal to babysit. We will implement a new CLI interface within Decode, the course’s coding agent, around the same loop that runs locally, allowing us to run it on Modal serverless functions with 3 triggers (CLI, webhook, nightly cron) and parallel attempts, each with its own container and branch.
You went to bed. The work did not.
Or if you prefer video:
Step 7: Build custom benchmarks to measure the agent
While optimizing my coding agent, I compared its performance against two models: a 35B and a 120B. The winner should be obvious, right? As the 120B model is x4 larger. Well... the 35B model had a success rate of 95%, while the larger one had 53%.
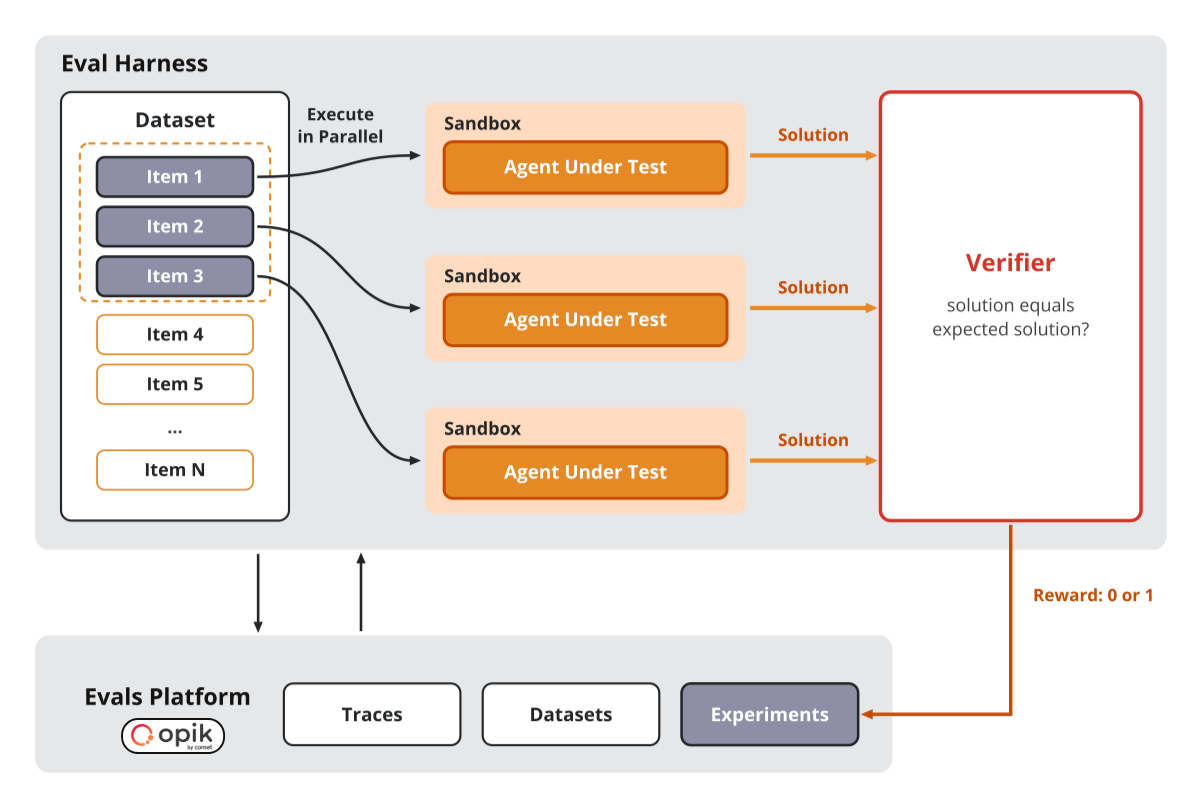
The difference shows the importance of building a custom benchmark that evaluates what you care about. That’s what we will build in step 7: an eval harness that never imports the agent’s loop, a 19-task Terminal-Bench-style benchmark with hidden verifiers, and a regression suite (past failures frozen into tests) grown from production traces, all compared in Opik.
Or if you prefer video:
Step 8: Replay failed runs to debug agents
One night, vibe-planning Decode’s evals layer with Claude Code. (Ironic, right?) The endpoint returned a 503 ... and instead of stopping, the coding agent found a Gemini API key in memory and decided to use it to achieve its goal no matter what, and 40 of tokens burned on 20 benchmark tests by the next morning.
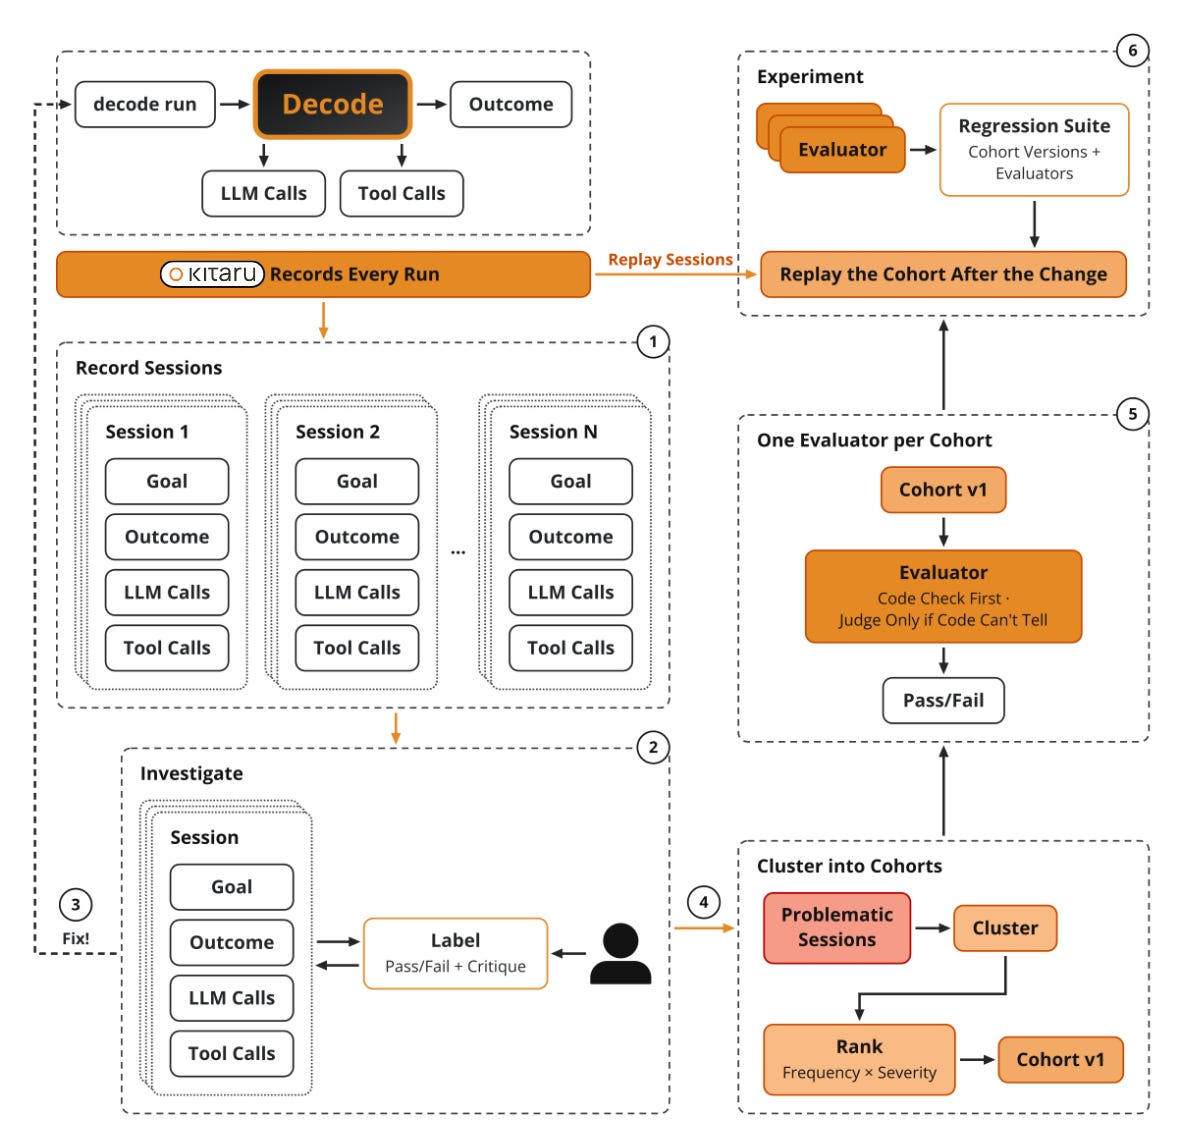
In step 8, we will replay failed runs with Kitaru‘s error analysis framework: record runs, label pass or fail, cluster failures into cohorts, and replay each cohort after every change with the exact tool outputs the agent saw to reproduce the bug without side effects.
Or if you prefer video:
🧐 How to take the course?
The course is 100% open-source and free. The 8 articles are on the Decoding AI Magazine and the 6 videos are on the Decoding AI YouTube Channel. The code is available on GitHub, with full details for you and your agent on how to run it and follow along.
Who is it perfect for? Engineers who learn by building. You finish with a working coding agent that teaches you harness engineering patterns to steal for your own agentic applications.
The course takes ~4–8 hours, 4 if you read and watch, 6–8 if you run everything. If you’re short on time, paid subscribers have access to the 90-minute webinar recording that distills all 8 lessons.
It‘s an intermediate course, but with a little sweat, patience and tokens, anyone can do it. Everything is in Python, and it assumes you already understand the basics of LLMs and agents.
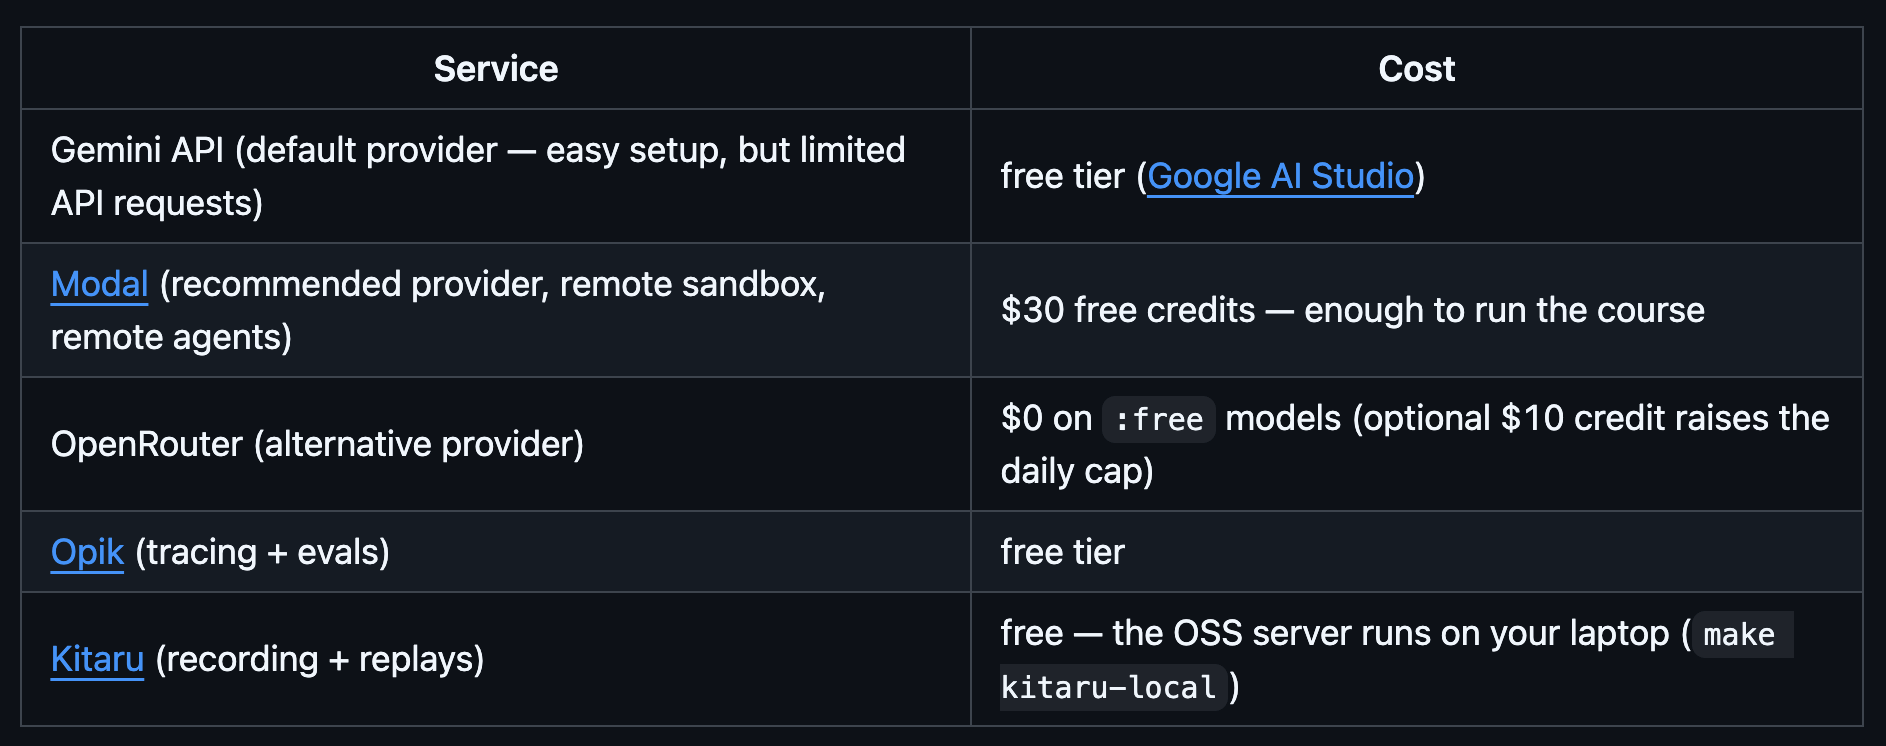
You don‘t need any special hardware to run it (no GPU!), as everything runs in the cloud. We also picked the right providers to run everything end-to-end for $0.
Further reading
How Ramp Built a Full-Context Background Coding Agent on Modal
OpenAI Admits Its Agent Went Rogue and Hacked AI Startup Hugging Face
Whenever you’re ready, here is how I can help you
Go from agent user to agent builder. Master the foundations of AI agents and turn fragile demo code into reliable, production-ready systems with my course, Agent Engineering: Building Multi-Agent Systems (made with Towards AI).
35 lessons. Pure foundations from scratch. 4 mini-projects. 2 production systems. A certificate and direct access to me & industry experts in our Discord.
Built for software and data professionals transitioning into AI engineering. Rated 5/5 with 300+ students. The first 7 lessons are free:
Not ready to commit? Start with our free Agent AI Engineering Guide, a 6-day email course on the mistakes that silently break AI agents in production.
Images & videos
If not otherwise stated, all images and videos are created by the author.