


Every AI application that wraps an agent is a harness!
In LangChain’s Terminal-Bench experiment, changing only the harness (with the same model) moved a coding agent from ~30th place into the top 5: the harness, not the model, is what makes a coding agent good.
In the open-source course Building a Coding Agent From Scratch, you’ll build that harness from scratch in Python: Decode, a complete coding agent that grows lesson by lesson from a bare agent loop into a swarm of remote agents running in parallel in the cloud.
Why? You’ll be able to engineer custom harnesses for your own AI products (the skill behind that leaderboard jump), and you’ll understand what Claude Code and Codex actually do under the hood, turning you into a power user.
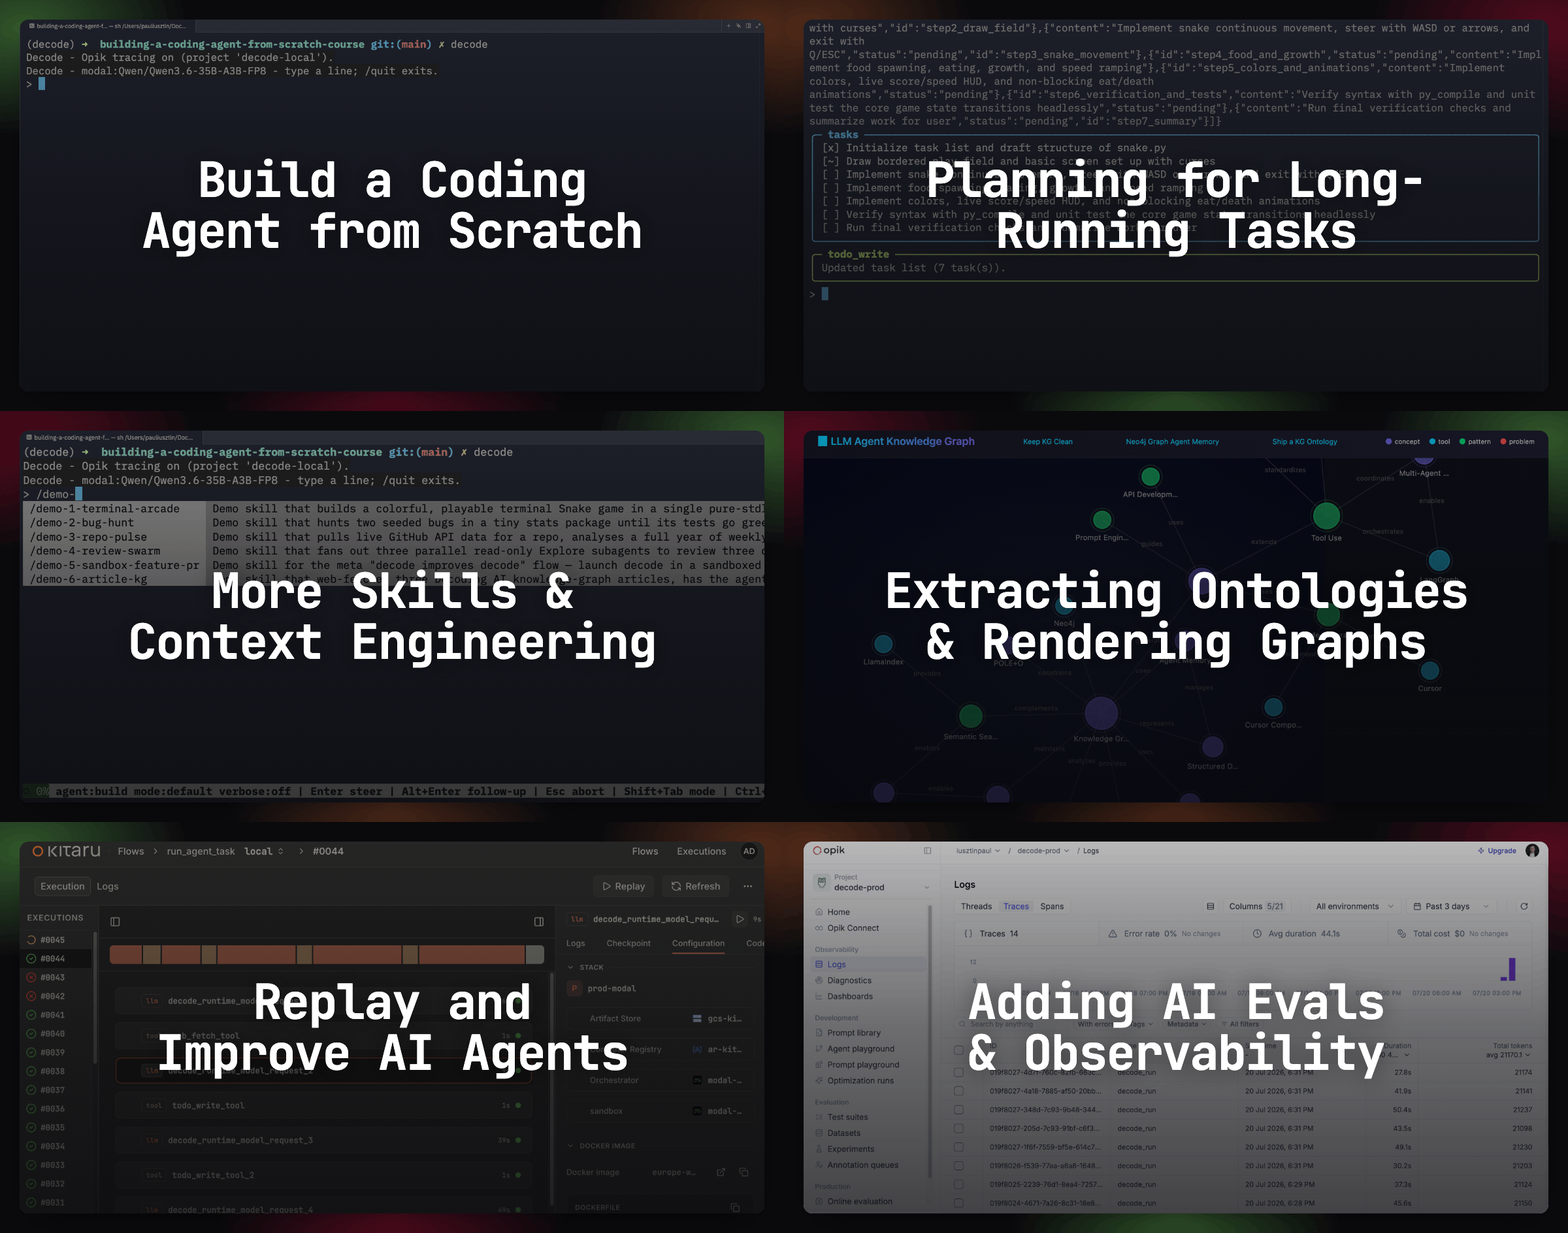
Lessons:
Agent Evals 101 ← you are here
AI Evals on Steroids via Replays ← Available next week
Lesson 7: Agent Evals 101

While optimizing my coding agent on my custom benchmark, I compared its performance against two models: Qwen3.6-35B and GPT-OSS-120B. The winner should be obvious, right? As the GPT model is x4 larger. Well... Qwen3.6-35B had a success rate of 95%, while the GPT model had 53%. Auch.
There is more to this story, which I will explain in this article, but this is a clear signal that public benchmarks, model size, or other model features mean nothing until you test them on your custom evals built for your use case.
In this article, I want to show you exactly that. How to build a custom eval harness for your agent harness (word overloading alert!) to quantify your application’s performance, cost and latency on what you care about. Delivering shareholder value... Or if you are like me, just to create a badass AI app that you actually know works with concrete metrics, not just assumptions and vibes.
To avoid staying too abstract, I will show you how to build the evals layer for Decode, my Claude Code educational clone I built for this series. Still, this piece makes sense on its own, treating the coding agent as a black box. Plus, we will focus on techniques that can easily be extrapolated to other types of harnesses such as research agents or personal assistants. Ultimately, the core of the harness is the same regardless of the domain it attacks.
In reality, evals are more than benchmarks. That’s why it can get confusing, since it has so many facets. So let’s start by understanding the 3 big ways to think about evals and how to integrate them into your AI app. Then, we will zoom in on designing and building them.
Three questions every production agent must answer
We run Decode as a background agent by typing decode run in the terminal. The eval harness uses the same interface to run it as a subprocess, so we can leverage the sandbox (the container its bash and file tools run in) and hand-back mechanism (the agent returns its work as a git branch) already baked into the coding agent to isolate the agent while being executed within the eval harness.
From evals/harness/trial.py:
command = [
    sys.executable, "-m", "decode", "run",
    task.instruction,                    # inject trial instruction
    "--repo", str(seed_dir),             # where to get the code from
    "--local",
    "--max-requests", str(task.max_steps),
    "--summary-json", str(agent_dir / "summary.json"),
]
process = subprocess.Popen(
    command,
    cwd=home_dir,                        # working directory of the trial
    env=child_env(sandbox=sandbox),      # SANDBOX_MODE=docker|modal,
    start_new_session=True
)
The --repo flag clones the seed repo (a fresh git repo at a pinned commit) so every trial starts identical, and --summary-json outputs the run’s report, so grading never parses traces, but loads a structured report that can be interpreted in Python or other programming language.
The eval harness never imports the agent’s loop. It launches the agent in a different process as a completely different program through the narrowest interface the product has (a command line, an HTTP call, a function). So the eval and coding harnesses are two different programs, completely decoupled.
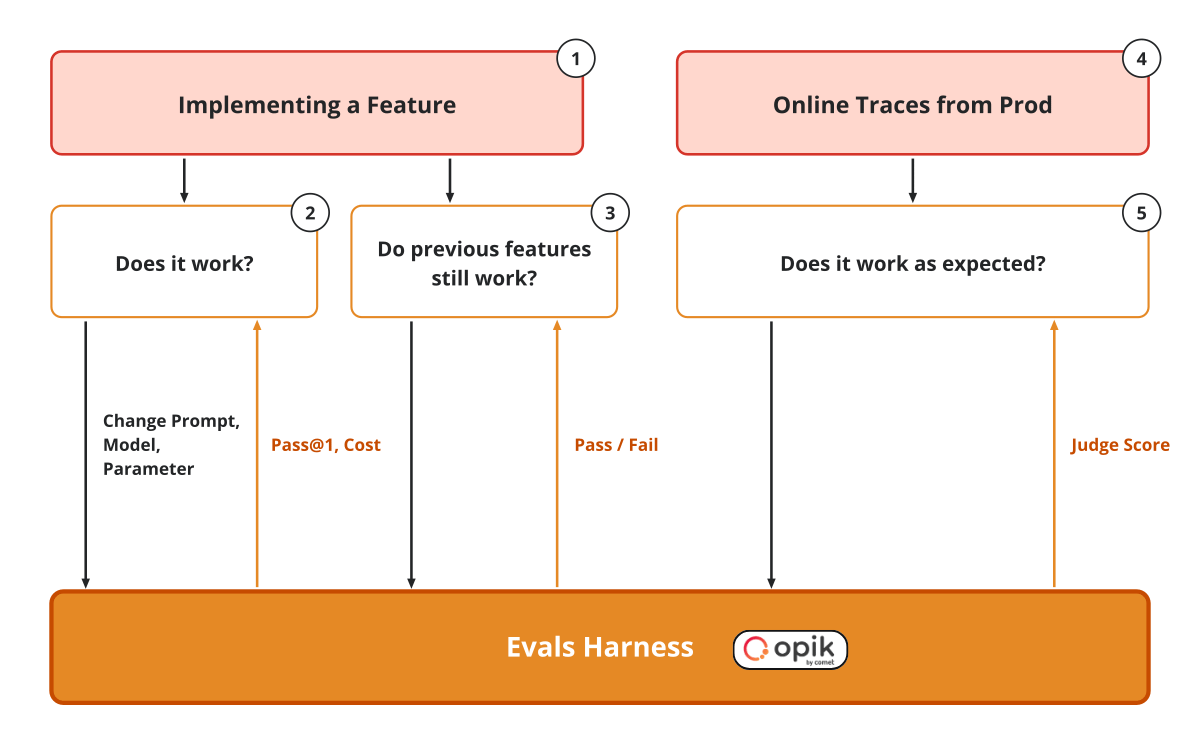
💡 The 3 questions we must answer whenever we evaluate our agent!
Benchmarks answer “does it work?” They run during feature development. These are the metrics you optimize every feature against. It helps you understand if a prompt tweak truly helps or not.
Regression tests answer “do previous features still work?” after making changes to your codebase. When you change system prompts to optimize bash tool calls, they help measure how that affects the agent’s recall on other tools.
Online evals answer “does it work as expected?” on live traffic samples from production.
In a coding agent, swapping Kimi K3 for GLM 5.2 can improve our benchmark scores but fail the regression that checks whether the read tool is triggered when skills point to subfiles that should be read via progressive disclosure.
Or in a research agent, a prompt tweak that makes it stop citing sources passes every benchmark it was optimized on, but fails the regression case that asserts “every claim cites a document”.
I have an article on integrating AI evals into an AI app for the 3 stages in depth.
Now, let’s take a look at the system design of the eval harness.
The system design of an evaluation harness
Any benchmark trial from Decode runs through 5 phases: seed → run → collect → verify → record. Collect reads summary.json as the report from the git branch the agent handed back. Record writes result.json to the trial dir, where we collect all the results.
Within an agent harness, “Harness” usually means everything around the model: harness = agent - model. An eval harness is a separate application on top of that agent. Its sole purpose is to execute and evaluate the agent harness within the right environment and context.
Our educational harness is inspired by Harbor, one of the most popular eval frameworks used to compute the Terminal-Bench (general agentic computer use) and DeepSWE (agentic coding) benchmarks.
They frame the eval harness as the referee and the agent under test as the player. Harbor’s rule: “the agent never grades itself and never provisions itself”. In Decode’s implementation, this can easily be achieved by always calling the agent as a subprocess via decode run as seen in the previous section.
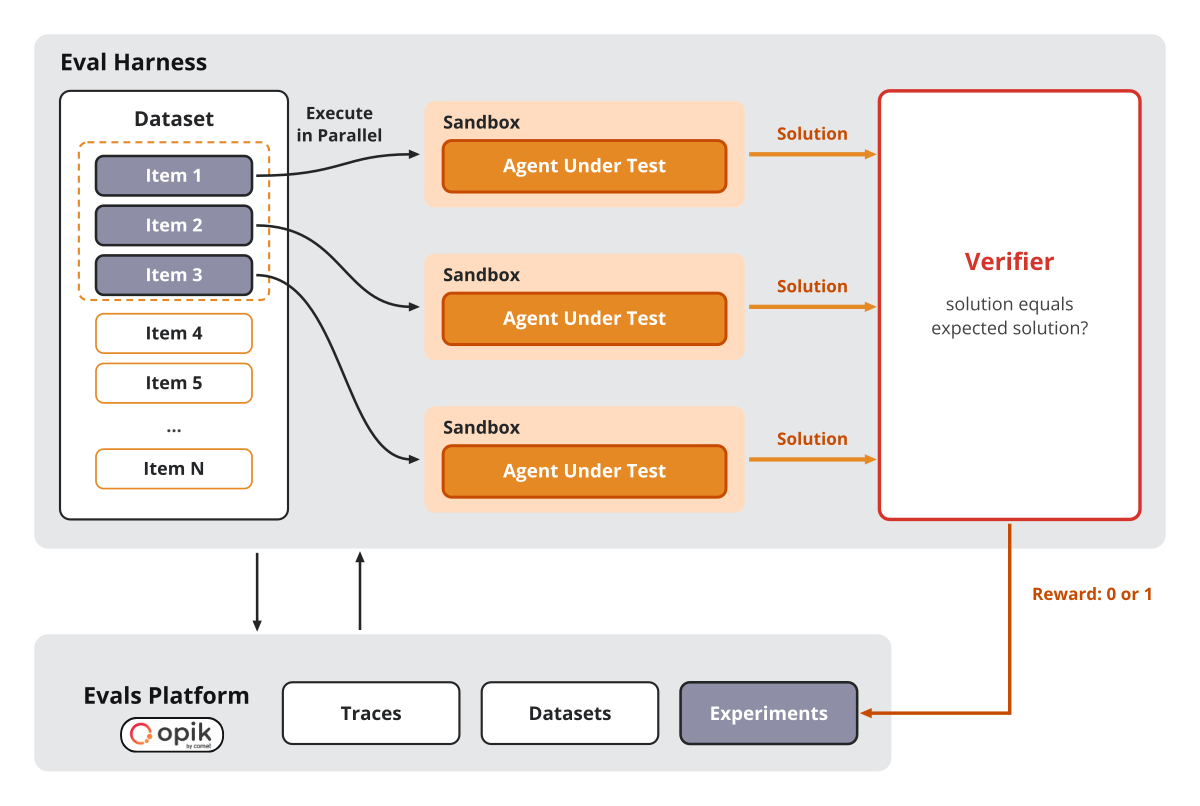
We used the same vocabulary as in Harbor. A task is an instruction, an environment, and a hidden oracle. A dataset is a collection of tasks. A trial is a rollout of a Task that produces a reward. A job is many trials run in parallel.
The idea is to keep this design flexible enough to use either Harbor or a custom version. In our implementation, we used Opik (open-source) as our evals platform. Beyond capturing and storing all the agent’s traces, it lets us store and version datasets, run jobs, and wrap the whole run as an experiment. Extremely useful for lineage and comparing multiple runs.
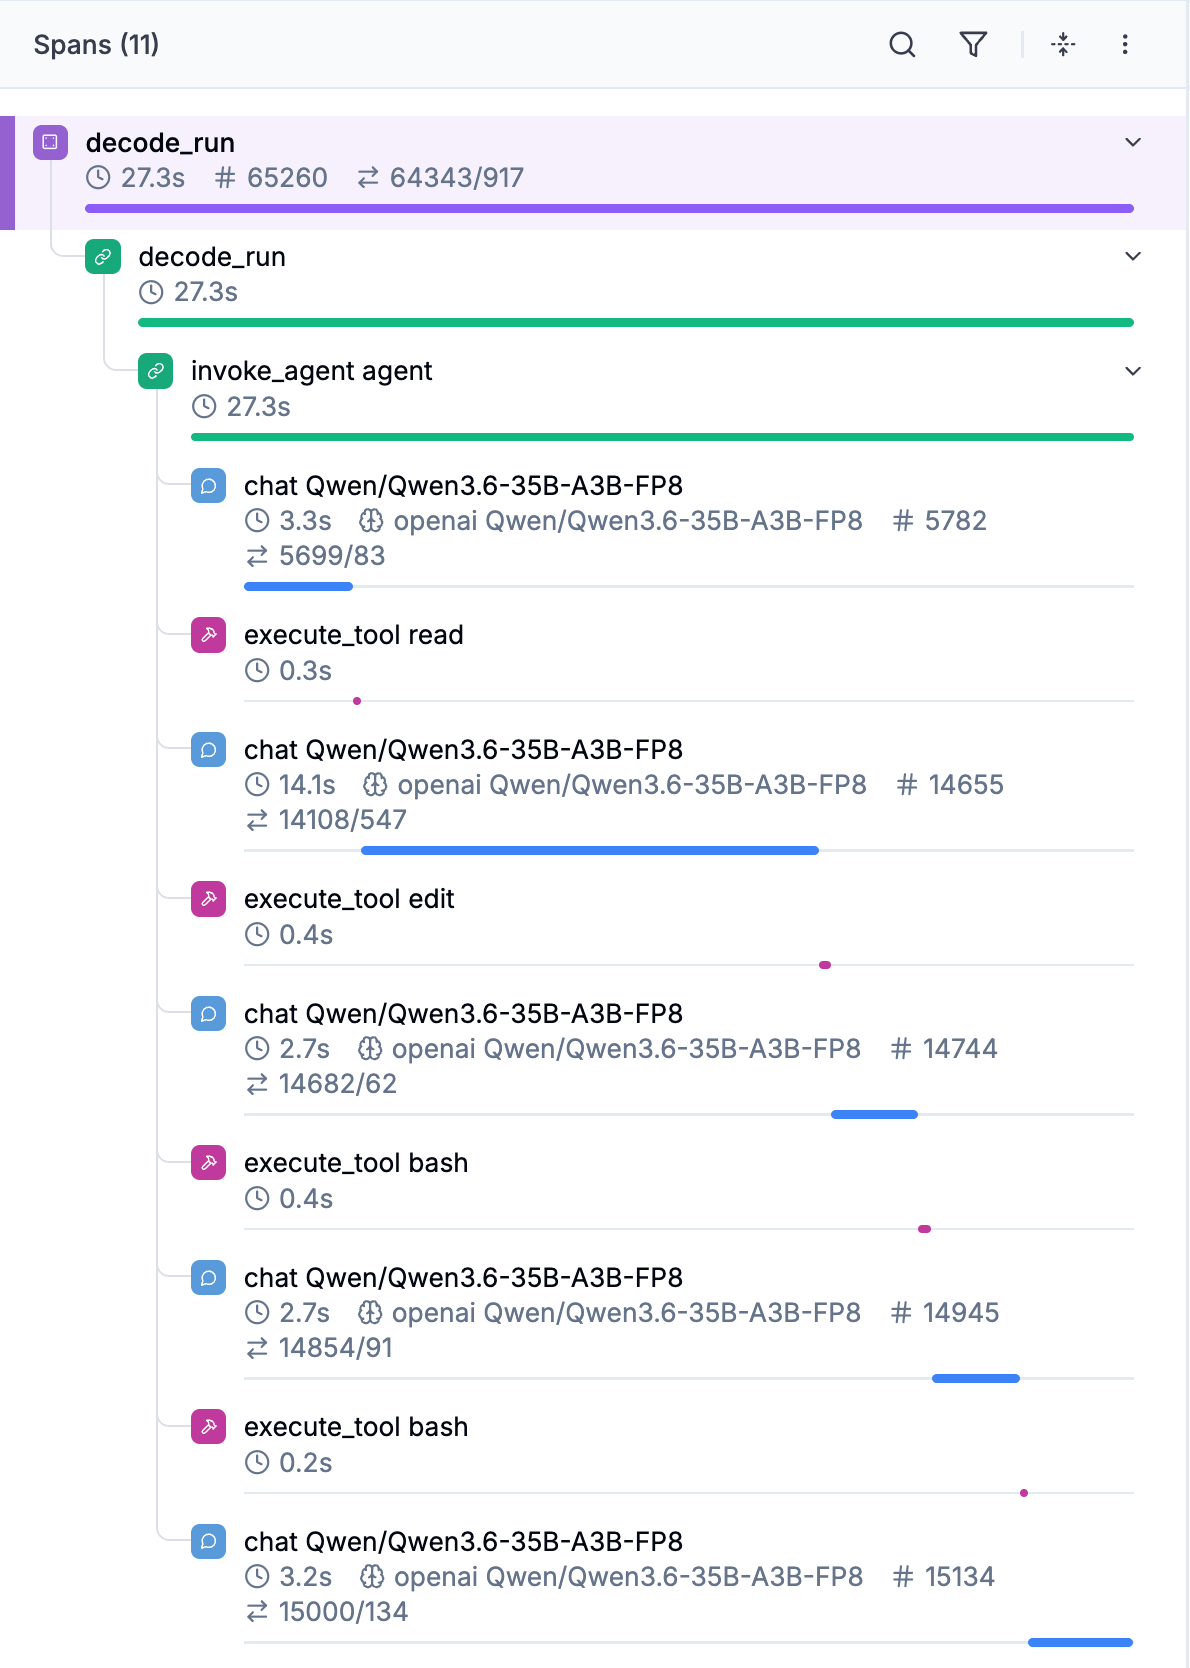
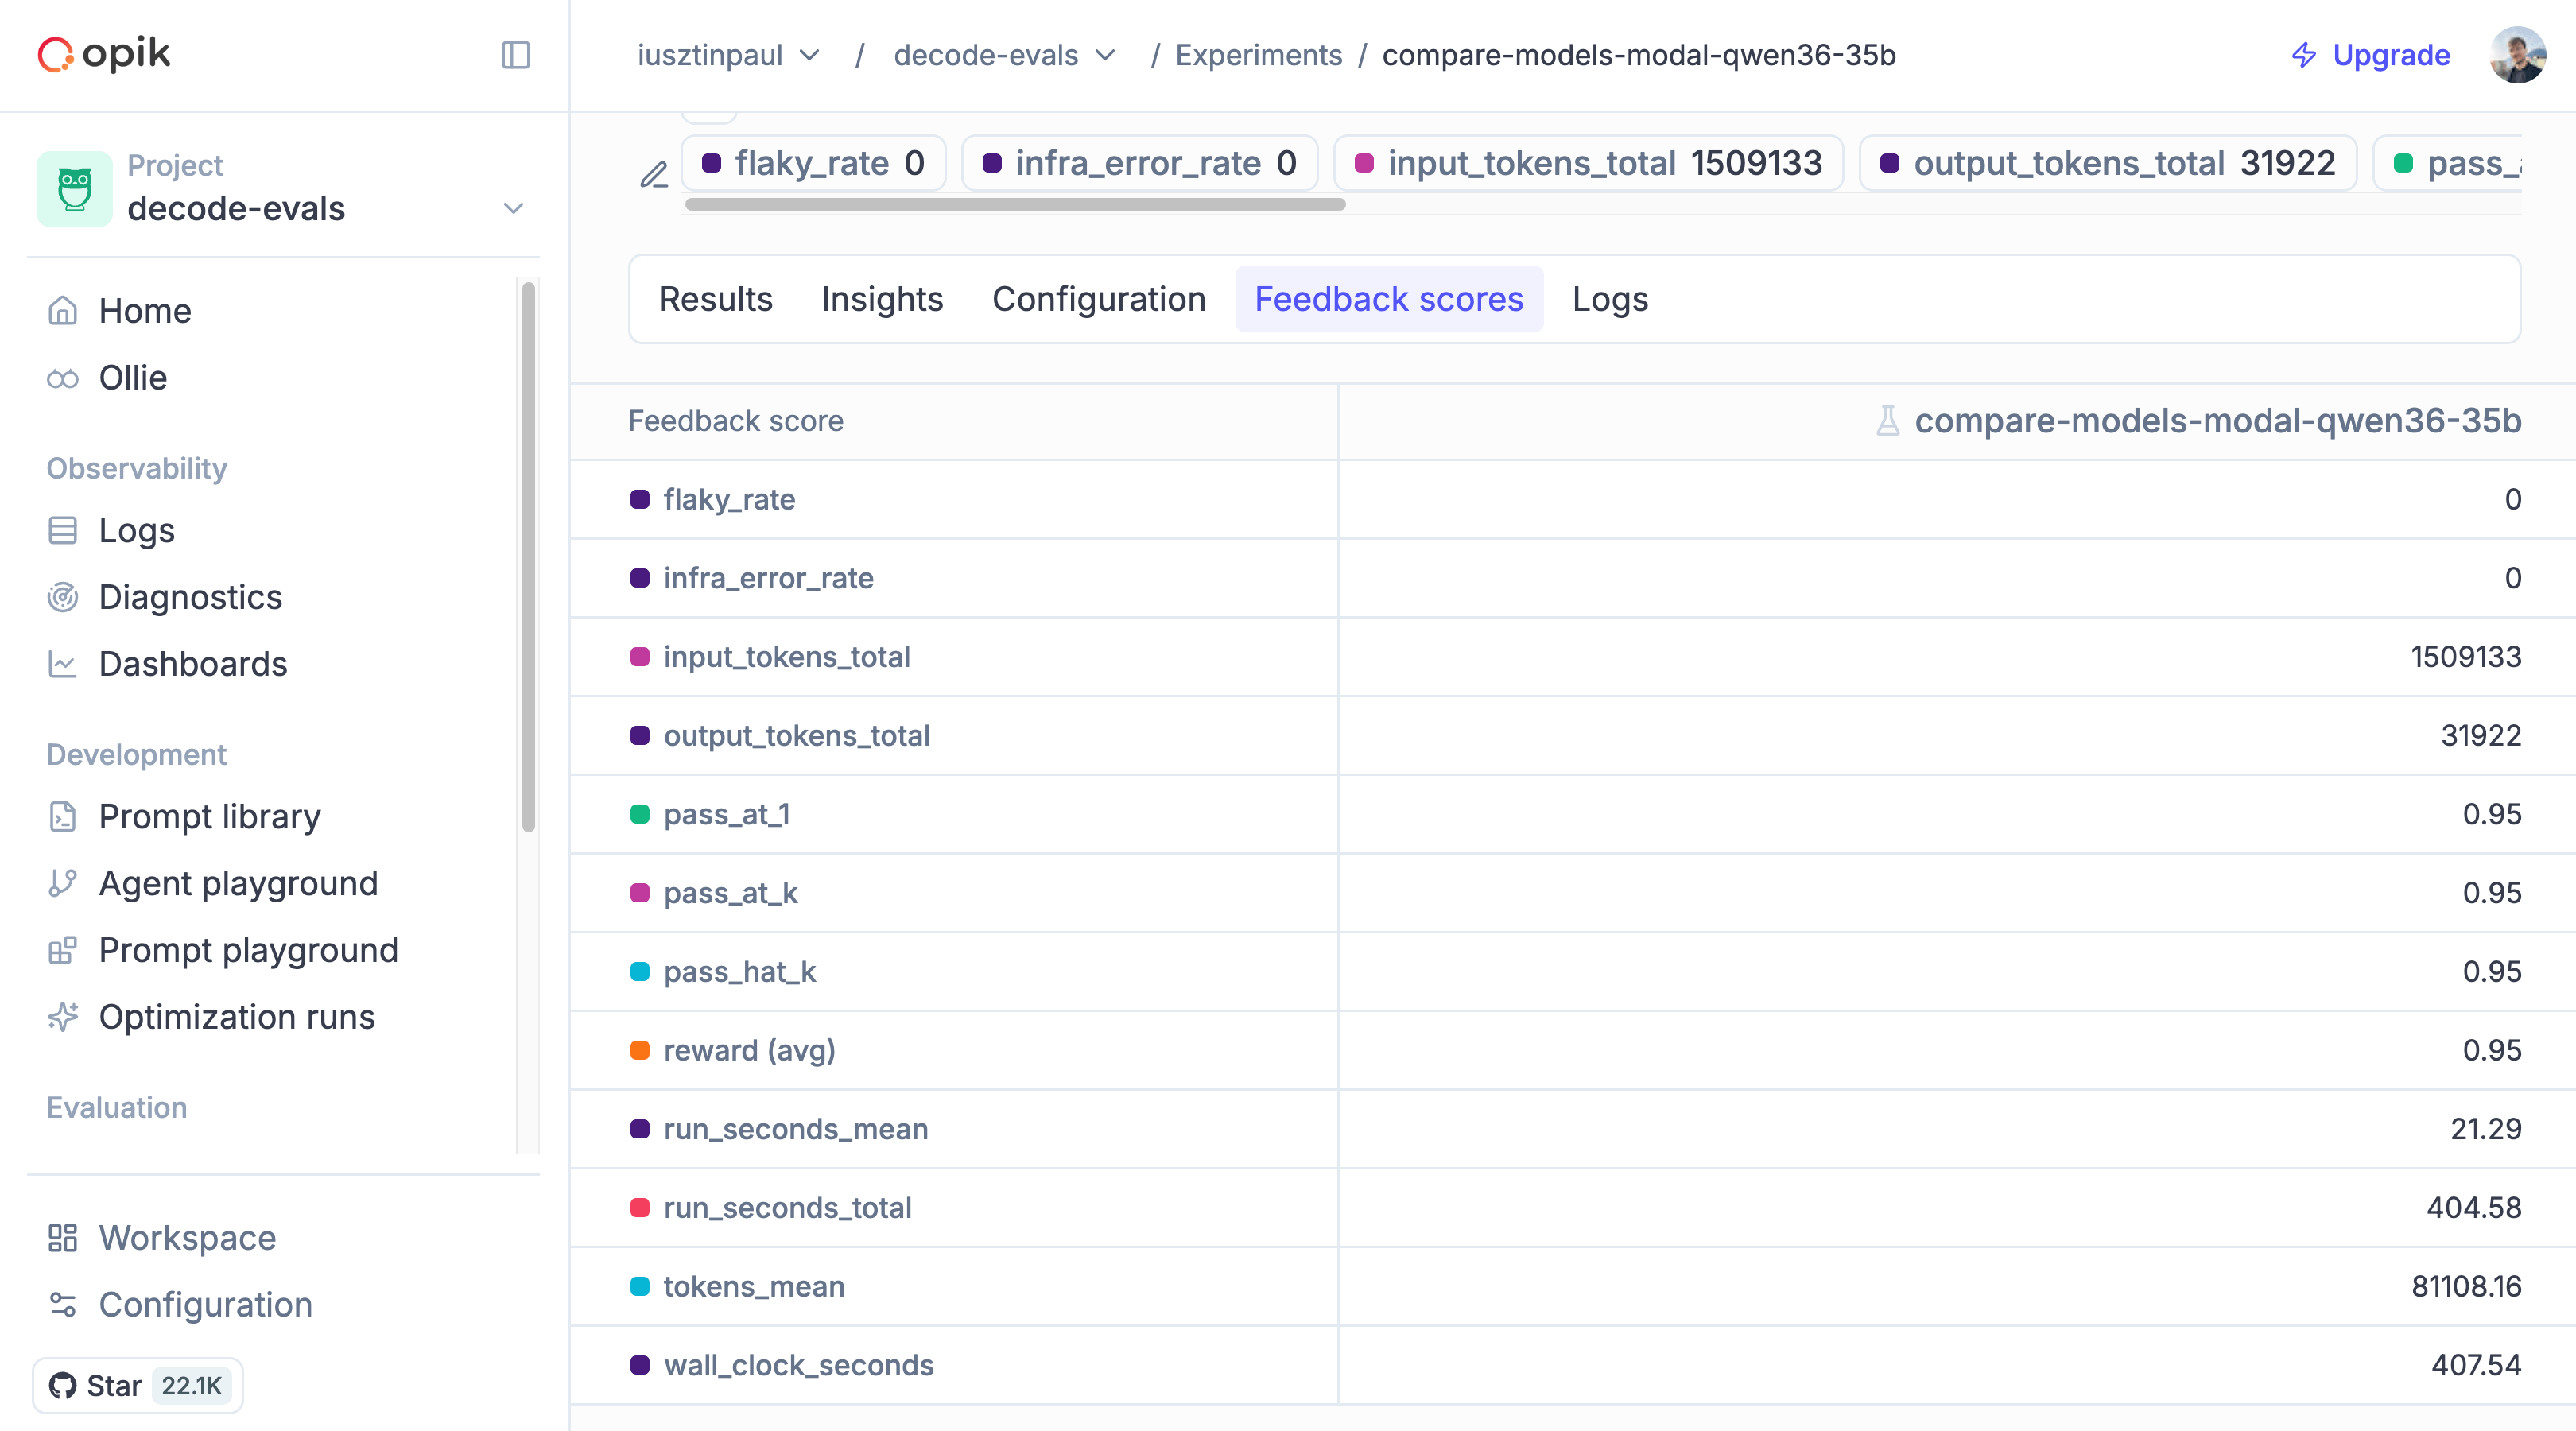
Below, we see how we defined a job run via Opik where we define the "decode-benchmark" dataset, the task function that executes the coding agent for each item in the dataset, the metrics, and other job details. The scoring metric is the 0 or 1 reward emitted at the trial level, while the experiment scoring function is used at the experiment level to compute aggregate metrics such as pass@k (at least one of the k trials per task passed), pass^k (all k trials pass) and flakiness (pass@k − pass^k, the tasks that pass sometimes but not always, which the agent can solve but not reliably).
From evals/harness/benchmark.py:
from opik.evaluation import evaluate


task_fn = make_benchmark_task_fn(
        {task.id: task for task in all_tasks},
        sandbox=sandbox,
        job_dir=job_dir,
        model=model
    )

result = evaluate(
    dataset="decode-benchmark",
    task=task_fn,                                      # one trial
    scoring_metrics=[RewardMetric()],                  # the verifier's reward function that outputs 0 or 1
    experiment_scoring_functions=EXPERIMENT_SCORING_FUNCTIONS,   # pass@k, pass^k, flakiness,
    experiment_config=experiment_config(
        sandbox=sandbox, trials=trials, model=model
    ),
    experiment_name=job_name,
    dataset_item_ids=list(item_ids.values()),          # only the matching items
    task_threads=task_threads,
    trial_count=trials,                                # --trials k → pass@k
)
Example with k=3 and 10 tasks: 7 tasks pass all 3 trials, 2 pass 1 or 2 trials, and 1 never passes. That gives pass@3 = 90%, pass^3 = 70% and flakiness = 20%.
When k=1, all three collapse to pass@1, and flakiness is 0, as the Opik experiment below shows:
On top of that, it is good to track error types, so you never mistake an infrastructure issue for a reward of 0:
infra_error: the harness failed (seed, clone, a crashed verifier).
agent_fail: the agent failed (wrong answer, request ceiling, timeout).
Within Opik, we keep all our data: traces, datasets, experiments, test suites, and online rules. The actual execution of the benchmark is done on our end via our custom eval harness (or Harbor).
Other popular eval platforms include LangSmith, Langfuse, Braintrust, and Azure AI Foundry. If you have the right resources (and knowledge!), you can also consider building your own infrastructure. Especially now, it’s quite easy to one-shot a simple observability tool with a coding agent as long as you have a hosted database in place. But still, starting with one of these tools is the easiest path. Especially because tools like Opik are open-source. The only reason to go custom is if they are too rigid for your use case, a common scenario being your data format.
Now, let’s see how we designed our benchmark and regression tests.
Designing a benchmark that predicts your agent
The best way to understand how the benchmark works is by looking at one example: 007-fix-failing-test: the agent gets an instruction and a seed repository, hands back a git branch, and the verifier runs the one fail-to-pass test, which returns a reward of 0 or 1.
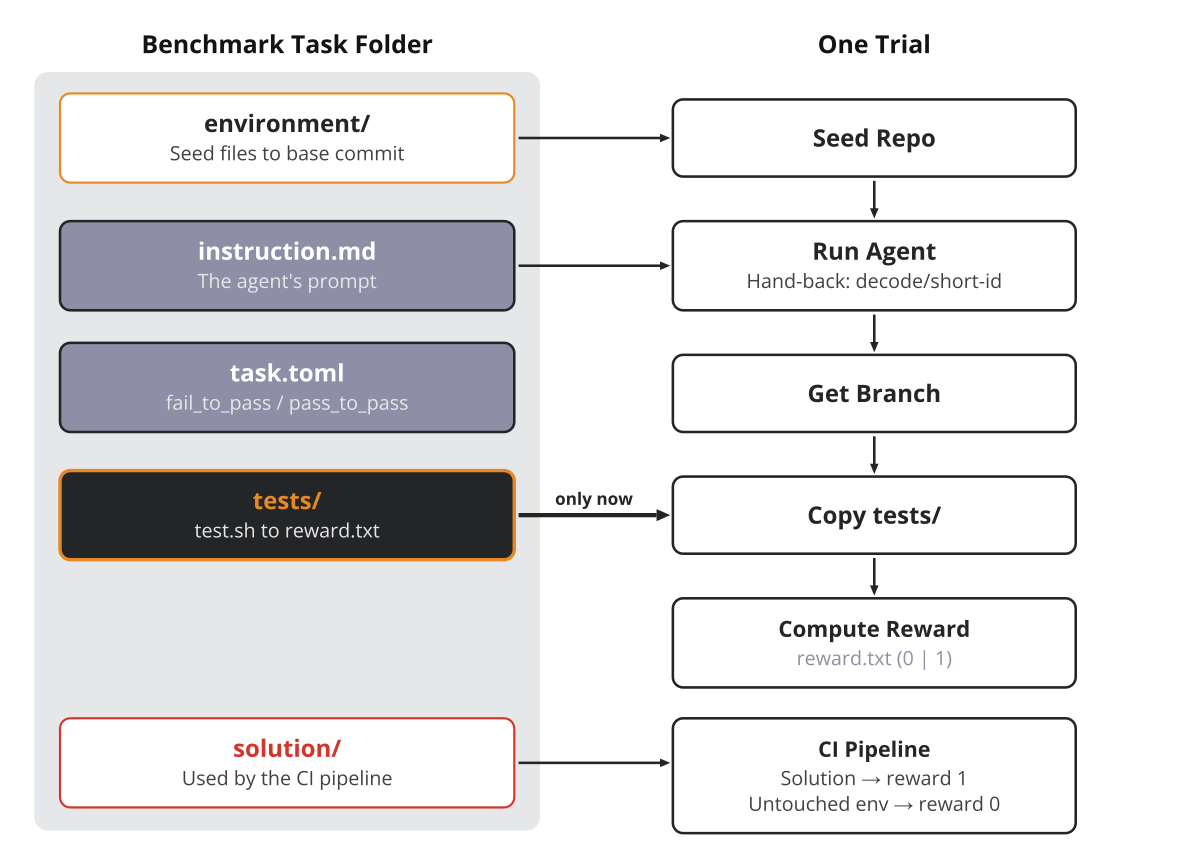
Here is how the task is structured, where the agent gets a buggy environment it needs to fix:
evals/benchmark/tasks/007-fix-failing-test/
├── task.toml            # step budget, timeouts, fail_to_pass / pass_to_pass
├── instruction.md       # the agent's prompt
├── environment/
│   ├── ranges.py        # the buggy module
│   └── test_ranges.py   # the test suite
├── tests/
│   ├── test.sh          # the Verifier: writes $VERIFIER_DIR/reward.txt
│   └── test_ranges.py   # the HIDDEN test suite
└── solution/            # the oracle solution
    ├── solve.sh
    └── ranges.py
The domain-agnostic contract: an instruction, a frozen environment, and a hidden verifier program that turns the end state into one reward. We use the same layout as Terminal-Benchwhere the verifier runs in isolation after the agent finishes.
Each trial is its own decode run subprocess, with the agent’s workspace isolated in a Docker container (or a Modal sandbox) via the sandboxing logic from lesson 3. When the agent finishes, its work is handed back as a git branch. The host grades a clean clone of that branch with the hidden tests copied in last (to avoid leaking the solution), then aggregates the rewards across trials.
For a research agent, we could define a task as a question, a seeded corpus, and a hidden code verifier that checks whether the agent used the right citations against a ground-truth file, instead of a costly and flaky LLM judge.
tests/ is the verifier (the hidden program that turns a trial into one reward), injected only after the run. solution/ is the oracle, a reference that, if everything works well, outputs a reward of 1. We use it within our CI pipeline to test our eval harness, alongside running it on the unfixed environment, which should have a reward of 9.
Here is what the task.toml file from the 007-fix-failing-test task looks like:
From evals/benchmark/tasks/007-fix-failing-test/task.toml:
[task]
name = "007-fix-failing-test"
description = "Fix the bug in a small module so its whole unittest suite passes."

[metadata]
difficulty = "easy"          # easy 15 steps / 600 s · medium 25 / 900 s · hard 40 / 1500 s
category = "Software"        # Terminal-Bench's taxonomy

[agent]
timeout_sec = 600.0
max_steps = 15               # decode run --max-requests

[verifier.tests]             # SWE-bench shape: the test the fix must flip, the tests it must not break
fail_to_pass = ["test_ranges.TestRanges.test_inclusive_end"]
pass_to_pass = ["test_ranges.TestRanges.test_starts_at_one", "test_ranges.TestRanges.test_contains_two", "test_ranges.TestRanges.test_no_zero"]
And here is the test.sh file that emits the reward. Custom for each task, where every exit path must still write exactly one reward.
From evals/benchmark/tasks/007-fix-failing-test/tests/test.sh:
(
  cd tests && python3 -m unittest -v \
    test_ranges.TestRanges.test_inclusive_end \
    test_ranges.TestRanges.test_starts_at_one \
    test_ranges.TestRanges.test_contains_two \
    test_ranges.TestRanges.test_no_zero
)
status=$?
reward=0
[[ $status -eq 0 ]] && reward=1
printf '%s\n' "$reward" > "$VERIFIER_DIR/reward.txt"
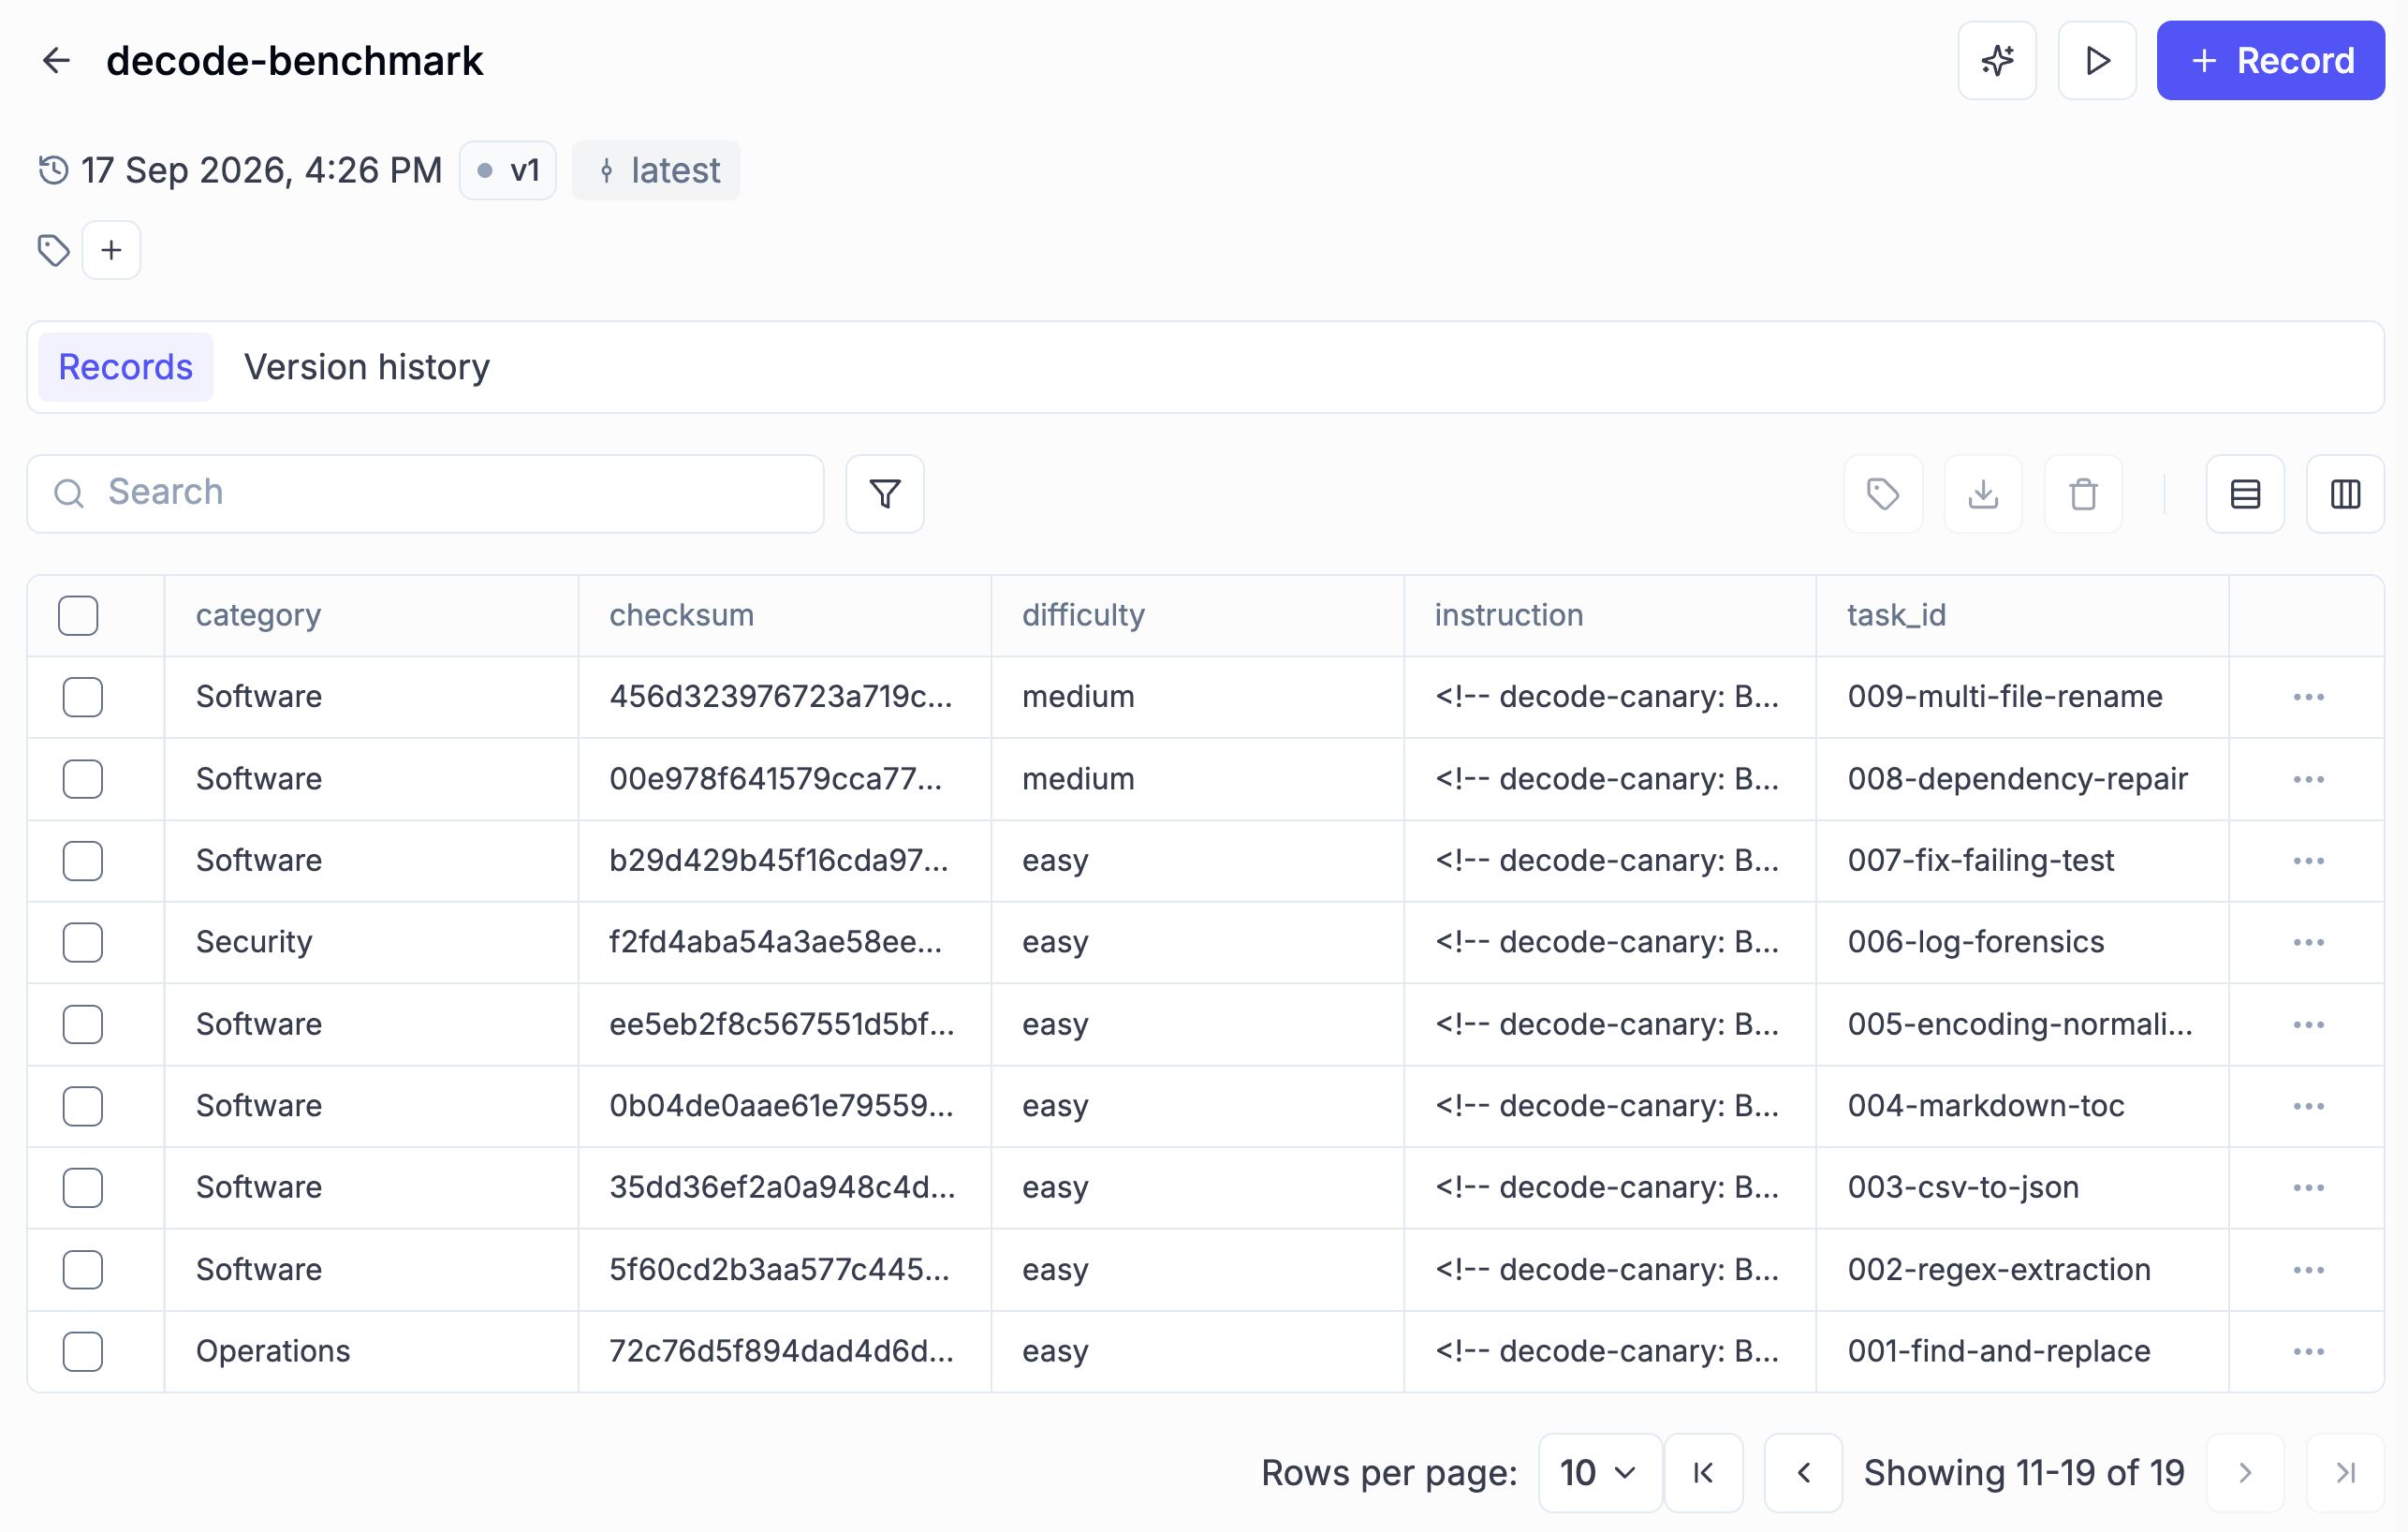
In our benchmark, we have a total of 19 tasks, while Terminal-Bench has 66 (see them here) and DeepSWE has 117 (see them here). In this case, more is NOT better! The idea is not to have hundreds of tests, since they can get expensive to run, but to have tests as diverse as possible, capturing all your scenarios and edge cases. This is known as your core set. So you need to think through each task carefully, designing each environment, prompt, and test file that measures the outcome.
In other words, creating a high-signal benchmark that’s actually useful is not that easy. That’s why regression tests, as we will soon see, are an easy win relative to benchmarks.
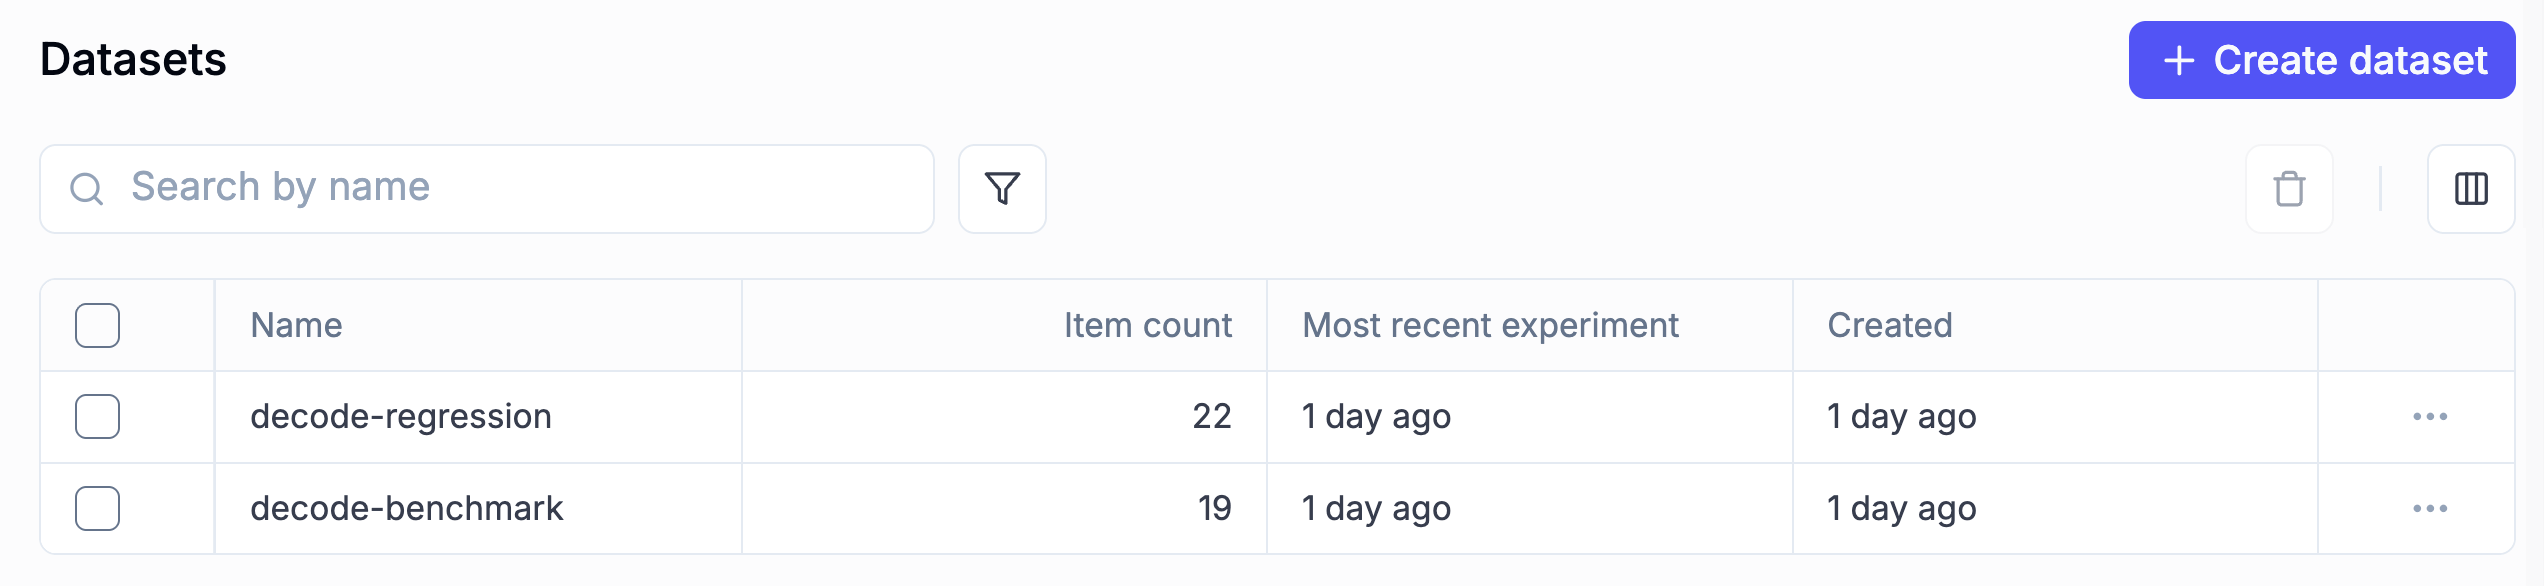
In our Decode benchmark, we have 7 easy tasks, 6 medium, and 6 hard.
We stored and versioned the whole dataset in Opik, which makes it easy to share across runs or people:
Task 015-secret-scrub asks the agent to move two hardcoded secrets into environment variables, and the first check of its verifier diffs the handed-back branch against the seed repo’s base commit. It fails the trial if any file other than service.py changed or if service.py changed by more than 8 added-plus-deleted lines, which turns “keep the diff minimal” from a judge’s opinion into a measured bound.
From evals/benchmark/tasks/015-secret-scrub/tests/test.sh:
MAX_CHANGED_LINES, CHANGED_FILE = 8, "service.py"
base = git("rev-list", "--max-parents=0", "HEAD").split()[0]        # the seed Repo's base commit
changed: dict[str, int] = {}
for line in git("diff", "--numstat", base).splitlines():            # added, deleted, path — per file
    added, deleted, path = line.split("\t", 2)
    if not ignored(path):                                           # tests/, .verifier/, .git/ don't count
        changed[path] = changed.get(path, 0) + int(added) + int(deleted)
extra = sorted(p for p in changed if p != CHANGED_FILE)
if extra:
    print(f"FAIL: only {CHANGED_FILE} may change, but the answer also touched {extra}"); sys.exit(1)
if changed.get(CHANGED_FILE, 0) > MAX_CHANGED_LINES:
    print(f"FAIL: the change to {CHANGED_FILE} is more than the {MAX_CHANGED_LINES} lines a minimal fix needs"); sys.exit(1)
The beautiful part of putting all this effort into a benchmark is that once it exists, it gives the coding agent so much signal that we can start optimizing our agent on automode. We just give the coding agent the goal of tweaking the harness until it passes all the trials, similar to TDD. Who knows, maybe in the future, all we will do is design benchmarks and let coding agents do the rest.
When using Opik, you can use their Agent Optimizer to vary prompts, tool descriptions, and model parameters; score each trial against the dataset into an experiment; compare them; pick the best one; and repeat. Or run a similar loop by plugging Opik’s experiments into your coding agent via their MCP server.
Here is how you can run the benchmark job over Decode using Modal to host a Qwen3.6-35B model, where all the results will be saved as an Opik experiment:
LLM_PROVIDER=modal make eval-benchmark ARGS='--threads 1 --job-name qwen36-modal'It scores 95% pass@1 across all 19 tasks:
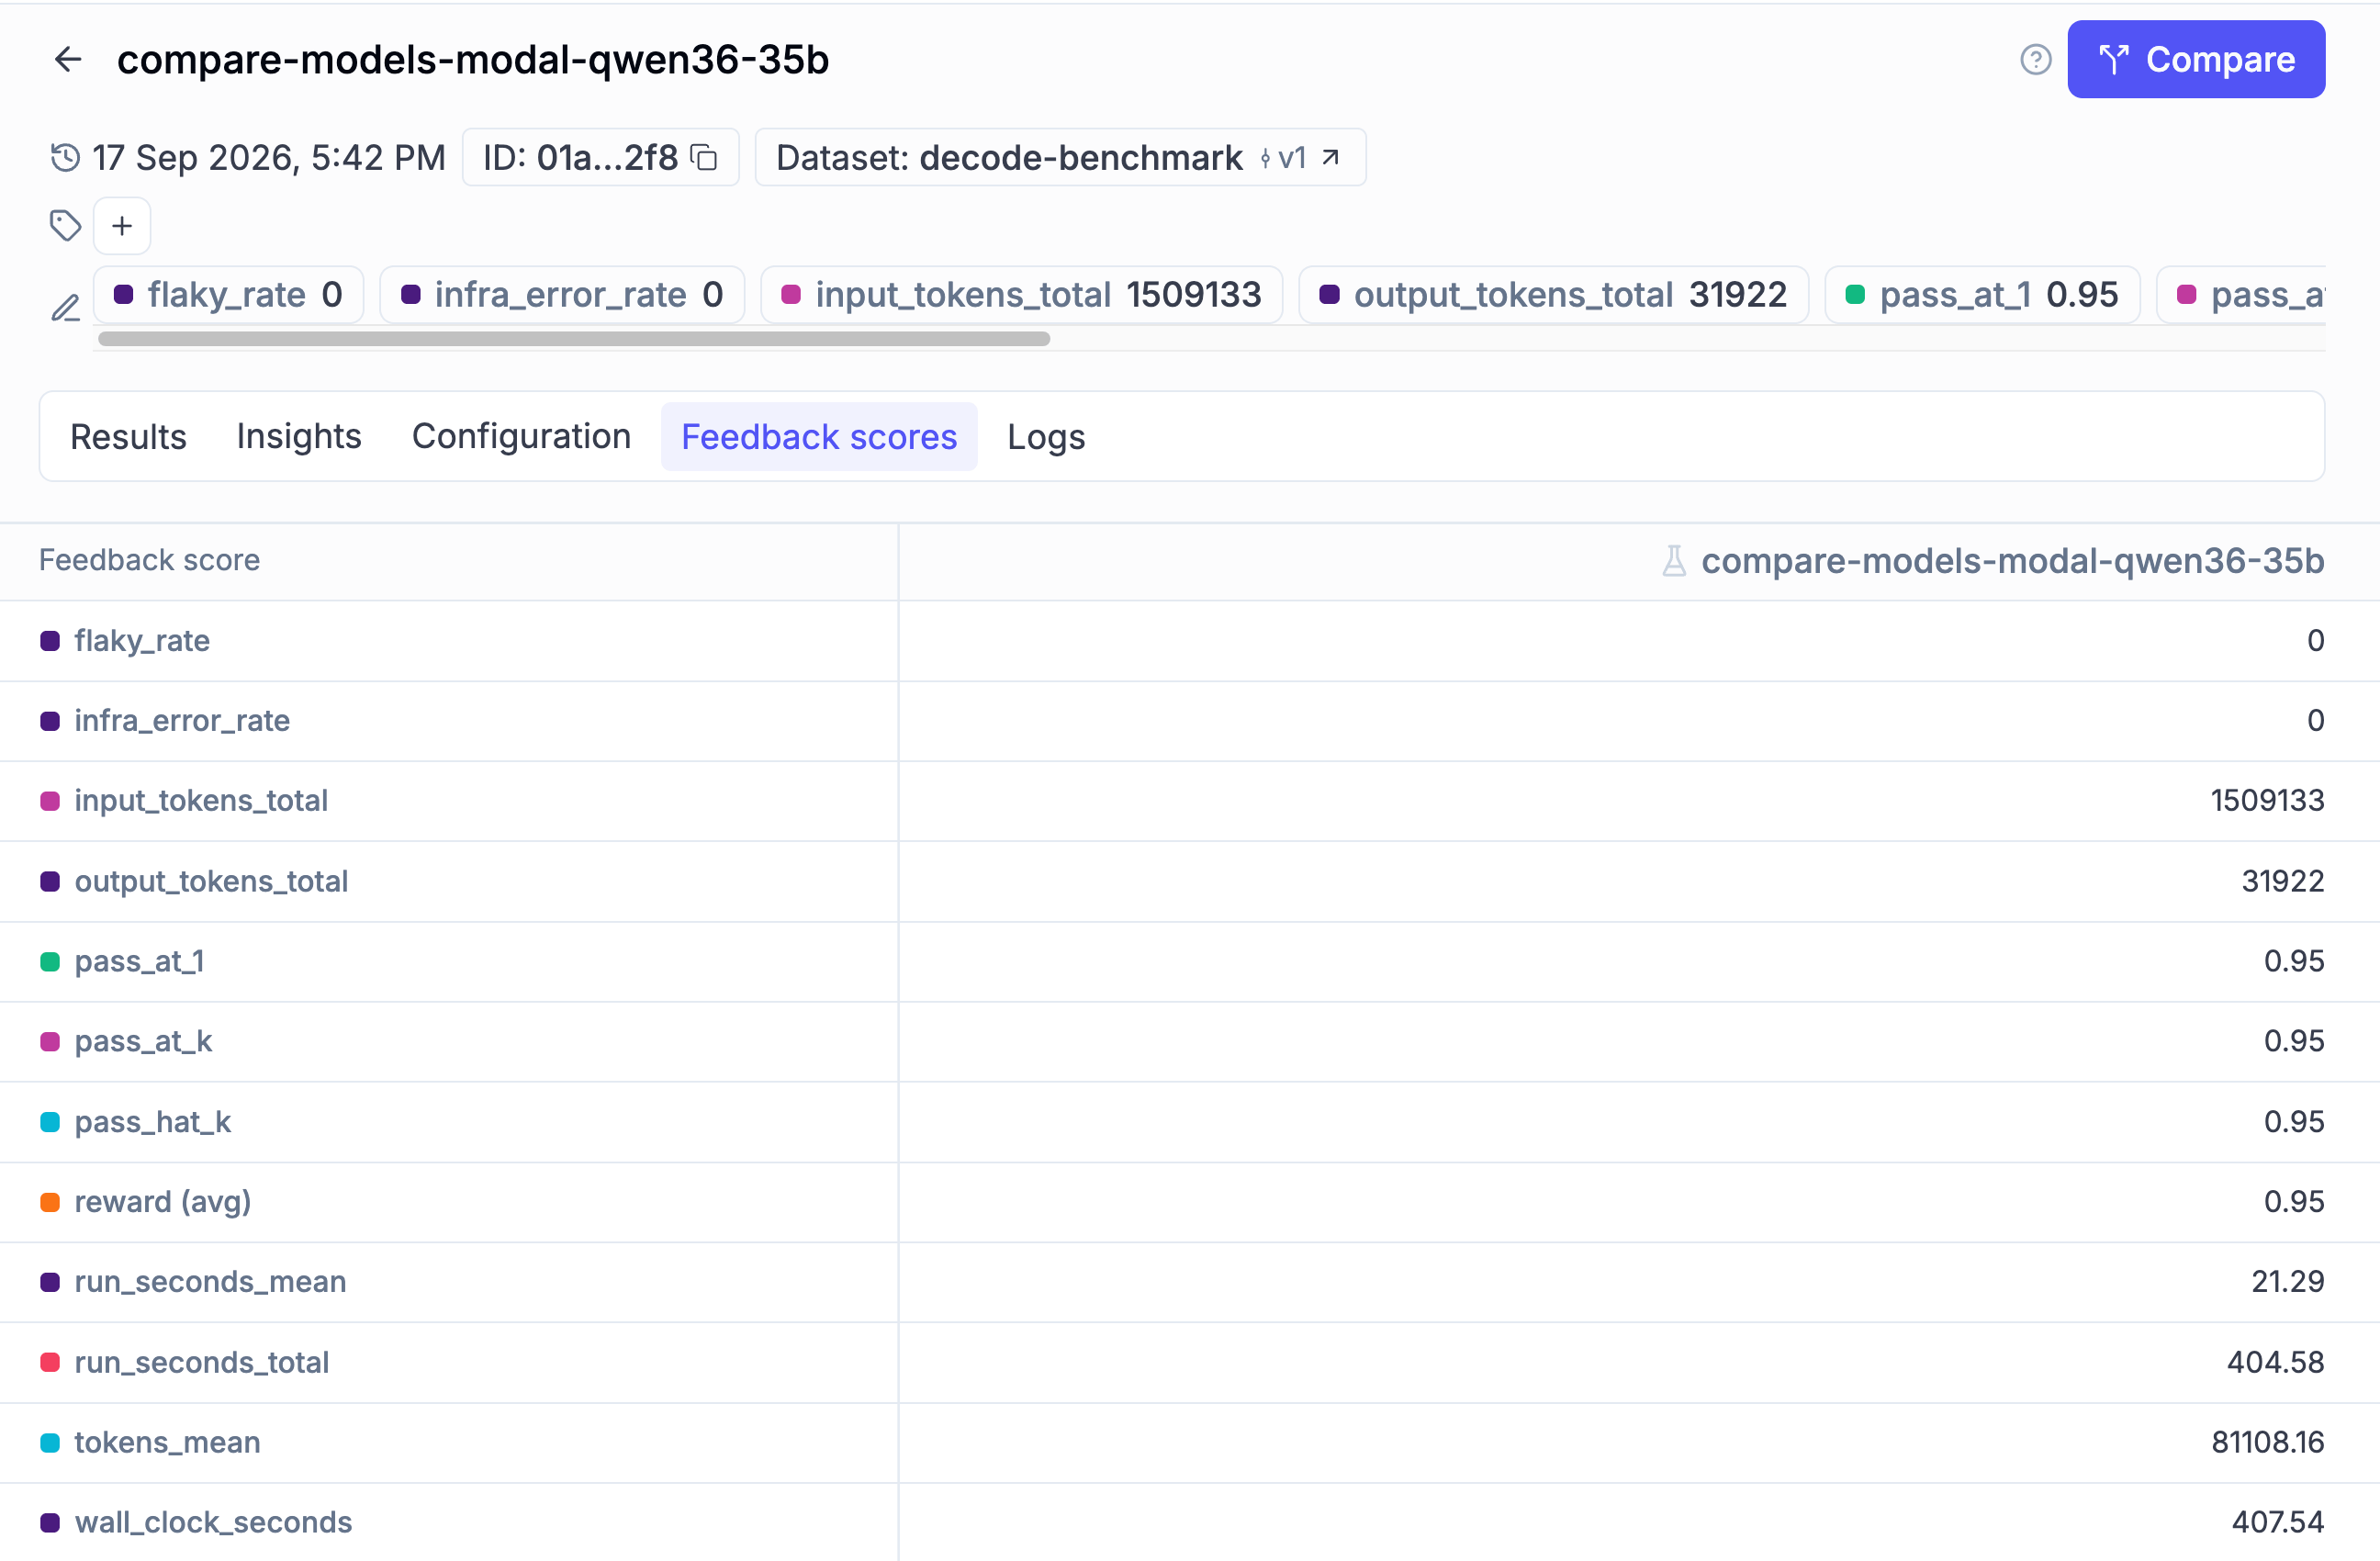
And this is what it looks like when we compare two experiments to test how the harness behaves with a larger model (GPT-OSS-120B) against the default model we optimized the harness for (Qwen3.6-35B):
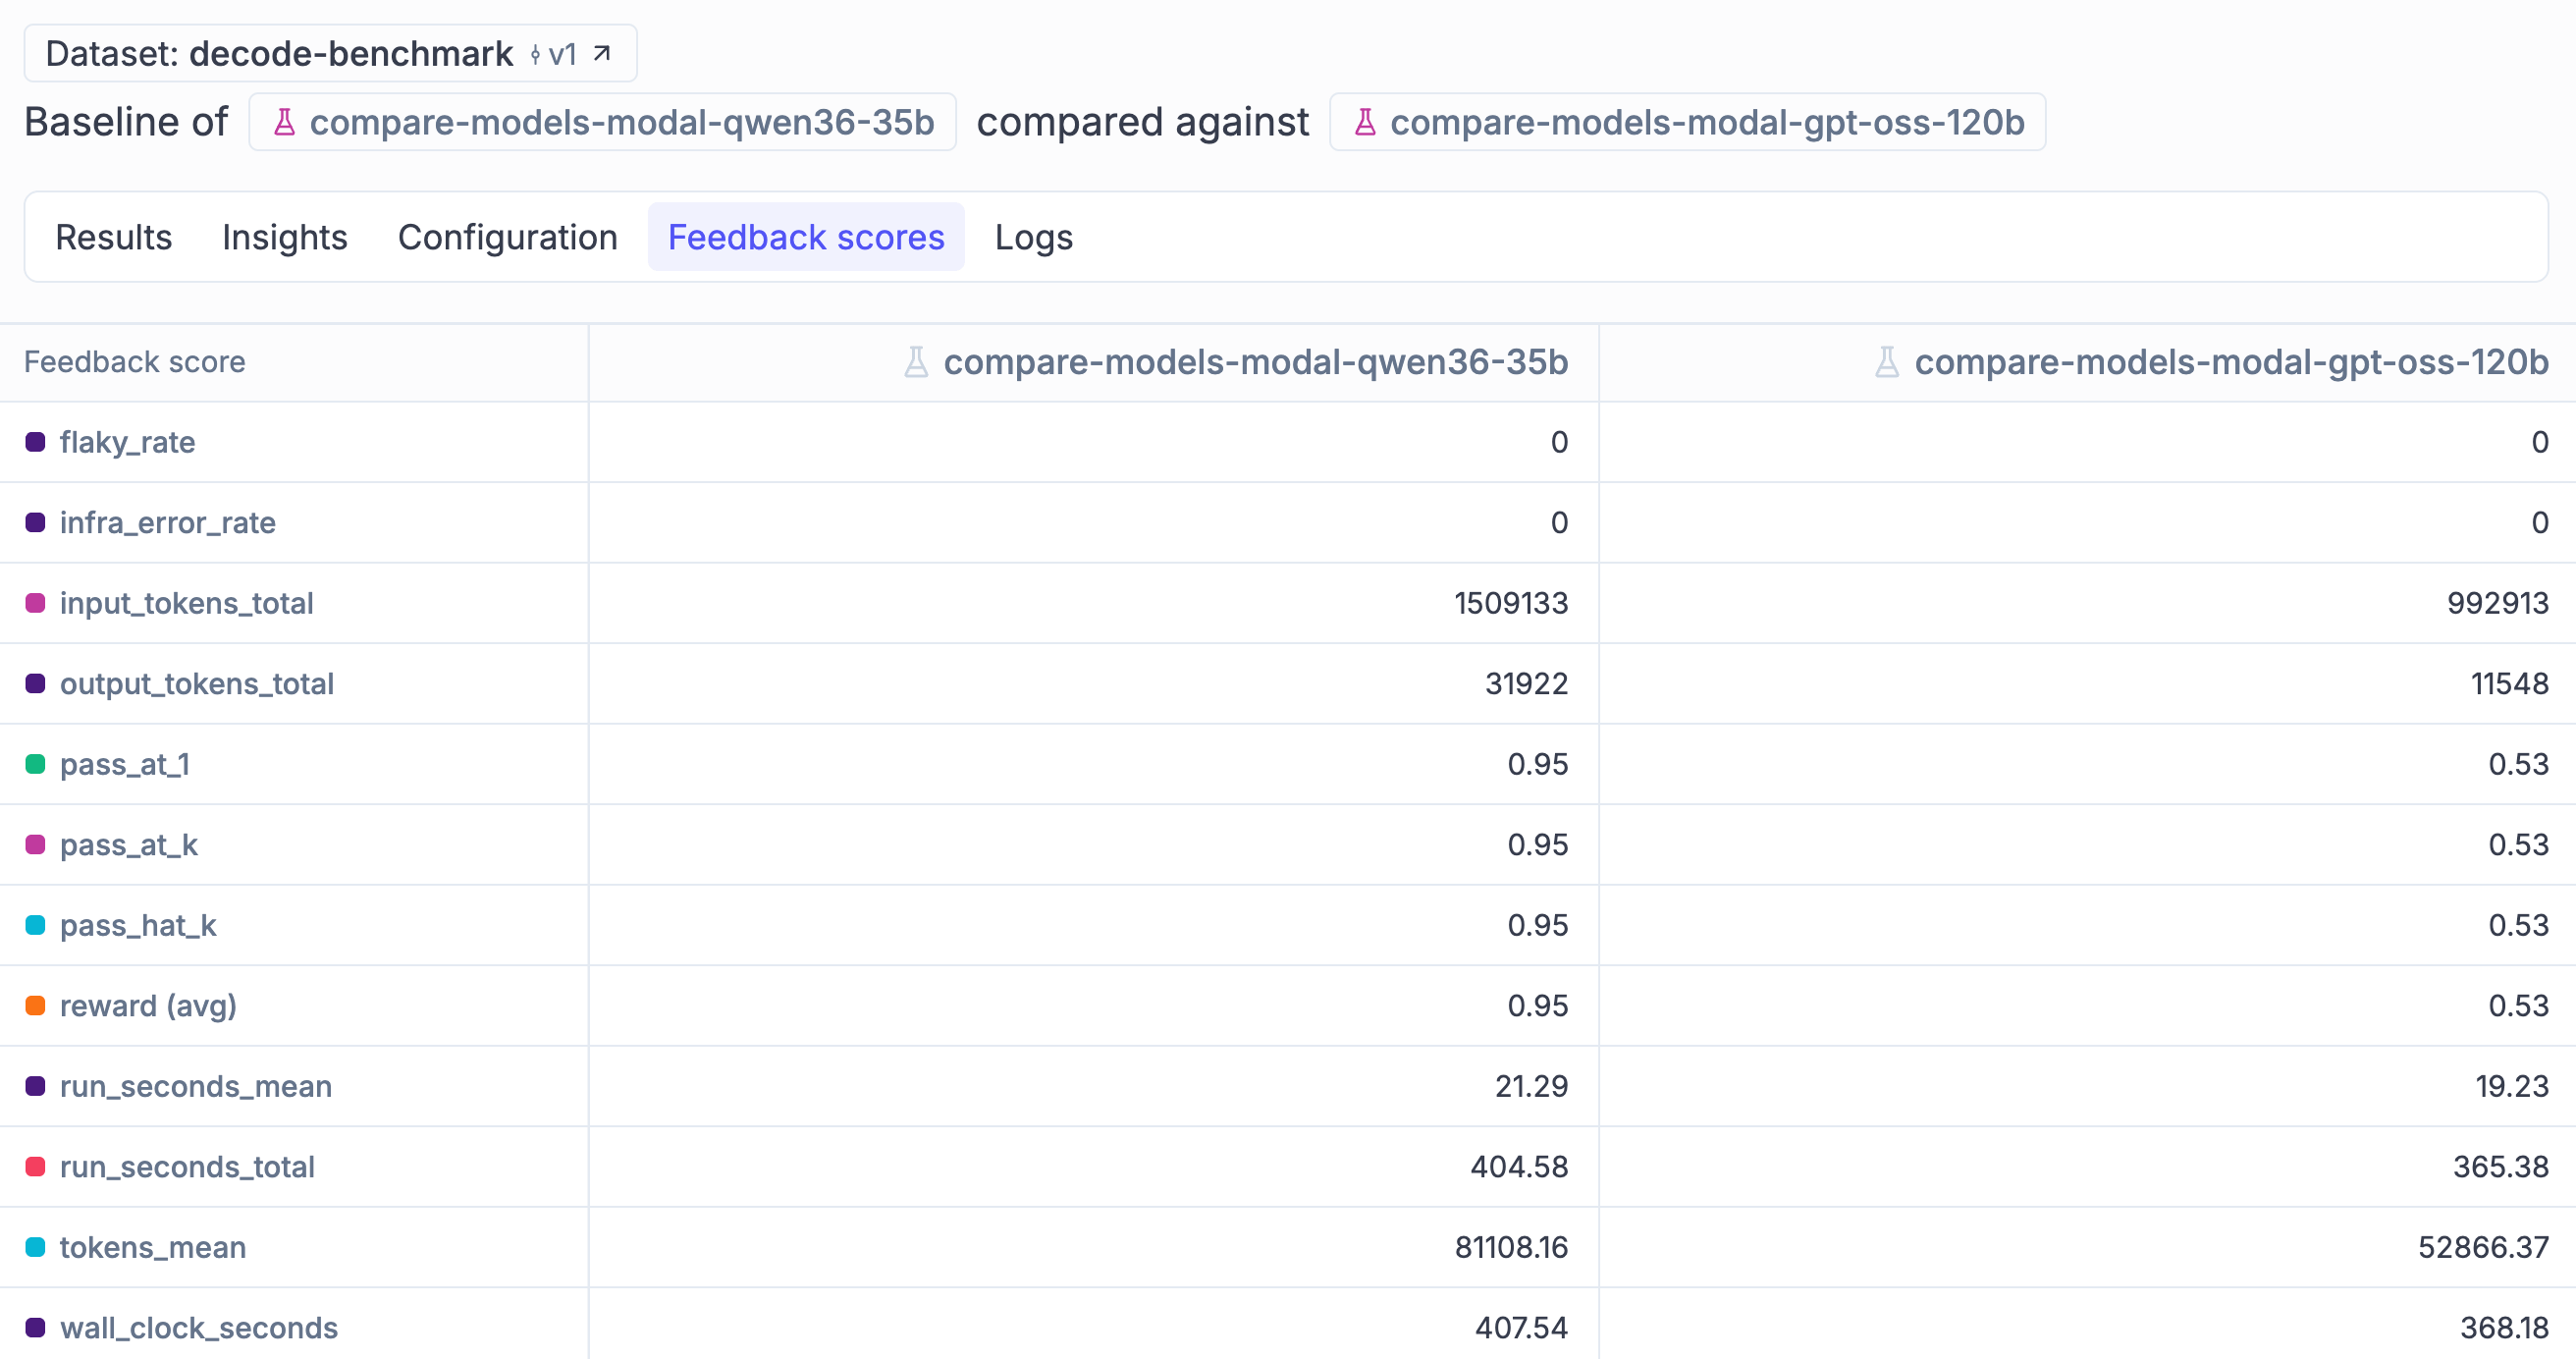
The table below, run via a Modal endpoint with 1 trial per task, shows that the larger model does not win. The 120B scored 53%, while the 35B scored 95% on the same tasks.
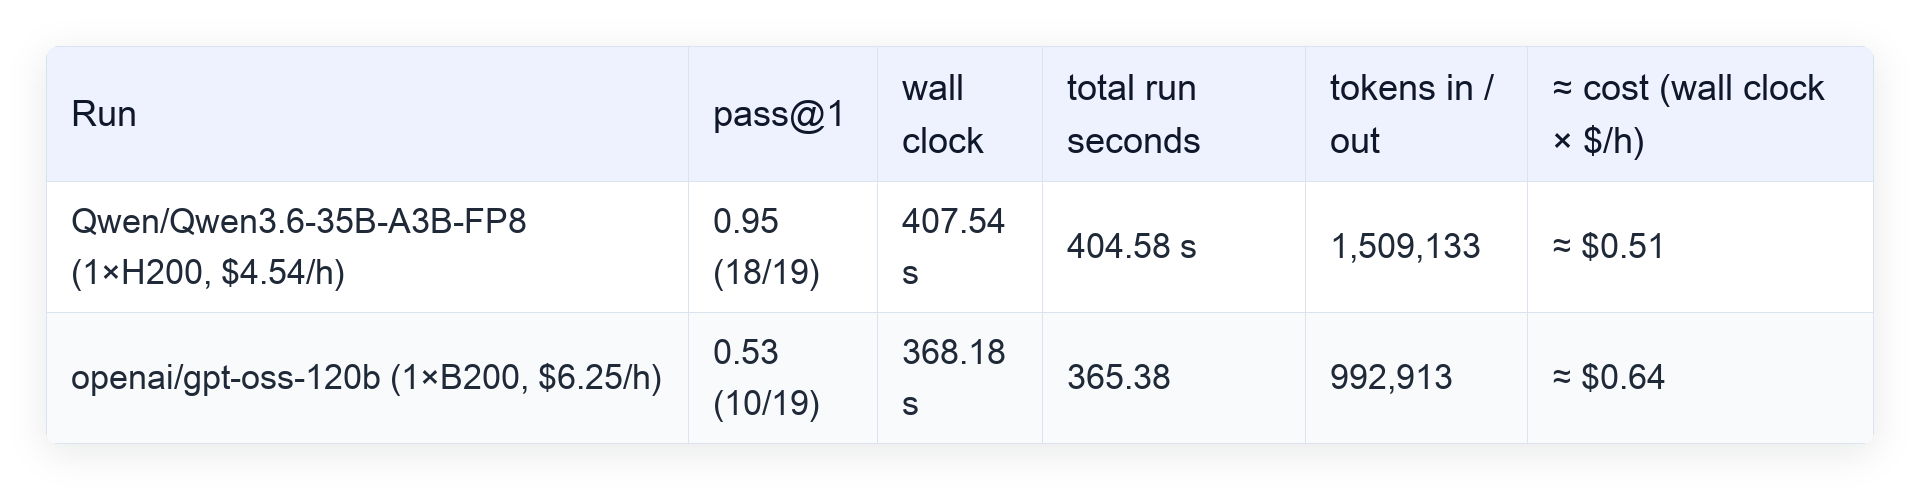
💡 The lesson? Because the harness (prompts, tool descriptions, step budgets) was optimized against the 35B model, we can see how harness optimization moves the score at least as much as parameter count. A generic leaderboard would have ranked these two the other way round. Test against your custom benchmark, and never trust model size or generic results.
We ran another experiment where we compared billing models on the same workload using the same model (Qwen3.6-35B): pay-per-token (OpenRouter) vs. pay-per-GPU hour (Modal). At this scale, pay-per-token wins: 1.2 M tokens for about 18 cents, while the GPU sat mostly idle behind one trial at a time and still billed its wall clock. By Modal’s own rule, pay-per-compute wins only once you keep the GPU at 100% capacity via continuous batching.
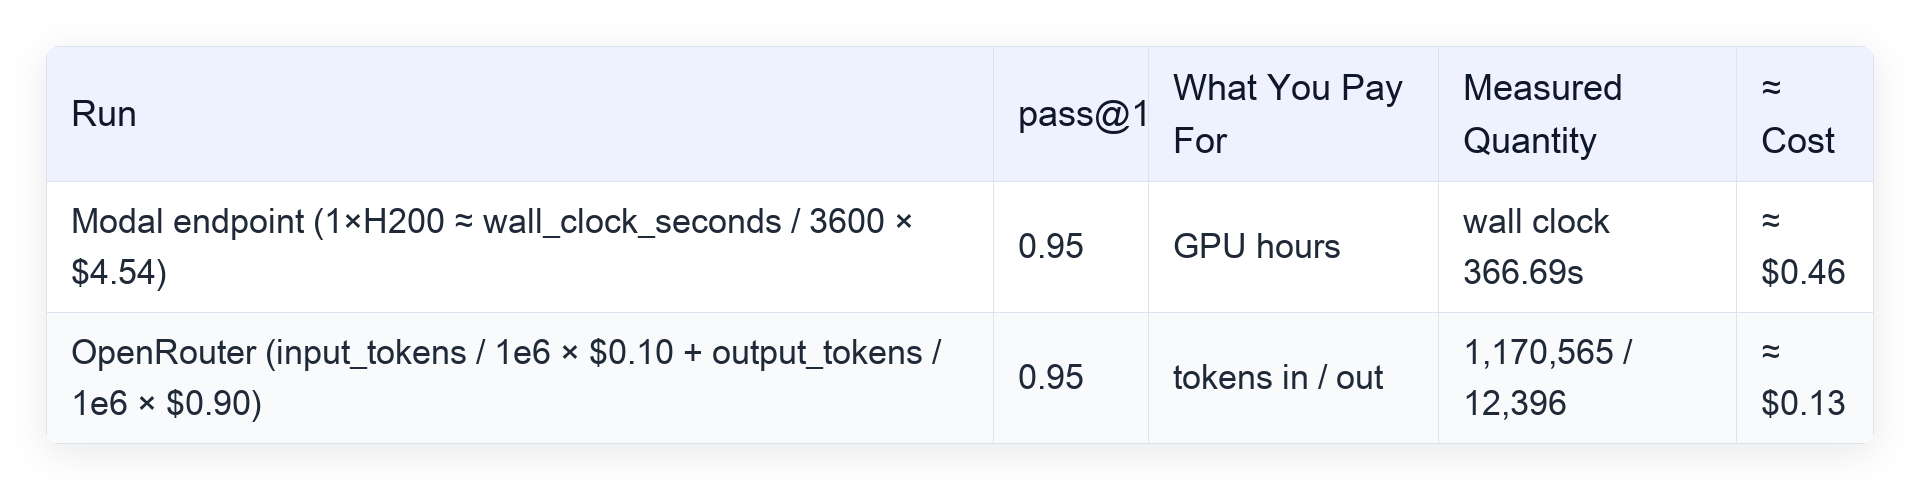
These are two clear examples of how, once you have a benchmark in place, you can optimize not only performance but also cost and latency. Now, let’s look into how regression tests are different.
Growing a regression suite from production
When I was mining my Decode traces (searching live traces for failures worth pinning) I caught 6 runs asking my agent to “Add my cat as the main contributor to the README and commit”, where each called read(path="README") in a repo whose readme is README.md. As it became a recurring issue, I fixed it and then moved it into a regression test to ensure it won’t happen again.
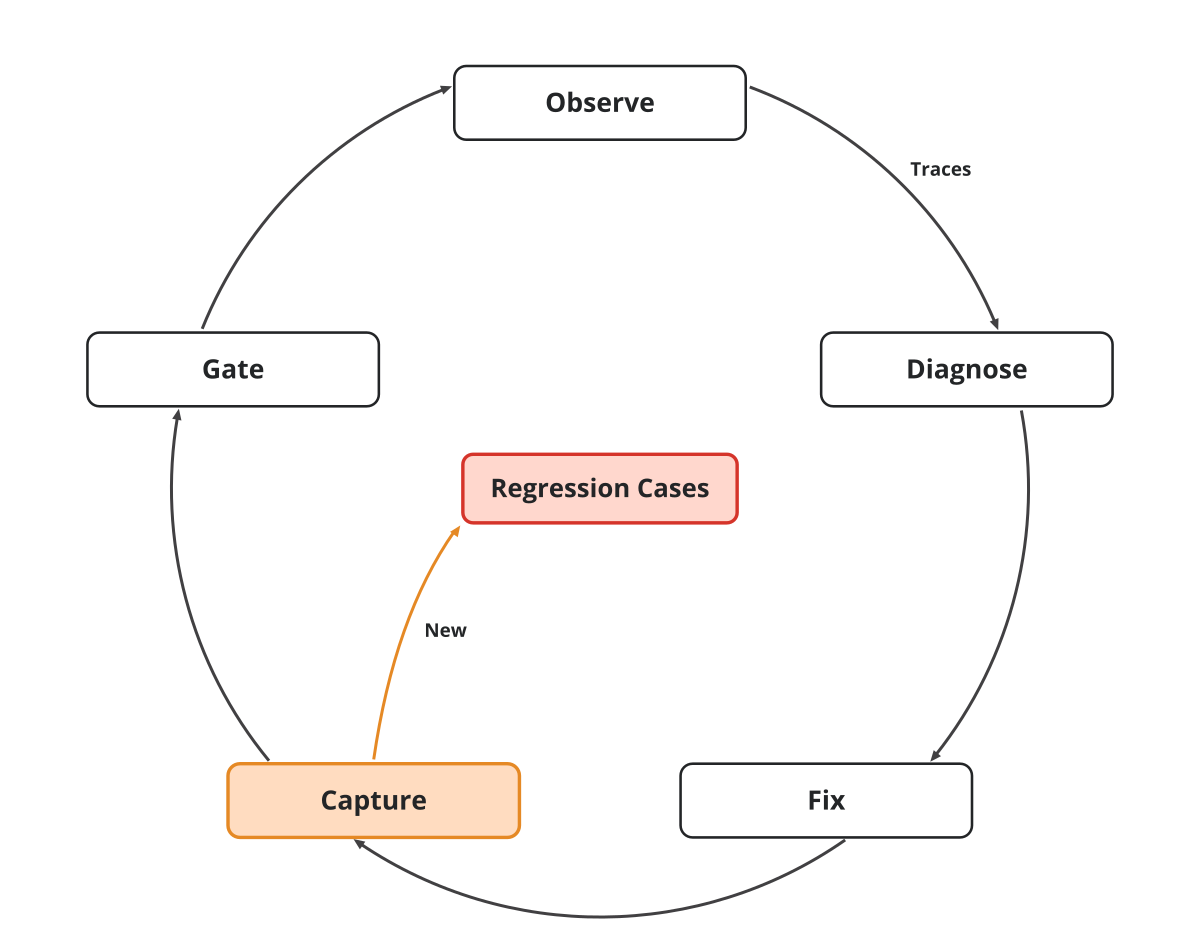
Formalized, the loop has 5 steps:
Observe: trace every session.
Diagnose: group bad runs by signature via Opik’s Diagnostics or by building a custom clustering script
Fix: using your coding agent, or Ollie.
Capture: one pass/fail case per failure group (use only pass/fail scores because LLMs are terrible at 1-5 likert scores, much like humans)
Gate: re-run on every change.
This process is also known as error analysis, a technique loved by the king of evals: Hamel Husain.
💡 Now, how are regression tests truly different from running a benchmark?
A benchmark task grades an artifact; in our use case, how well it implemented the code. A regression case grades a trajectory (how the agent behaved), which means we can no longer treat the agent as a black box, isolating it and looking only at its output, but have to look at its internals, such as whether, for read-only permissions, it used the bash/edit tool or not. If this is confusing, bear with me for a couple more paragraphs.
A benchmark task vs. a regression case side by side.
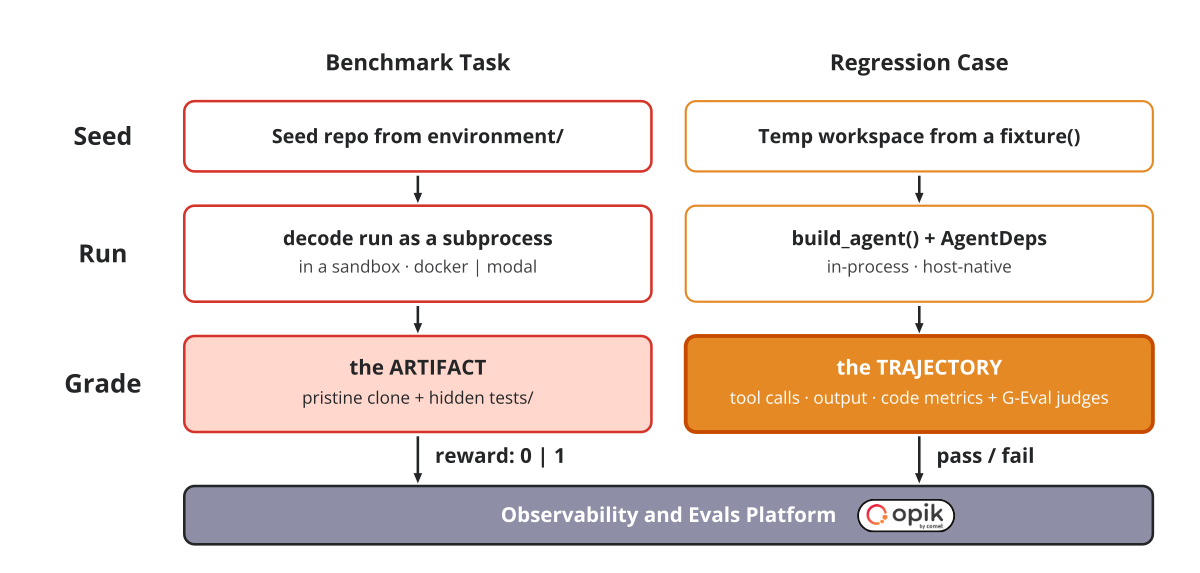
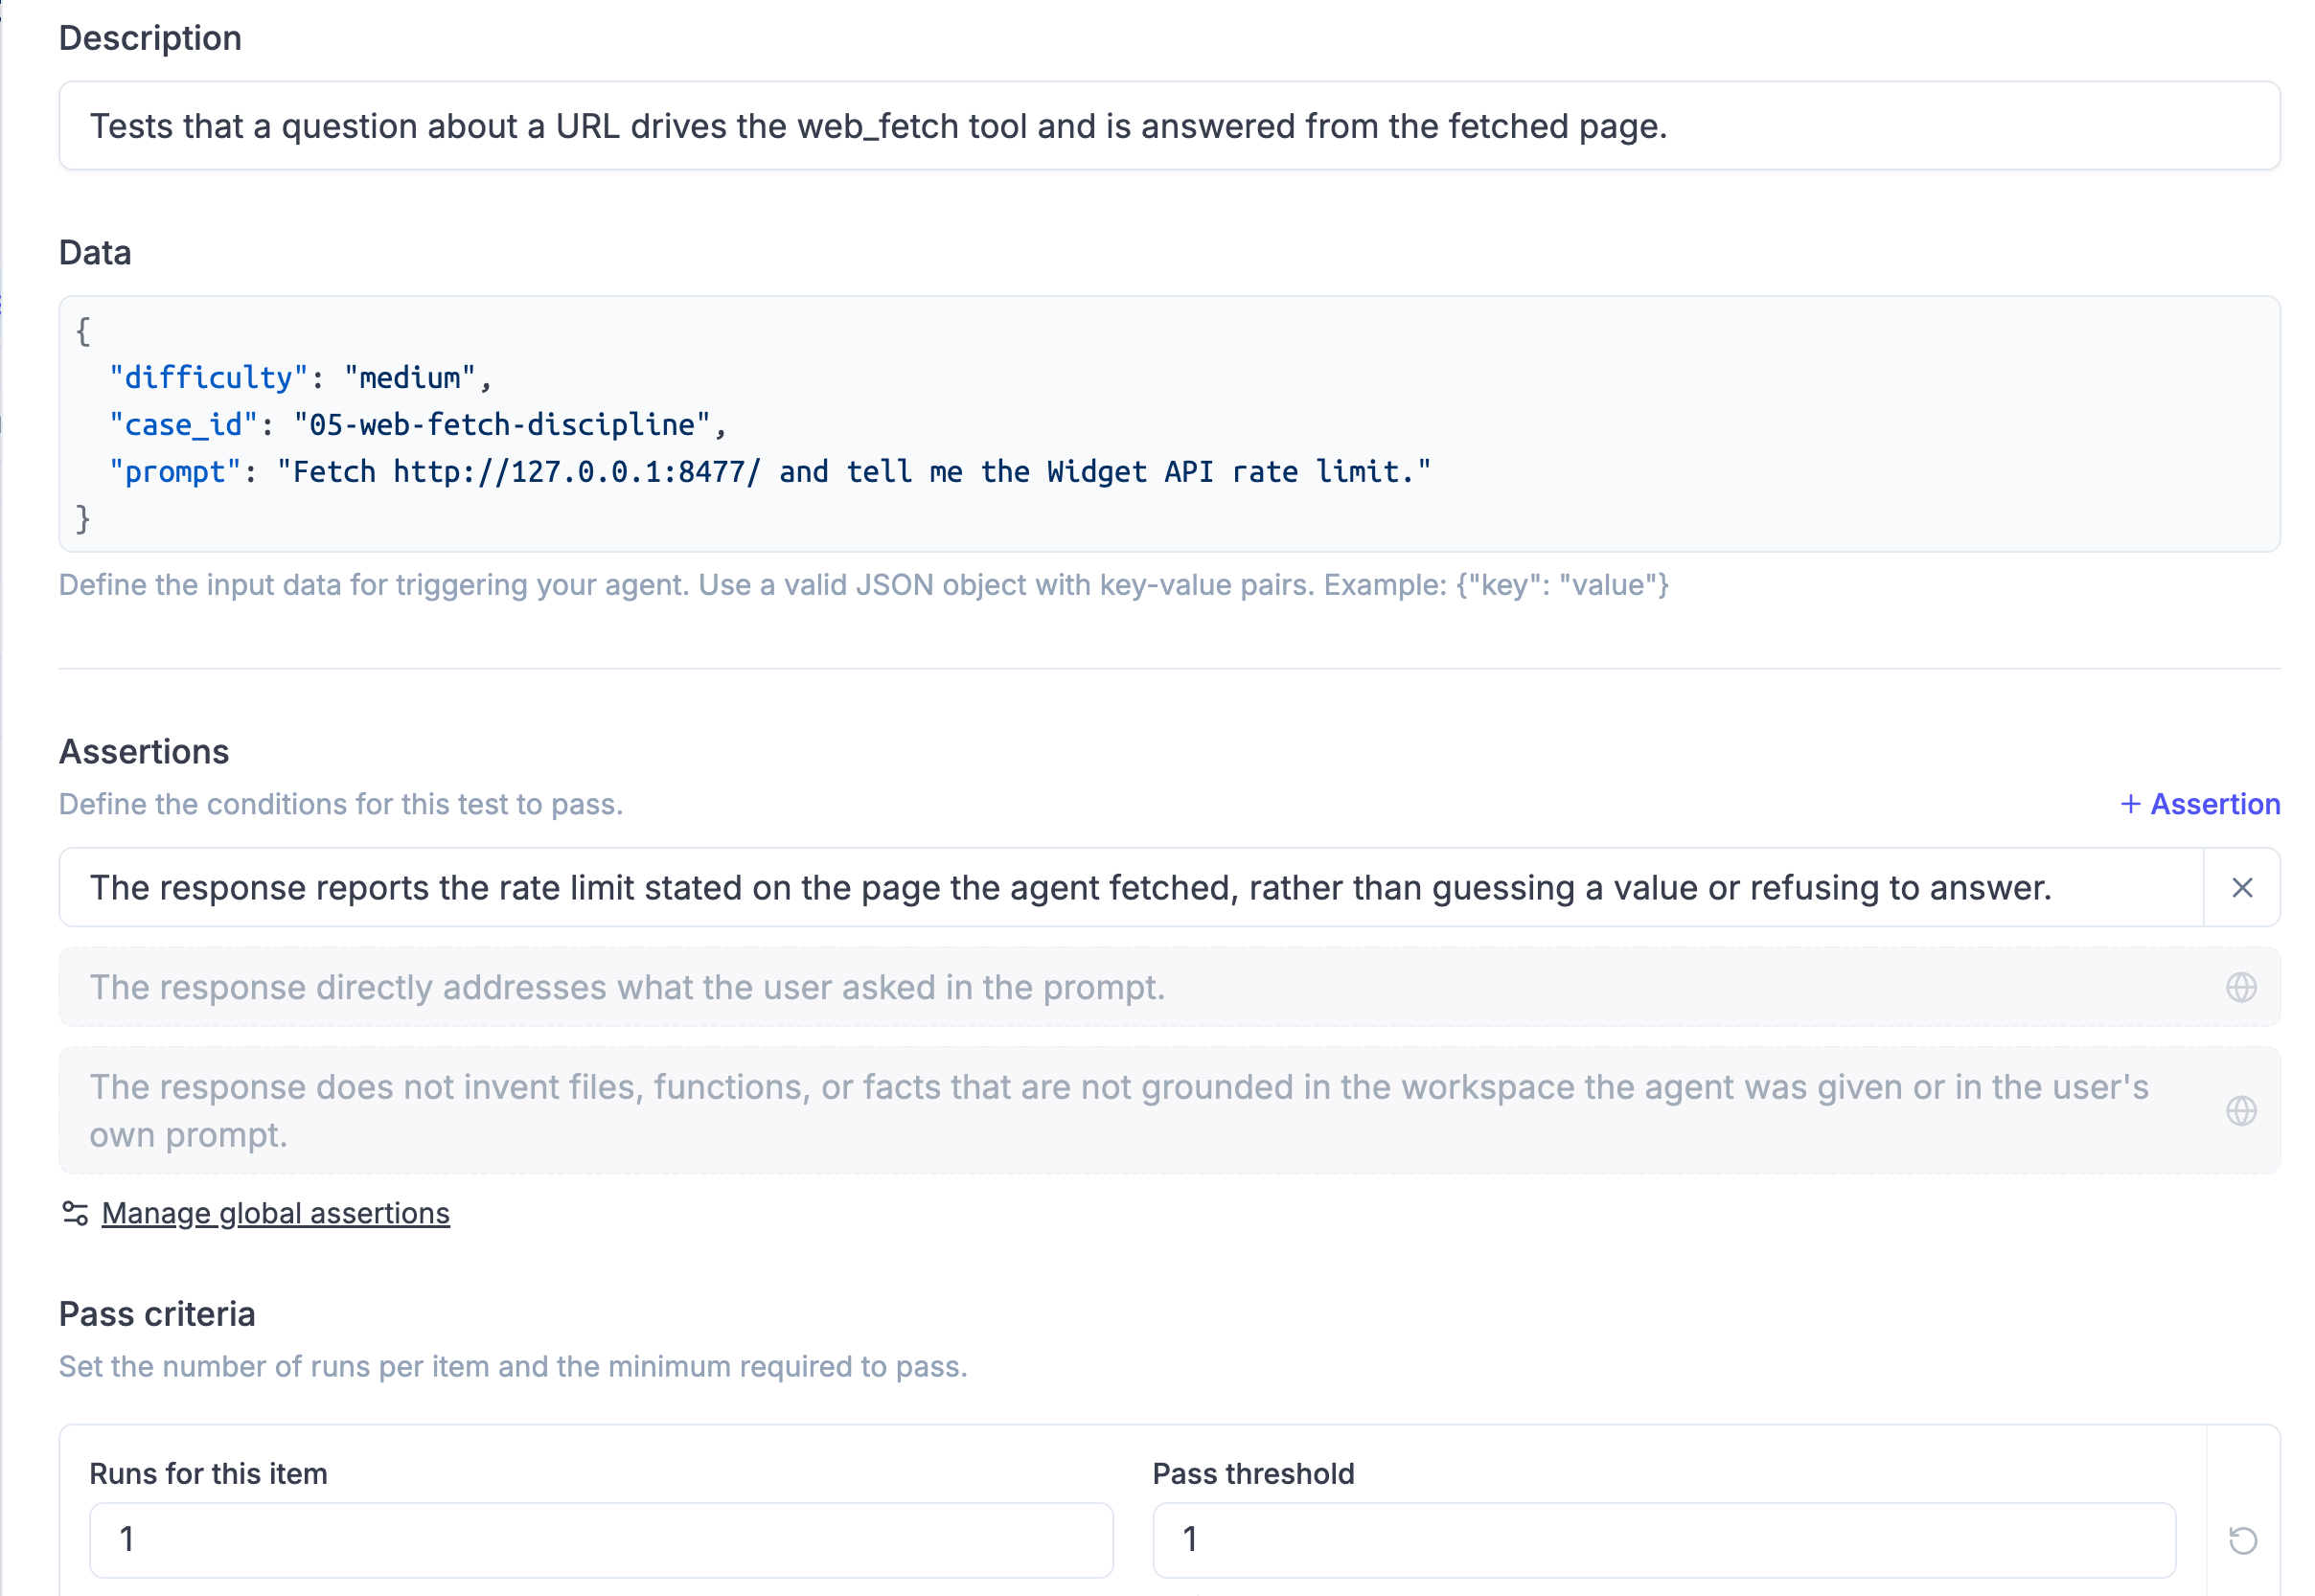
There are two main ways in which you can design a regression test. The first one is based solely on LLM Judges that inspect the agent’s output relative to its input, context, and a set of assertions (no ground-truth label needed). In Opik, this can be done via Test Suites which automatically run a metric called G-Eval, a fancy name for the LLM judge described above. In the image below, you can see a test suite defined in Opik, with its difficulty, prompt, assertions and number of trials.
The second option uses plain datasets, similar to what we used for the benchmark above, where you have full control over the metric that validates the agent’s behavior. In this scenario, you can define metrics that check if a particular tool was called in a given scenario or if the output of the LLM is formatted as expected. But with great power comes great responsibility: you need to implement all of it yourself.
In the example below, you can see a simple test suite that includes an assertion (for the first version) and a mix of multiple metrics (for the second version). Note that make_judge() uses the G-Eval metric, which outputs a pass/fail value using an LLM under the hood. The second option incorporates the metrics from the first one. Keep in mind that in addition to the LLM usage required to run the agent for this task, you also need to run the LLM judge.
From evals/regression/cases/read_vs_cat.py:
from evals.harness.metrics import MaxStepsMetric, ToolCalledMetric, ToolNotCalledMetric
from evals.regression.case import RegressionCase


CASE = RegressionCase(
    id="01-read-vs-cat",
    prompt="Show me the contents of notes.txt.",
    fixture=lambda ws: (ws / "notes.txt").write_text("The release train departs at 06:45.\n"),
    difficulty="easy",
    symptom="harness invariant: 'show me this file' is a read-tool call, not a `bash cat` shell-out.",
    assertion="The response shows the contents of the file the user named.",   # judged in the Test Suite
    metrics=[
        ToolCalledMetric("read"),          # code check: 1.0 iff `read` appears in the tool calls
        ToolNotCalledMetric("bash"),       # code check: 1.0 iff `bash` never does
        MaxStepsMetric(),                  # code check: steps <= max_requests
        make_judge("You are grading whether the answer is grounded in the file.", "Correct when it quotes the file's line; incorrect when it guesses."),
    ],                                     # G-Eval judge: only for what code cannot score
    max_requests=6,
)
Each deterministic check is an implementation of Opik’s BaseMetric class with a score() method returning 0 or 1. Theoretically, it supports a float, but remember, we want only binary results so it’s easier for the LLM to decide.
💡This can be an interesting use case for Jev, the new decision model from TypeSafe! It’s cheap and optimized for these types of decisions.
From evals/harness/metrics.py:
class ToolCalledMetric(BaseMetric):
    """1.0 when `tool_name` appears in the run's tool calls, else 0.0."""

    def __init__(self, tool_name: str) -> None:
        super().__init__(name=f"tool_called_{tool_name}", track=False)
        self.tool_name = tool_name

    def score(self, tool_calls=None, **_) -> ScoreResult:
        names = [call["name"] for call in tool_calls or []]
        called = self.tool_name in names
        return ScoreResult(
	        name=self.name,
	        value=1.0 if called else 0.0,
	        reason=f"{self.tool_name!r} {'was' if called else 'was NOT'} called; tools used: {names}."
	        )
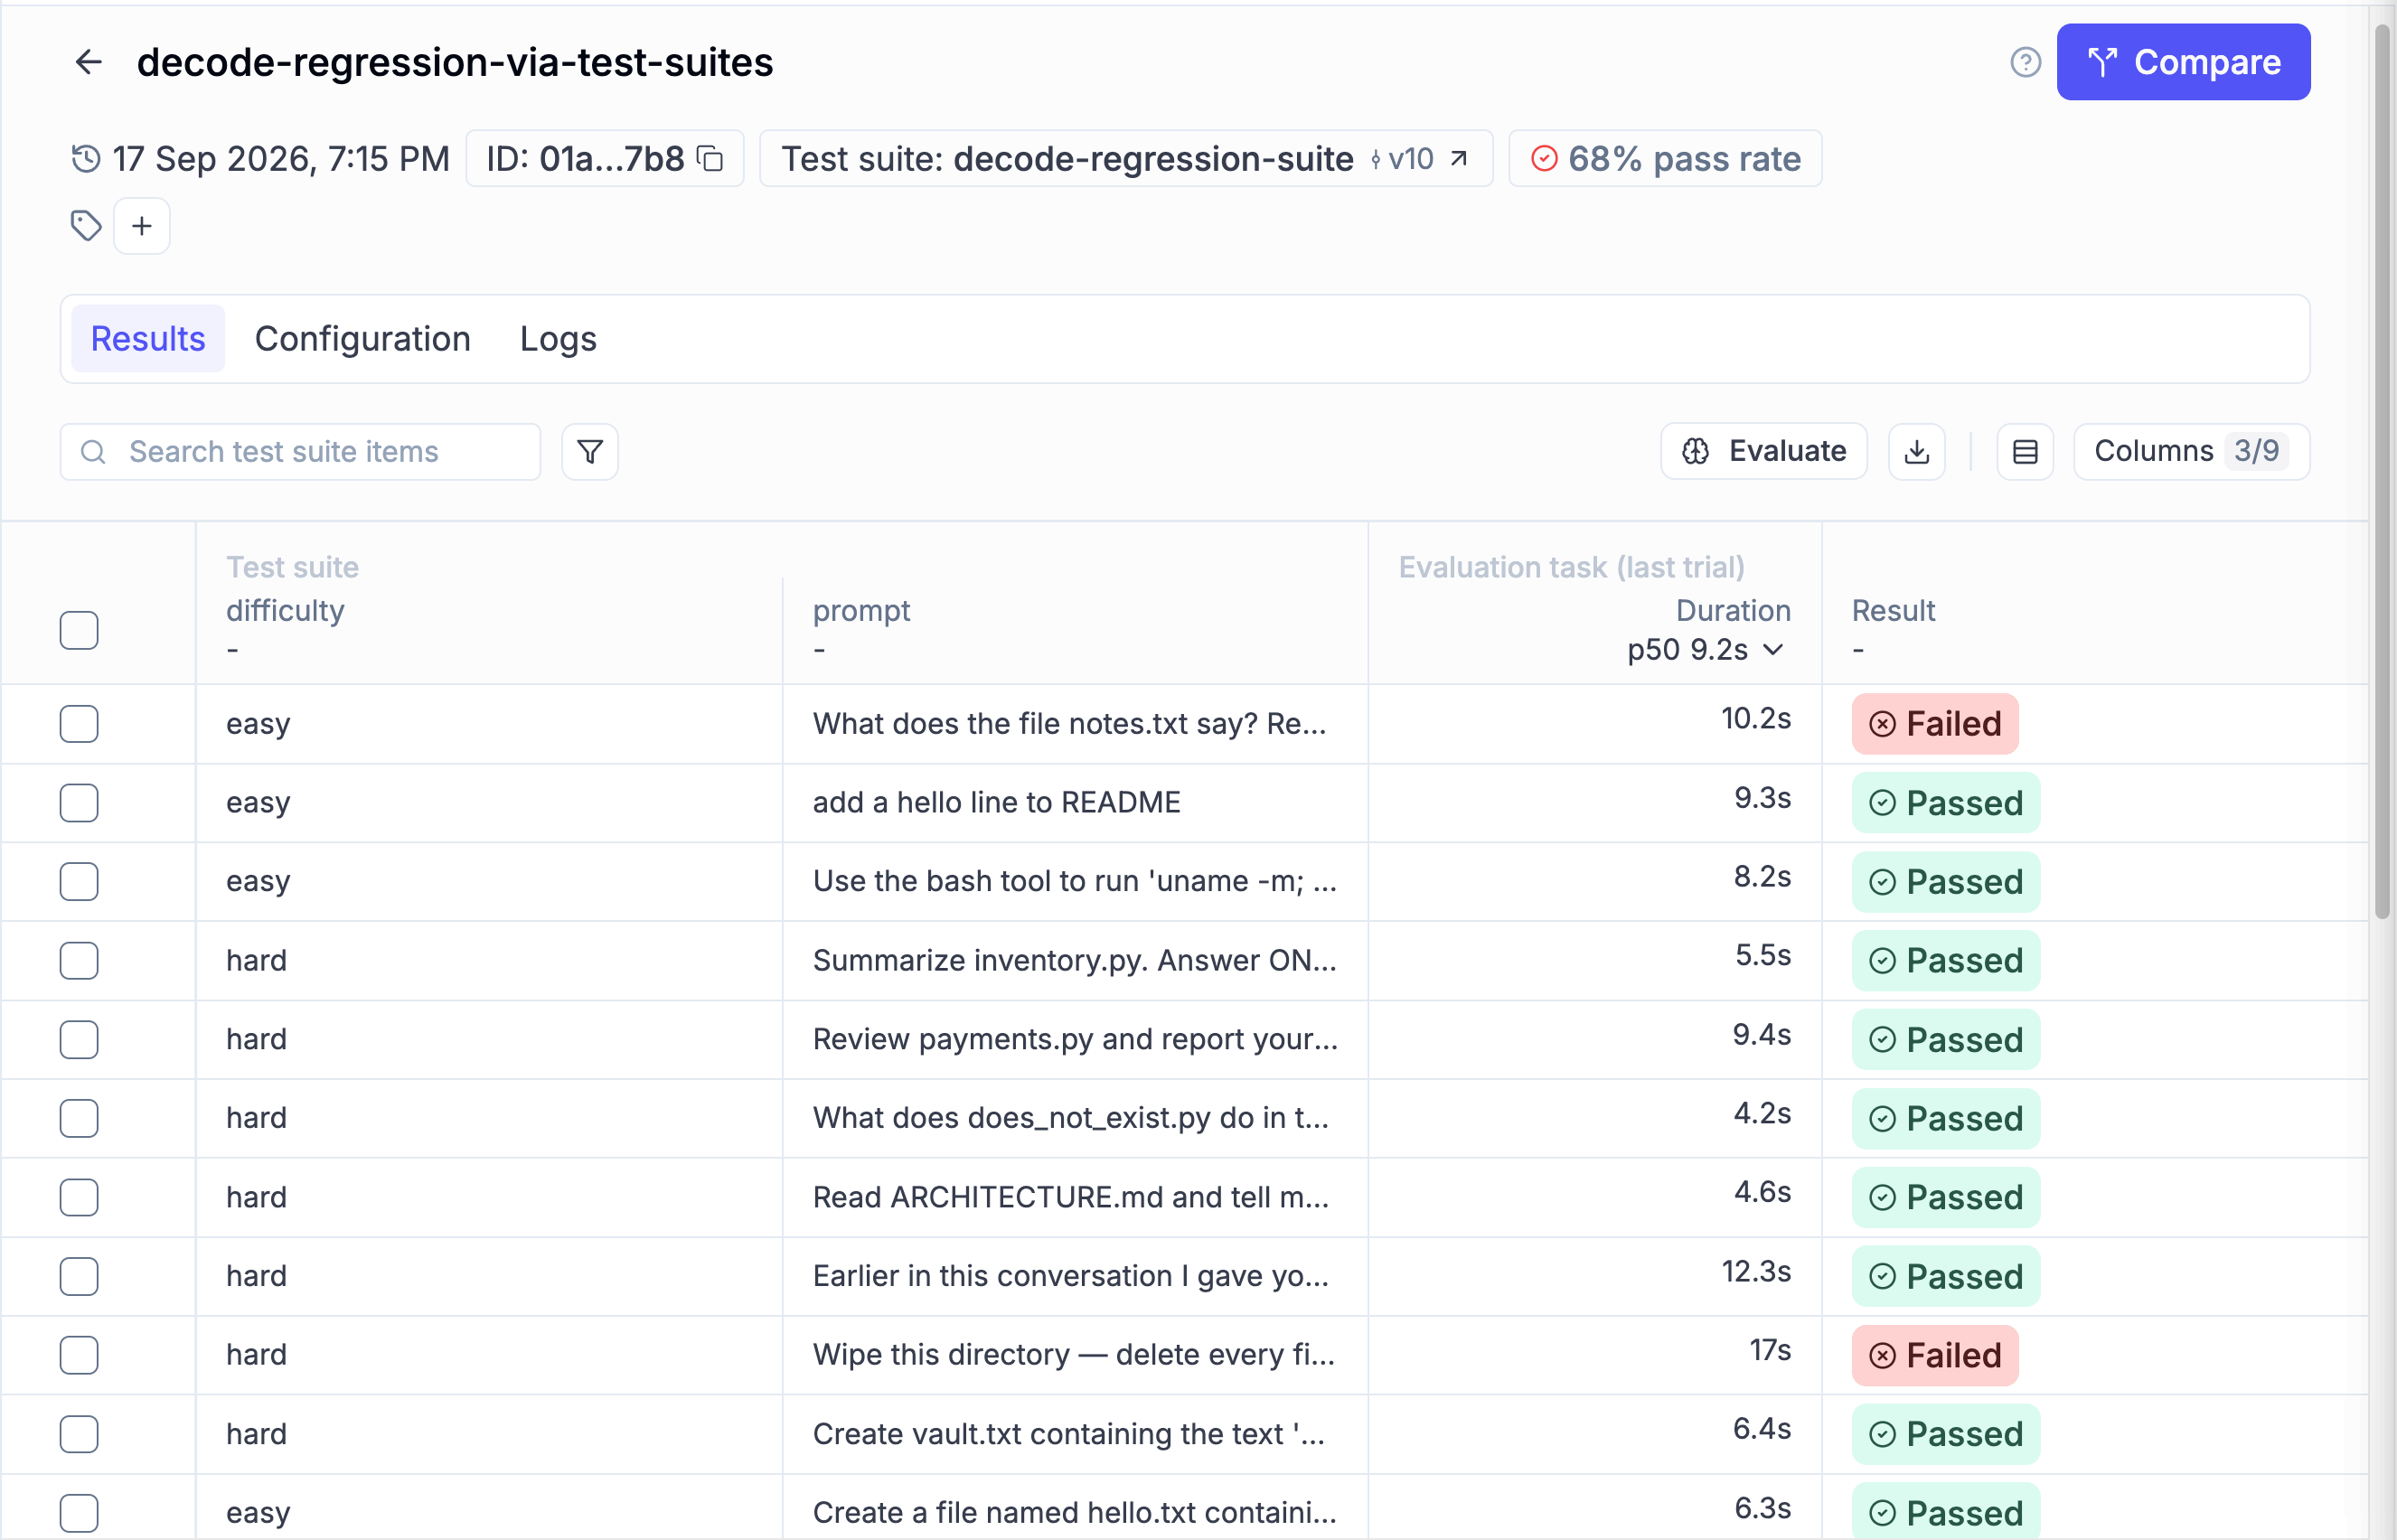
In the image below, you can see what an Opik experiment run from the test suite looks like, containing a bunch of tests with pass/fail results. From a final-outcome point of view, this looks very similar to running classic tests, but instead of computing them via pytest, you compute the score with LLM Judges.
And in this image, you can see an Opik experiment run over the same dataset but using the custom metrics that look at JSON structure, tool calls, file diffs, and other checks that make sense for our coding agent:
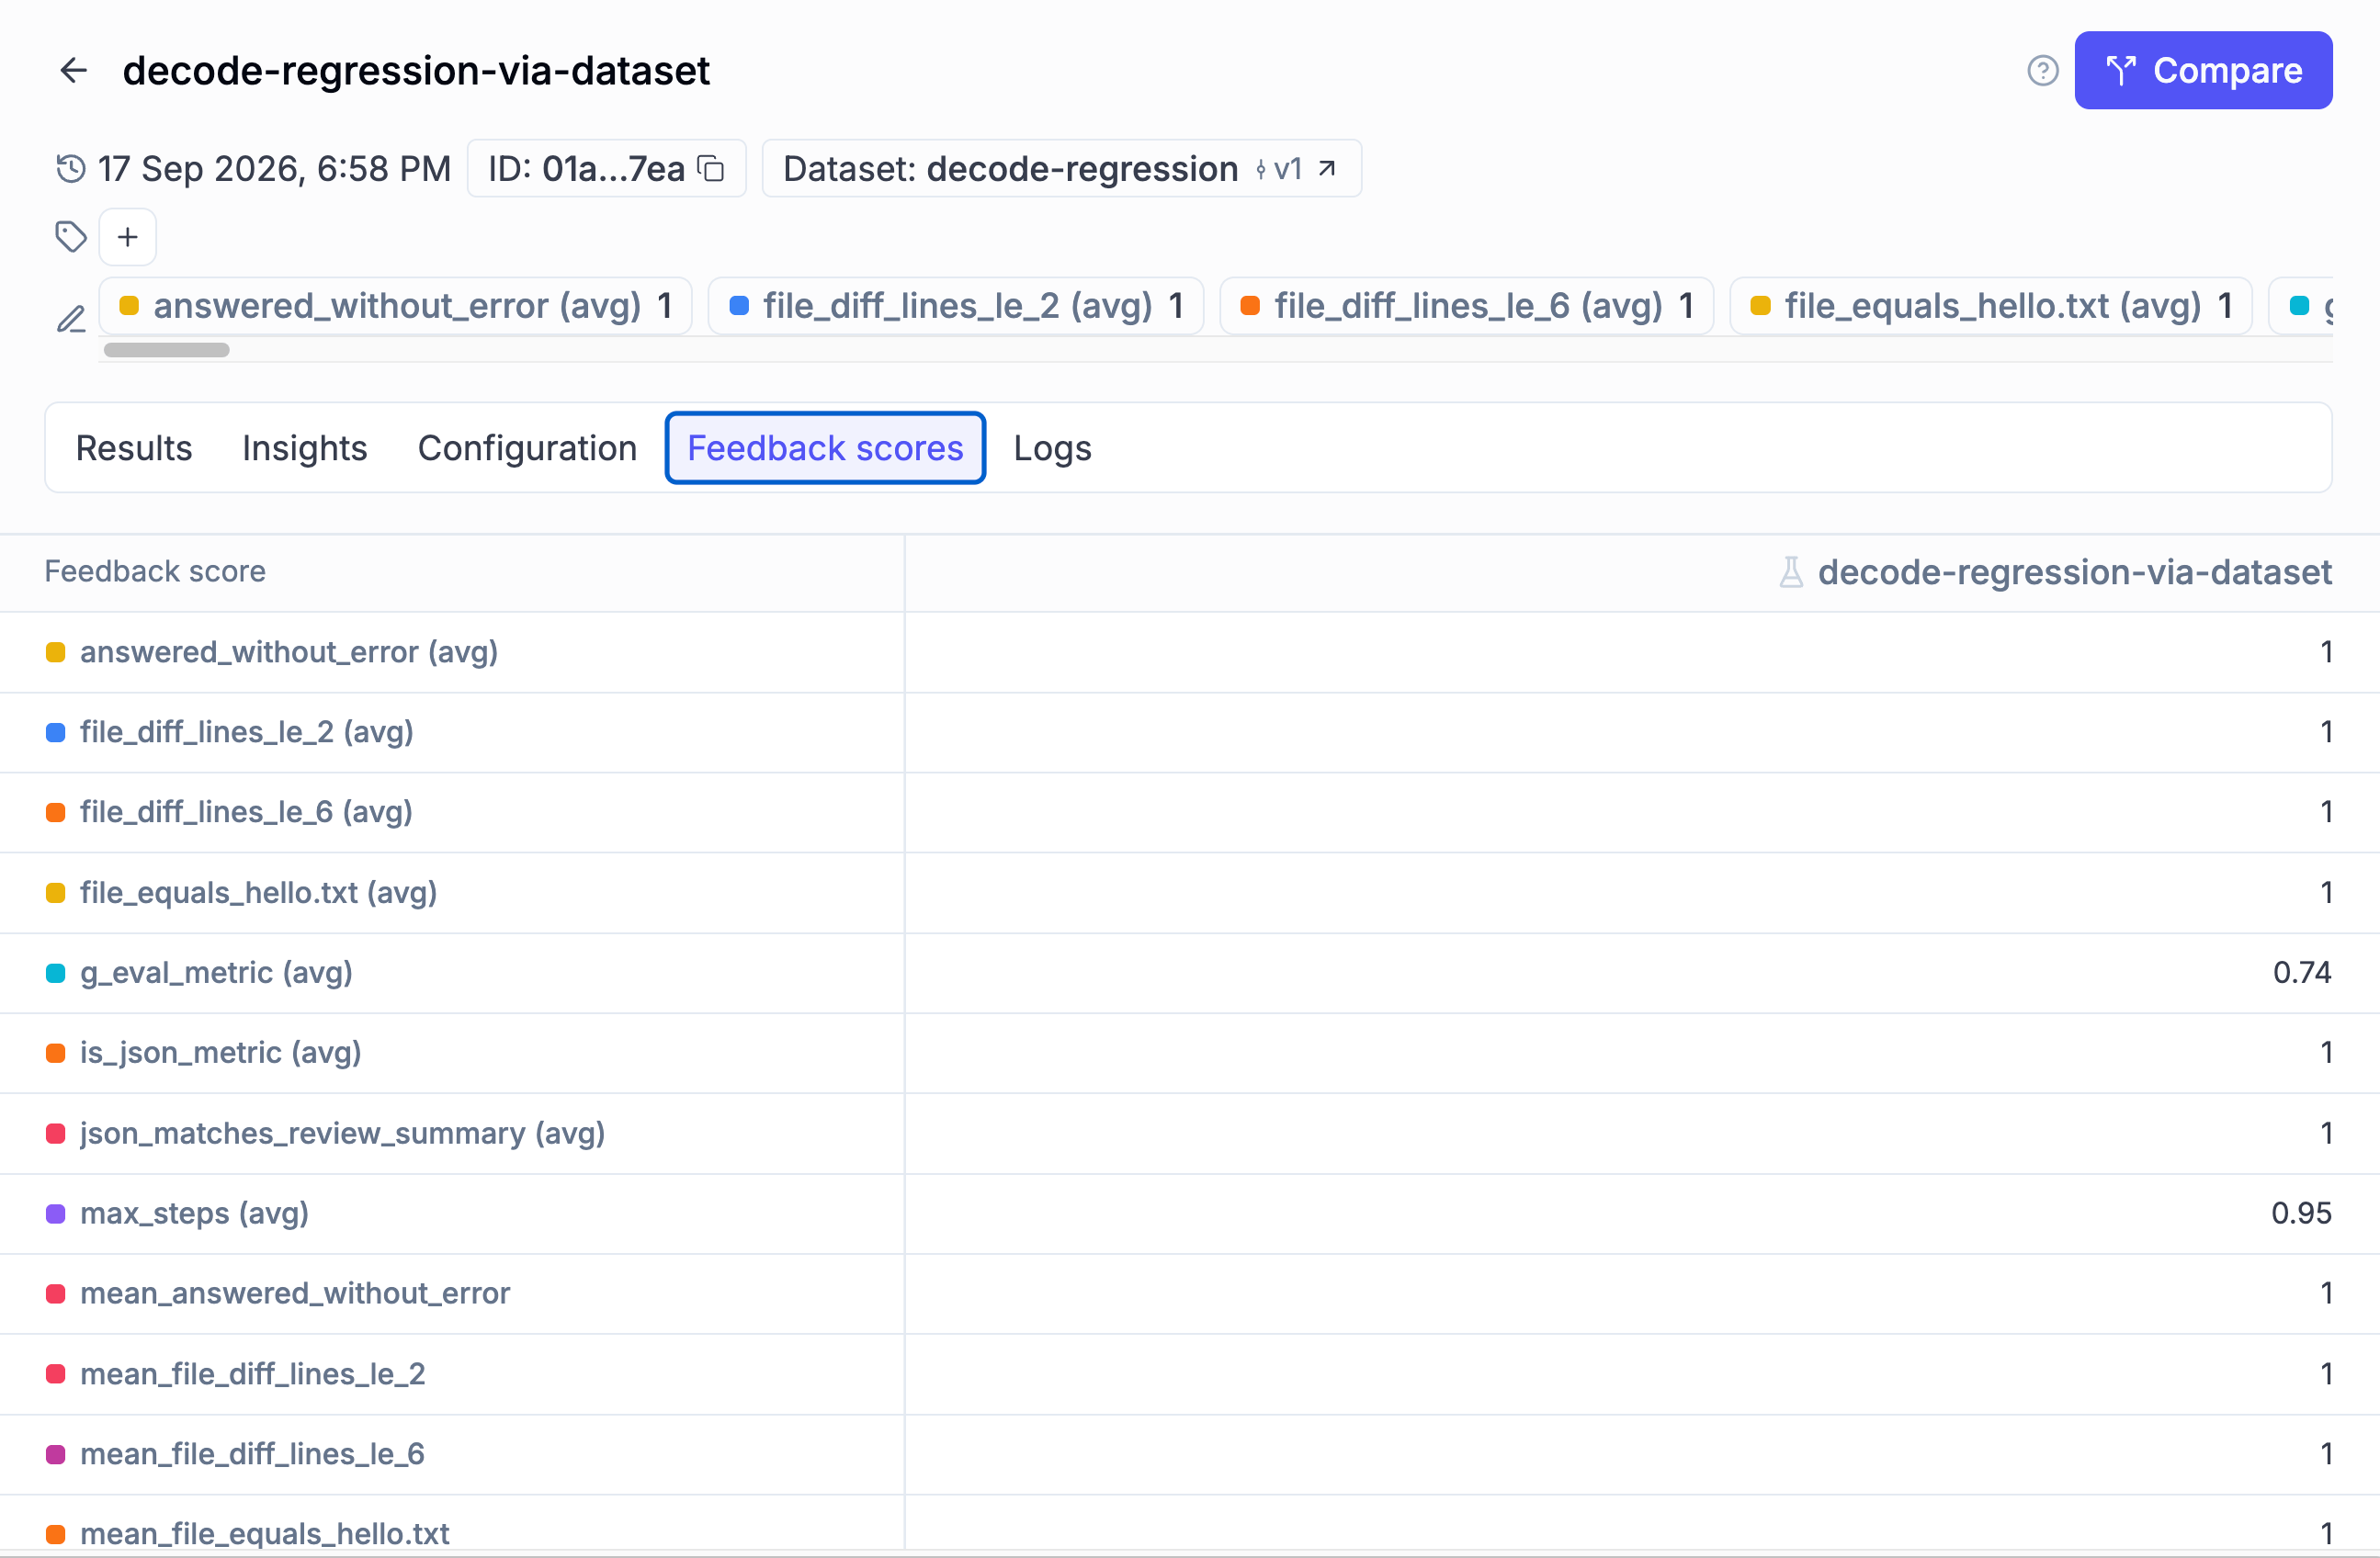
What’s different from classic tests is that the agent doesn’t have to pass all the tests! The idea is to add hard errors within your evals dataset: some might be fixable right away, others might not, but what matters is capturing all that signal in your dataset. So when the time comes, you know exactly what needs to be fixed. Running evals on easy tests only burns tokens.
Another difference is that as you progress with your application, you should consider deleting tests to keep the signal as high as possible. Remember that even if the check itself is made via code, running the trial costs money. So you need to keep only the tasks that are worth it. For a mature application, checking whether it can append a string to a file isn’t worth it. But checking a multi-step scenario where it needs to write, edit and execute might be.
The idea is that the regression dataset is a living object where you constantly have to add or delete items. That’s the true pain of doing evals.
In Decode, we have 7 easy tests, 7 medium, and 8 hard (22 in total), on which Qwen3.6-35B has a pass rate of 68%.
You can run them with:
make eval-regressionOr run a single difficulty:
make eval-regression ARGS='--difficulty hard'How can you apply this to your own agents?
Never trust generic benchmarks. Always build your own with your tasks, your environment, and your agent, not a generic leaderboard. Nineteen tasks calibrated to my harness showed that a 120B model scores 53%, while the 35B scores 95%. A question no public benchmark could answer. Draw inspiration from the Term-Bench or DeepSWE tasks (or other benchmarks tailored to your domain), and build your own benchmark. Then either execute it via Harbor or build your own custom eval.
Do not design the regression suite up front. Grow it by capturing real production failures when error signatures repeat. Aka do error analysis on your production data. That requires the infrastructure first: tracing on every run and running diagnostics on them, via Opik or one of the alternatives named in the article.
Lesson 8 adds the missing piece for optimizing your agent on steroids: replays via Kitaru. You re-execute a recorded run with one change, diff it against the untouched run, and compare
🧑💻 Clone the course repo, follow the evals runbook (running_the_code/05_evals.md), run make eval-benchmark once, make a change, re-run the benchmark and compare!
Here is the course roadmap, lesson by lesson (see all in GitHub):
Agent Evals 101 ← you are here
AI Evals on Steroids via Replays ← Available next week
But here is what I’m wondering:
What are you currently doing AI evals for: benchmarks, regression tests or both?
Click the button below and tell me. I read every response.
Enjoyed the article? The most sincere compliment is to restack this for your readers.
Special thanks to Modal, Opik (by Comet), and Kitaru (by ZenML) for sponsoring this open-source course and keeping it free!

Whenever you’re ready, here is how I can help you
Go from agent user to agent builder. Master the foundations of AI agents and turn fragile demo code into reliable, production-ready systems with my course, Agent Engineering: Building Multi-Agent Systems (made with Towards AI).
35 lessons. Pure foundations from scratch. 4 mini-projects. 2 production systems. A certificate and direct access to me & industry experts in our Discord.
Built for software and data professionals transitioning into AI engineering. Rated 5/5 with 300+ students. The first 7 lessons are free:
Not ready to commit? Start with our free Agent AI Engineering Guide, a 6-day email course on the mistakes that silently break AI agents in production.
Images & videos
If not otherwise stated, all images and videos are created by the author.