


In LangChain’s Terminal-Bench experiment, changing only the harness (with the same model) moved a coding agent from ~30th place into the top 5: the harness, not the model, is what makes a coding agent good.
In the open-source course Building a Coding Agent From Scratch, you’ll build that harness from scratch in Python: Decode, a complete coding agent that grows lesson by lesson from a bare agent loop into a swarm of remote agents running in parallel in the cloud.
Why? You’ll be able to engineer custom harnesses for your own AI products (the skill behind that leaderboard jump), and you’ll understand what Claude Code and Codex actually do under the hood, turning you into a power user.
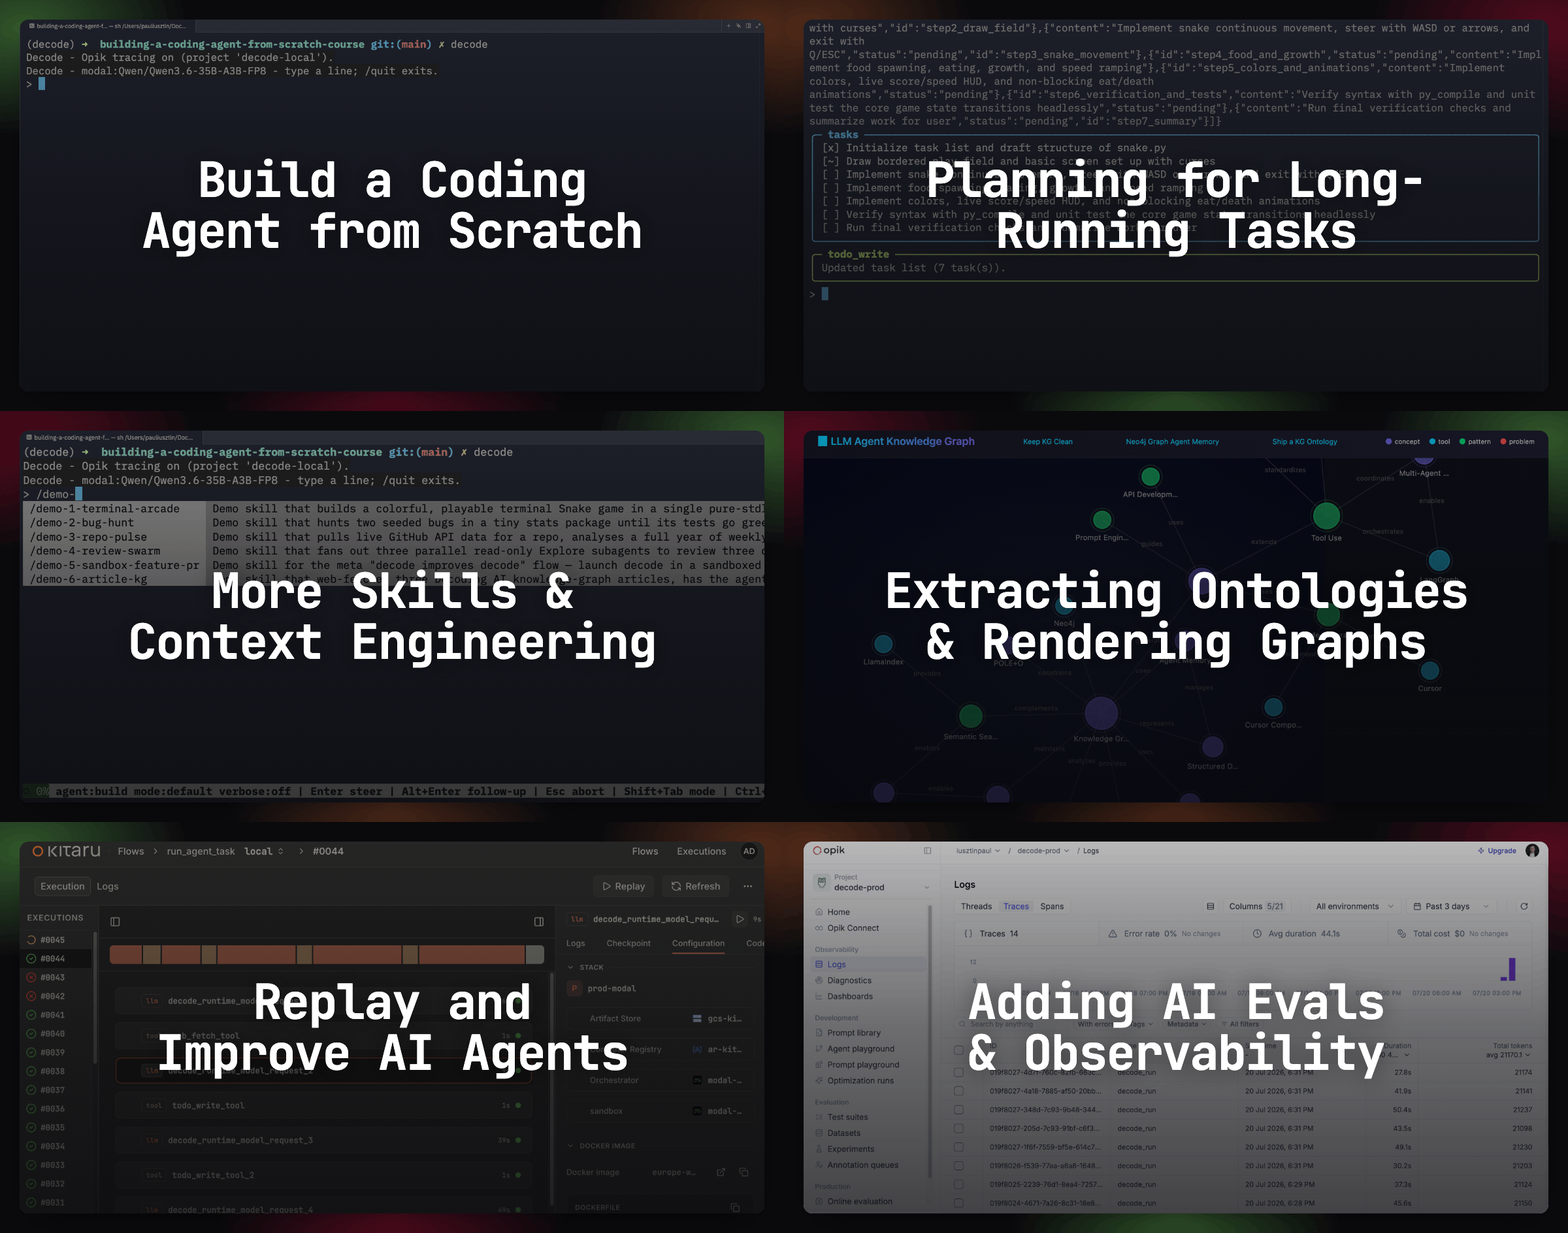
Lessons:
The Bare-Bones Coding Agent Loop ← you are here
Special thanks to Modal, Opik (by Comet), and Kitaru (by ZenML) for sponsoring this open-source course and keeping it free!
Lesson 2: The Bare-Bones Coding Agent Loop

When I first tried to implement the code for this course I got greedy. I tried to one-shot the harness in Python: a TUI, an agent, and a handful of tools like bash, read, write, and edit. It worked, until I started adding skills, memory, and compaction. That’s when everything started to fall apart. No “fix this “ prompt could have saved it. That’s when I realized that building a harness for a coding agent is a lot more strategic than just: “Hey, look at OpenCode’s open-source code and build a replica for me.”
So, I took a step back, deleted everything and started researching how Claude Code, OpenCode, Aider and Pi work. Only after I pinned down the whole architecture, with its components, interfaces and data flow I started to build Decode. The coding agent I will teach you how to build in this series.
In this article, lesson 2 from the open-source course Building a Coding Agent From Scratch, we will learn how to build a bare-bones coding agent from scratch. At feature parity with the popular Pi agent harness.
We will build the coding agent loop. See how the loop decomposes a goal into a plan and executes it. Understand which tools are critical for a coding agent, and which ones are nice to have. Build a TUI. See why naively sending messages from the terminal to the agent can corrupt the loop. For the full architecture of Decode, what we will build throughout this series, we recommend reading Lesson 1.
On top of that, we will plug in 3 LLM providers (Modal, OpenRouter, and Gemini) and understand when serverless computing such as Modal beats token-based APIs. Also, to easily debug the agent, we will integrate trace monitoring via Opik.
Example of running Decode (our coding agent) powered by Qwen 3.6 35B:
Let’s start with an end-to-end walkthrough of the coding agent harness.
One Turn, End to End
Our expectations from Decode’s coding agent loop are similar to any other coding agent you’re already used to: Claude Code, Codex, Pi, OpenCode, etc. You open it in a repository or any other folder, give it a goal, and let it loop until it completes the goal.
In our .decode/skills/demo-6-article-kg demo, managed as a skill, we ask Decode to pull data from multiple sources, extract key entities and concepts and render a KG in HTML.
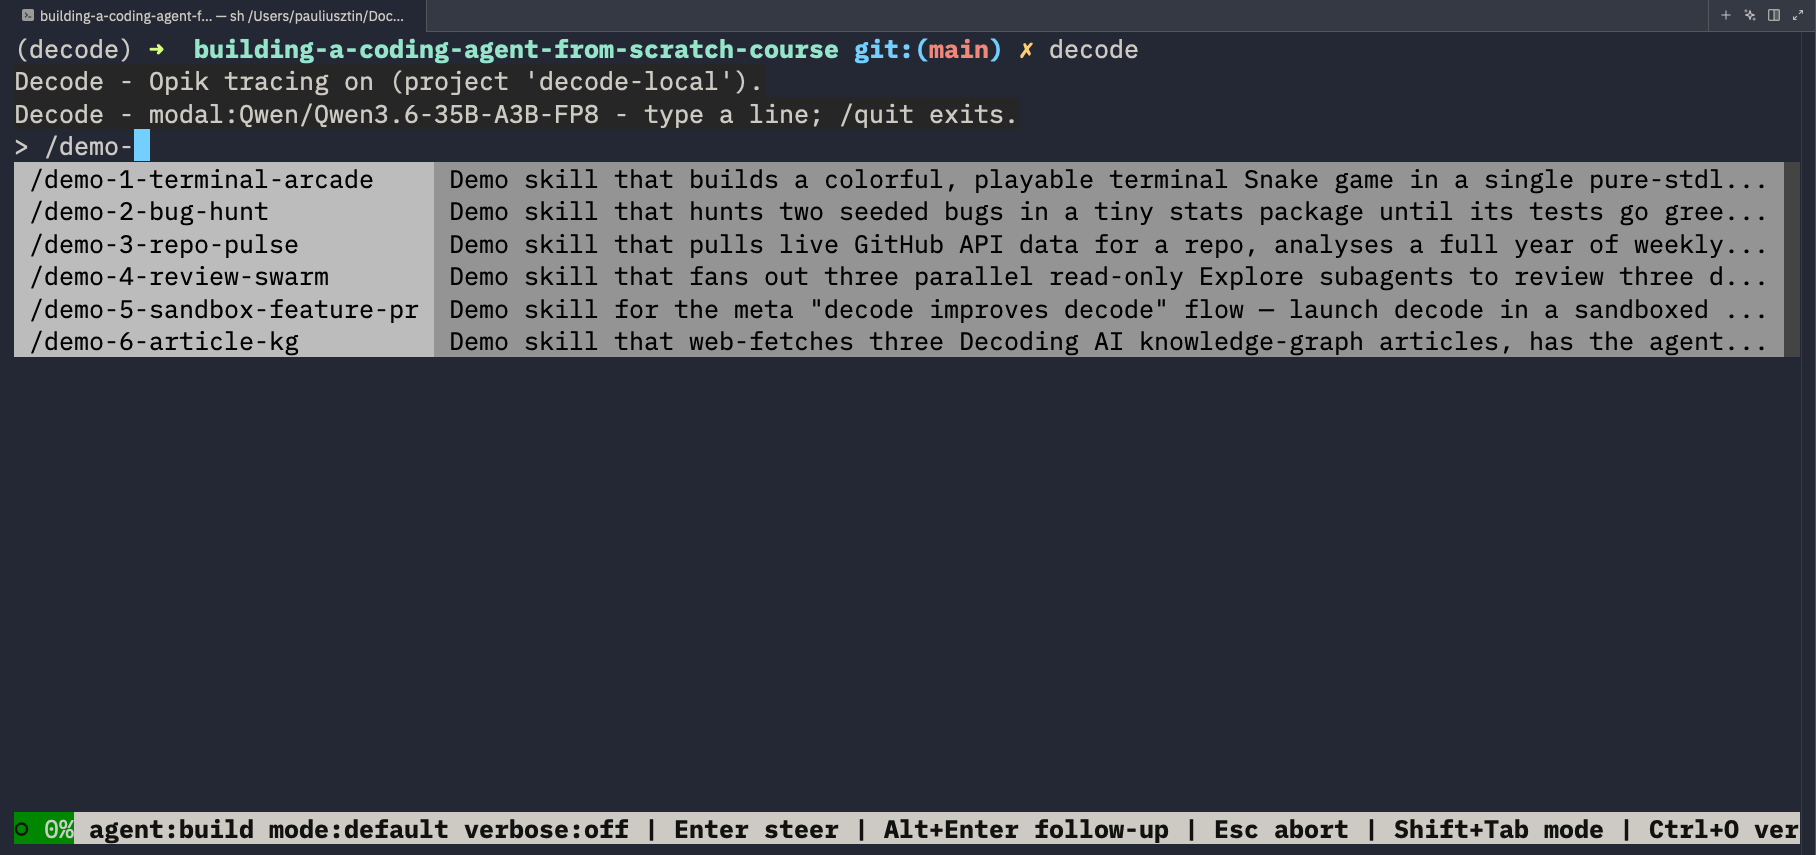
The agent kept looping until we got the graph below. Pretty cool, right?
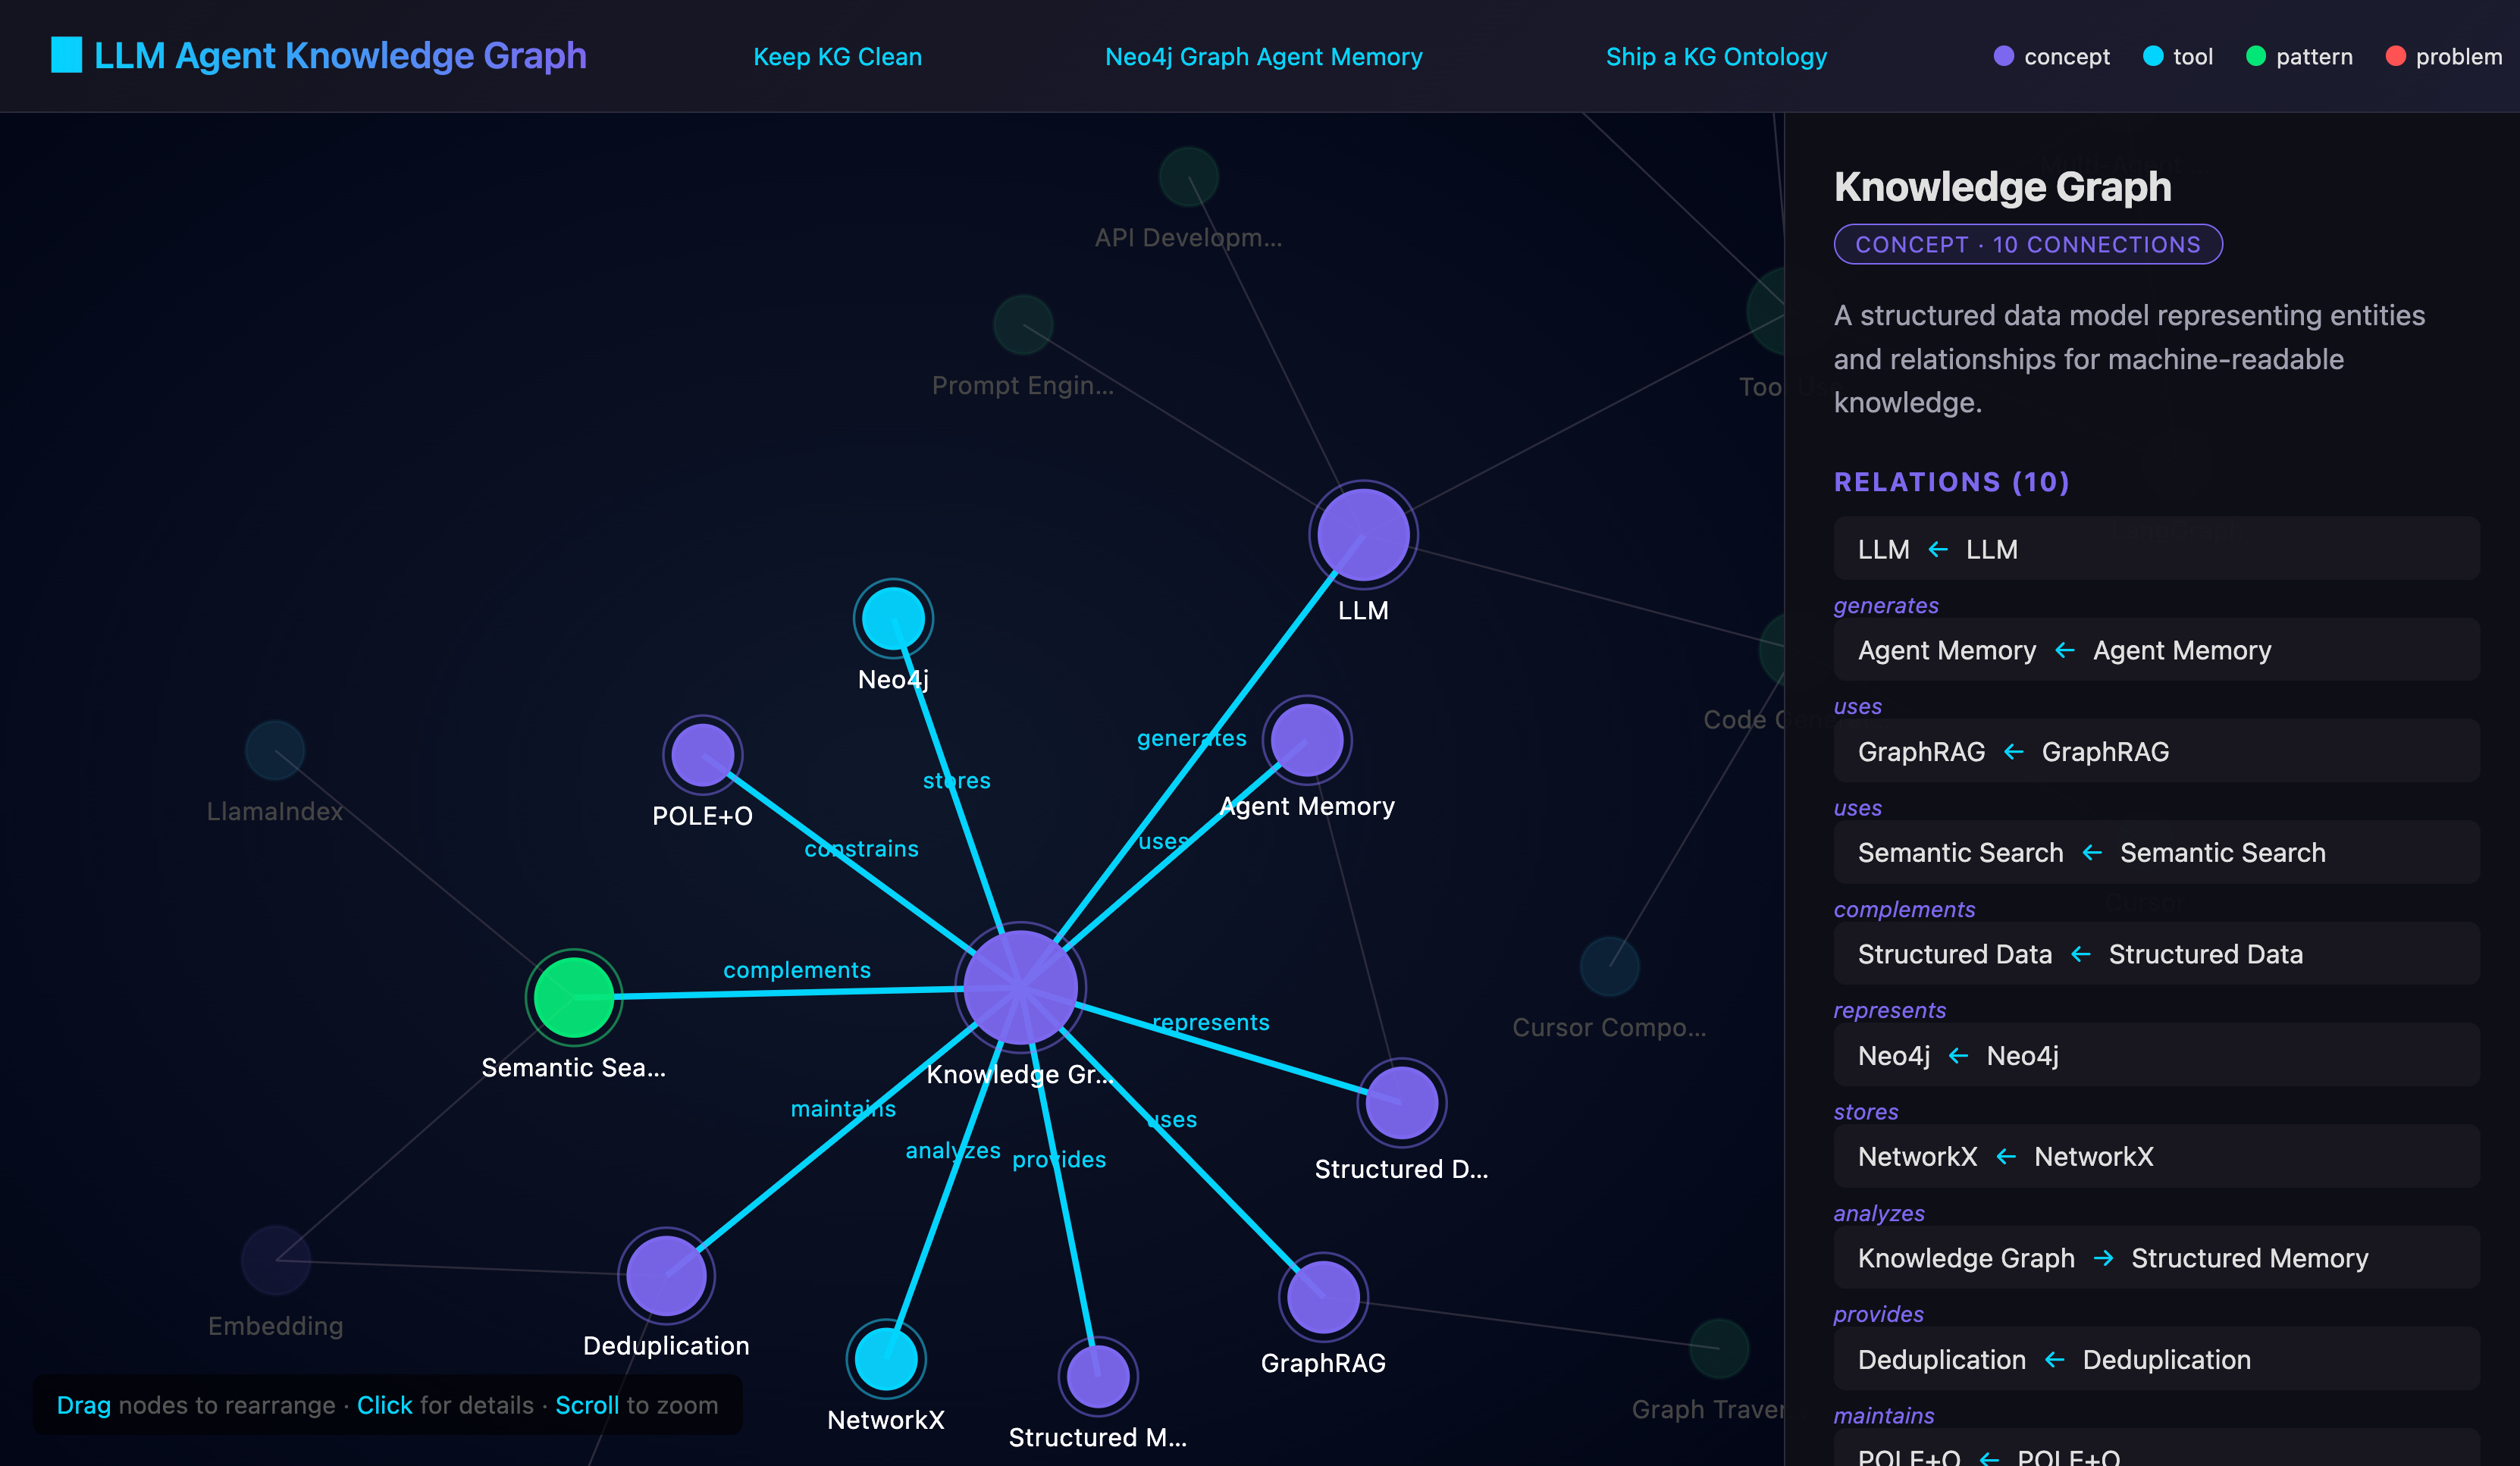
This is a great example where the agent had to break a goal into multiple steps and execute each one independently until the goal is reached.
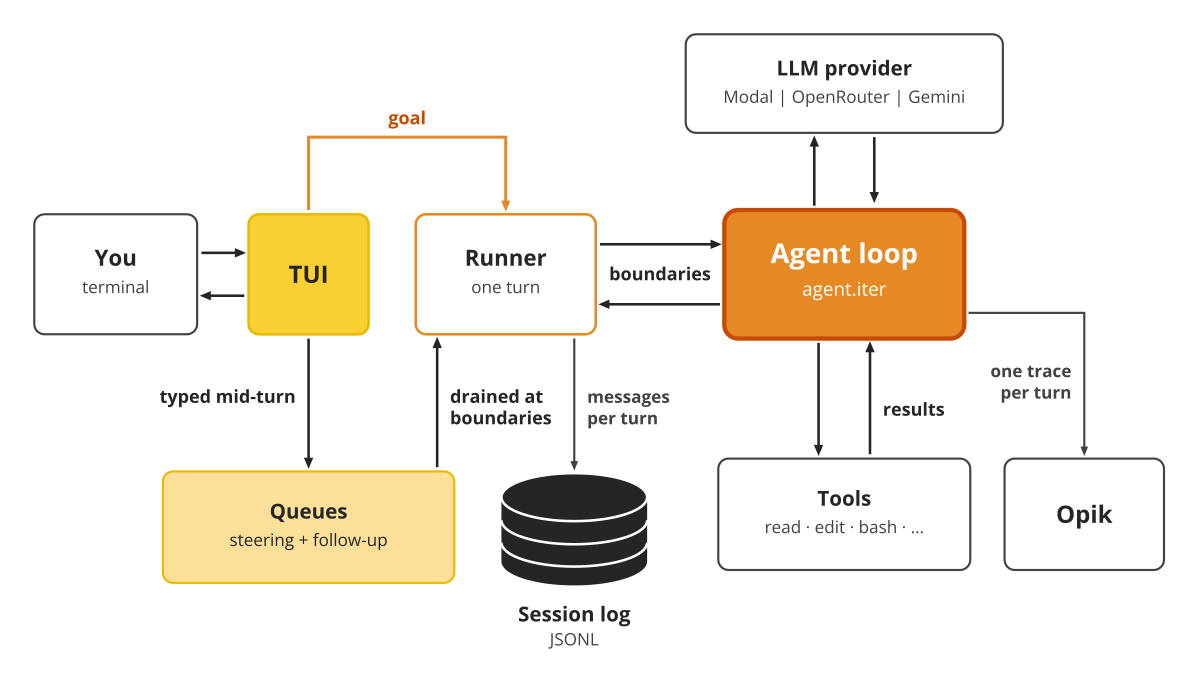
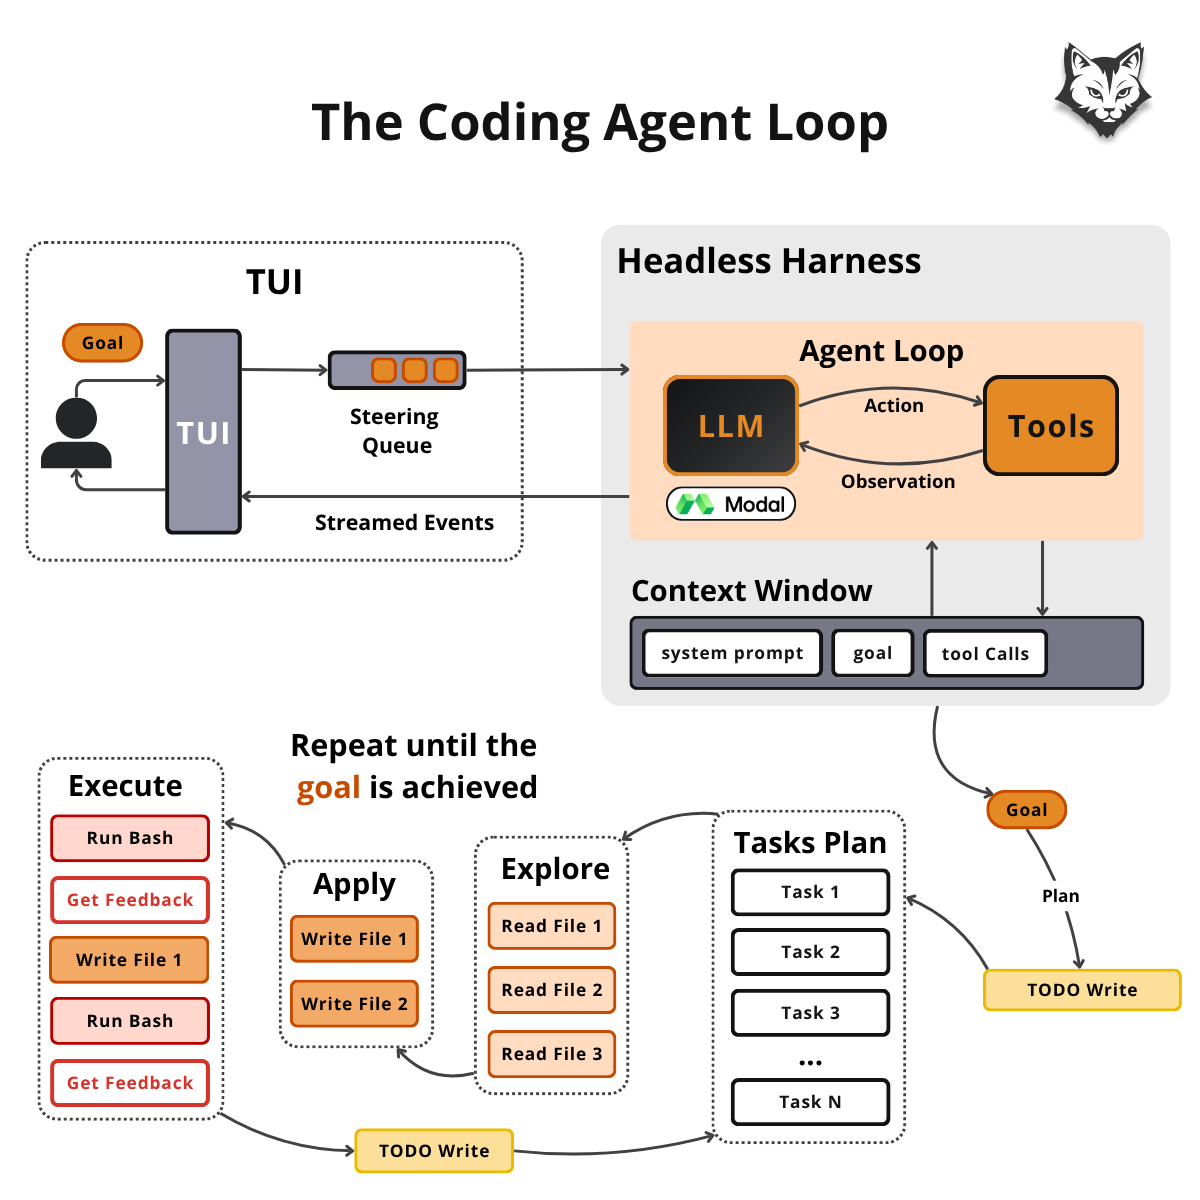
More concretely, this is the agent’s whole lifecycle: plan → explore → apply → execute → observe → next task, repeated until the goal is met.
Everything starts with you typing your goal into the TUI and pressing Enter. The request goes into the steering queue and then into a fresh turn, and the loop sends the prompt and tools to the model, a Qwen3.6 served on Modal. It kicks off planning. Via todo_write it records 4 tasks (fetch → extract → render → verify). Via web_fetch Decode fans out in one step and scrapes all the sources. The model reads the scraped output and extracts the KG triplets into a graph.json file via its write tool — the first call that can change your disk, so the run stops and asks. You type y. Ultimately it generates the HTML code that loads the data from the JSON files and beautifully renders it by calling the write tool to create the kg.html file. Finally, it calls todo_write to update the TODO list and mark the goal as done.
Based on our open-source GitHub, here are all the components of the agent loop that transform a simple Pydantic AI agent into the foundations of any coding agent you are using out there:
src/decode/
├── agent/          # loop.py (the agent loop), factory.py
├── harness/        # runner.py (single-flight turns), queue.py (steering/follow-up)
├── tools/          # registry.py, files.py (read/write/edit/glob/grep), bash.py, askuser.py
├── context/        # session_log.py (append-only JSONL)
├── observability/  # tracing.py (Opik via OTLP)
└── tui/            # app.py (prompt_toolkit input), render.py (Rich output)
In this course, we will mostly follow Claude Code/OpenCode’s design, where we have a larger set of tools, memory and agent features built into the harness. Mostly for educational reasons, to explore all the options out there. But there is also a beautiful, minimalist approach to this, based on the philosophy of Mario Zechner, creator of the Pi harness: strip the agent loop back to its bare bones, keeping only the essential logic, to avoid adding noise into the context window and keep everything observable and in control. If you want more features, you add them explicitly as plugins, instead of getting new “space ship” cool-but-useless features with every version. Thus, to understand both perspectives, we will keep drawing parallels to Pi’s architecture.
The Agent Loop
In Lesson 1, we said that the agent loop is the good old ReAct pattern. The model reasons, picks a tool, the harness executes it, and the observation feeds the next step — an agent is just an LLM using tools on environmental feedback in a loop.
ReAct in the abstract is reason → act → observe. Give it a set of tools it can operate on a codebase and voilà, it becomes a coding agent.
Plan: todo_write the task list before touching anything.
Explore: read, glob, grep the codebase.
Apply: write and edit, stopping for your verdict.
Execute: bash the tests, the linter.
Observe: a failure is the next observation, and the repair is another Apply → Execute pass on the same task. Tick it off, re-enter.
In Claude Code’s leaked source the core loop is ~150 lines. To emphasize the harness around the agent, we will use Pydantic AI for the “core agent” and focus on everything around it (from build_agent in src/decode/agent/factory.py):
def build_agent(*, model: str | None = None) -> Agent[AgentDeps, str | DeferredToolRequests]:
    built_model = _build_model(model=model)
    agent = Agent(
        built_model,
        deps_type=AgentDeps,                       # cwd, task store, event emitter — the harness state
        output_type=[str, DeferredToolRequests],   # a step ends in text — or pauses on approvals
        output_retries=3,                          # empty / thinking-only turns get another attempt
        tool_retries=5,                            # only resets on success — the plan-survival budget
    )
    register_tools(agent)                          # the coding tool set
    _register_instructions(agent)                  # ONE merged system prompt

    return agent
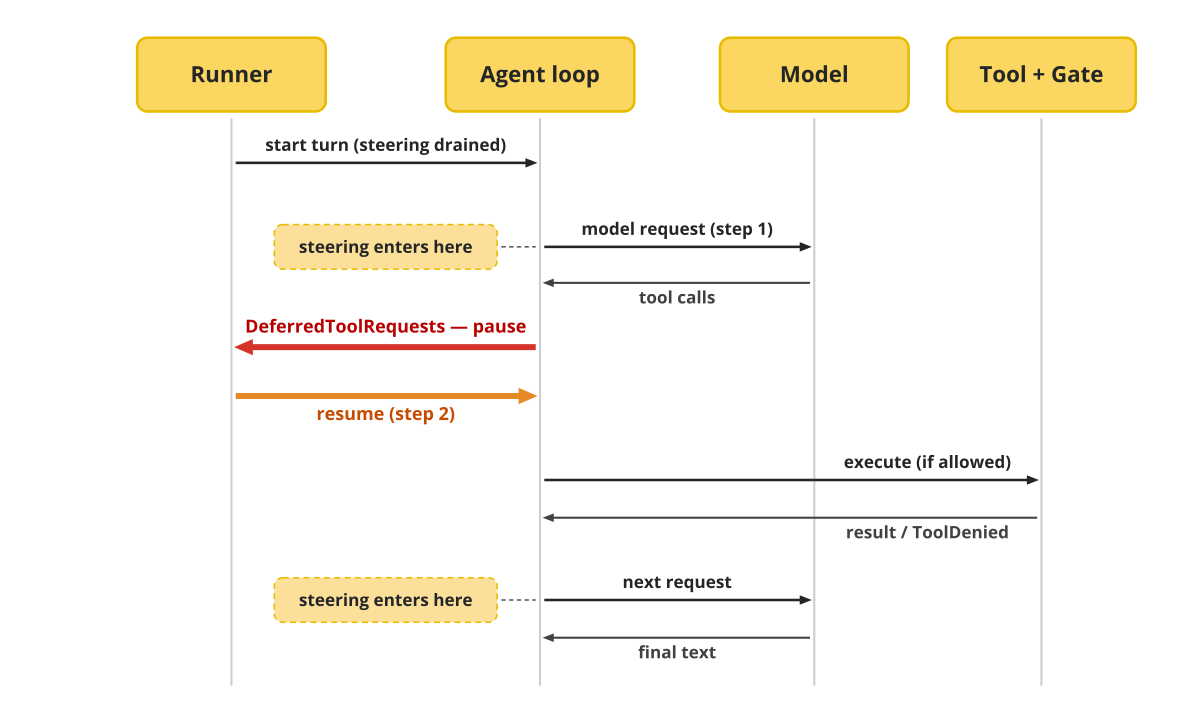
The Agent owns one step: one model request, the tool executions it triggers as “actions”, and the results it gets back as “observations”, ending in either text or DeferredToolRequests. The agent loop is operated by the AgentTurnHandler (src/decode/agent/loop.py) class chaining steps together through agent.iter.
AgentTurnHandler.__call__ is an async generator that streams tokens in real time via Python generators. It runs a while True loop with two boundaries: yield Boundary.MODEL_REQUEST and yield Boundary.WOULD_STOP. Via Boundary.MODEL_REQUEST, we can inject (steer) new messages into the loop before it finishes reaching its goals.
class AgentTurnHandler:

    ...                 # ONE instance per session; owns the turn + history

    async def __call__(self, ctx: TurnContext) -> AsyncGenerator[Boundary, list[str]]:
        while True:
            steering = yield Boundary.MODEL_REQUEST
            if pending_results is not None:
                self._append_steering(steering)
                output = await self._run_turn(ctx, deferred_results=pending_results)
                pending_results = None
            else:
                output = await self._run_turn(
                    ctx, prompt=self._compose_prompt(next_prompt, steering)
                )
            if isinstance(output, DeferredToolRequests):
                pending_results = await self._resolve_deferred(ctx, output)
                continue
            self._persist_turn()
            follow_ups = yield Boundary.WOULD_STOP
            if not follow_ups: return
            next_prompt = "\n".join(follow_ups)
The whole action happens inside the self._run_turn method, which makes the actual model call, and based on the results from the model, via the run object, it either emits answers from the model or executes a tool request.
In more detail, this is what happens:
A fresh step passes
prompt, a resumed step passesdeferred_tool_results, never both.The
async forstreams each node to the TUI as an event, so you watch tokens arrive live.The
finallycarriesrun.all_messages()forward, so a step that dies keeps everything it accomplished in memory.
class AgentTurnHandler:

    ...                         # ...same class as above

    async def _run_turn(self, ctx, *, prompt=None, deferred_results=None) -> str | DeferredToolRequests:
        async with self._agent.iter(
            prompt,
            deps=self._deps,
            message_history=self.message_history,
            deferred_tool_results=deferred_results,
        ) as run:
            try:
                async for node in run:
                    if Agent.is_model_request_node(node):
                        await self._stream_model_node(ctx, node, run)
                    elif Agent.is_call_tools_node(node):
                        await self._stream_tool_node(ctx, node, run)
            finally:
                self.message_history = run.all_messages()
                self._last_input_tokens = _leg_input_tokens(self.message_history)
        return run.result.output
💡 The loop has no max-steps knob, based on Pi’s principles: “the loop just loops until the agent says it’s done.” A cap is a guess about how many steps a task needs, and the model already signals completion by returning text instead of a tool call. The signal you should be careful about is the context window.
The first thing every step does is call a model, and picking that model should always be a one-line config choice.
The LLM Providers
It’s an architectural mistake to couple your design to a single provider. The loop shouldn’t know whether it talks to Gemini, OpenRouter, Modal, or whatever comes next.
All provider knowledge lives in _build_model() in src/decode/agent/factory.py. You pick the provider by setting the LLM_PROVIDER environment variable, which is picked by your Pydantic settings object from src/decode/config/settings.py.
def _build_model(*, model: str | None = None) -> Model:
    provider = settings.llm_provider                     # explicit LLM_PROVIDER env var
    if provider == "gemini":
        return GoogleModel(
            model or settings.gemini_model,
            provider=GoogleProvider(api_key=_provider_api_key("gemini"))
        )
    if provider == "openrouter":
        return OpenAIChatModel(
            model or settings.openrouter_model,
            provider=OpenRouterProvider(api_key=_provider_api_key("openrouter"))
        )
    if provider == "modal":
        client = AsyncOpenAI(
            base_url=f"{settings.modal_endpoint_url}/v1",
            api_key=token_secret,
            default_headers={"Modal-Key": token_id, "Modal-Secret": token_secret}
        )
        return OpenAIChatModel(
            model or settings.modal_endpoint_model,
            provider=OpenAIProvider(openai_client=client)
        )

    raise ValueError(f"unsupported llm_provider: {provider!r}")
So from all the options out there (we know there are tons), why these 3? And no OpenAI or Anthropic. Because between them they cover the three tiers of the build vs. buy decision: Gemini is proprietary (you buy the model), OpenRouter is open weights bought as a service (you buy the serving), and Modal is open weights you serve yourself.
We choose Modal as our default option for 3 reasons. You pay for GPU compute, not tokens: agentic bursts fit GPU-time pricing. Serverless open-source models supported by Modal that we deployed are Qwen3.6 35B, Kimi K3, and GLM-5.2 via Modal Endpoints. If you want to use a fine-tuned model, you can easily swap it in with 0 changes on the harness side. Because it’s serverless, it scales to zero: you pay only when the agent is working.
This combination makes it ideal for intermittent periods of extremely high compute demand. For example, if you want to process 1000 documents, instead of paying for each token, which is what’s typical of all the APIs out there, you just pay for the compute time. To make testing Decode extremely affordable, for most of our tests we used Qwen3.6 35B, which runs on a single H200 GPU at $4.54 / h.
But going back to our 1000 documents example, if these 1000 documents translate to 1000 * 30000 tokens, that's 30M input tokens, plus ~500 output tokens per document. If we wanted to process all these tokens with Sonnet, that would translate to: 30M / 1M x 3 (input) + 500k / 1M x 15 (output) ~= $97. And prompt caching doesn't save us here — every document is a different prefix, so there's nothing to reuse across calls. Considering we could process this data with Modal at ~3000 tokens/second batched, that's under 3 hours of GPU time, which would have cost only ~$13. Modal benchmarked the same tradeoff and found that giving up interactivity, from ~200ms to ~4s end-to-end, provided an x8 throughput increase on identical hardware. If we do this multiple times per day, it quickly adds up. This is just napkin math, but you get the idea.
Now, on the other side of the spectrum, let's assume Decode sits idle while it waits on a “y” confirmation the agent asked for. If that happens overnight, you can easily add 10 hours of idle time to your GPU billing, an extra ~$45.
Alongside the pay-per-token model, which quickly becomes inefficient at high volumes, another dimension to consider is serverless vs. reserved GPU time. When you reserve GPUs, you have to reserve your peak. If your peak needs 40 GPUs on Friday afternoon and 2 on Sunday night, you sign for 40 — and you keep paying for 40 all weekend, all month, all year. With serverless, the meter follows the demand curve, so the total cost is just the rate R_s times whatever you actually used at each moment. The reservation instead charges you rate R_r times the peak, times the entire length of the contract T.
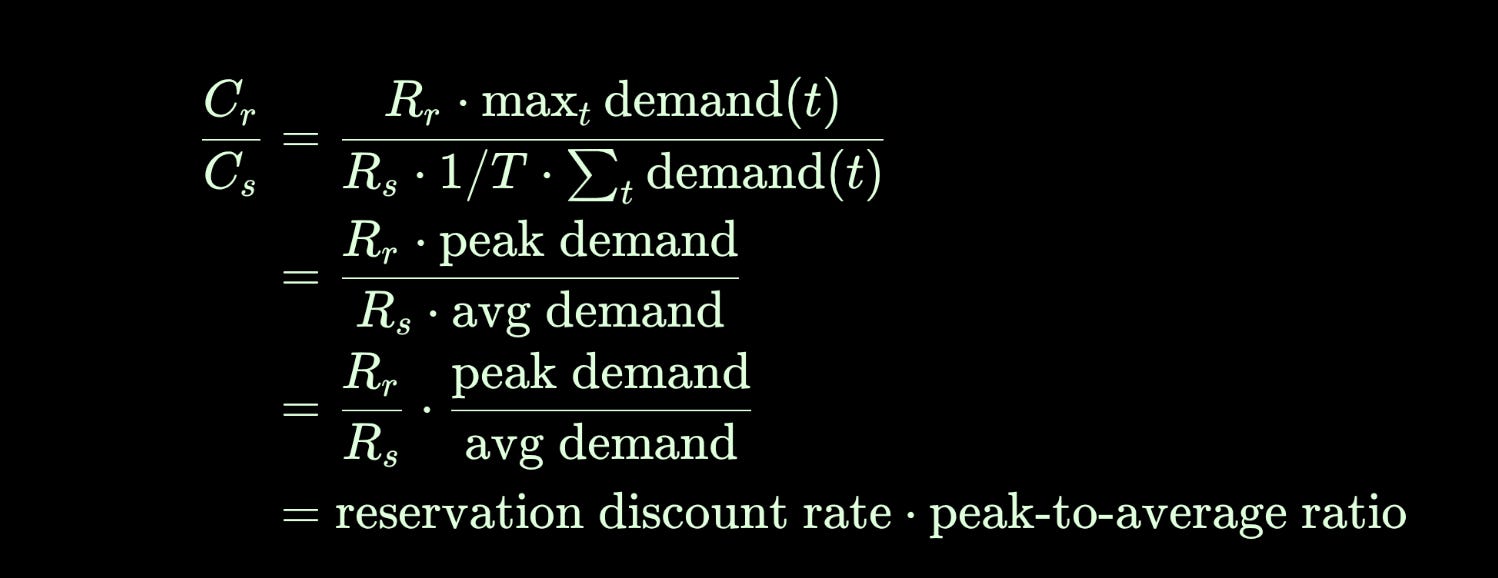
In other words, if reserving is 5x cheaper than serverless, but your peak is 5x higher than your average, then you break even. And the further your peak climbs above that price advantage, the better off you are paying for serverless. For the full math, see this blog post.
OpenRouter is the most popular gateway to every hosted model: closed source (Claude, OpenAI, Gemini) or open-source (Kimi K3, Z GLM-5.2, Gemma 4, etc.) behind one key. Thanks to their huge aggregated pool of models, they also have some free defaults, such as qwen/qwen3-coder:free, which we used in this course. Having them integrated into your app is a powerful way to easily experiment with different models without worrying about the underlying infrastructure.
We picked Gemini mostly due to their generous free tier, to provide you a third option to run Decode without any cost. Their models are rarely the best, but relative to other API-based models, especially OpenAI & Anthropic, they’re cheap and good enough to get most jobs done.
We recommend starting with Modal Endpoints, powered by Qwen3.6 35B by default, that spins up in a couple of minutes a configurable SGLangEndpoint. SGLang is the right default here because it and vLLM land in roughly the same place on throughput, but SGLang boots in ~1 minute against vLLM’s ~5 for small models, which is everything when your endpoint scales to zero. Modal’s $30 in free credits each month covers ~6.5 hours of H200 time, enough to run the whole course at no cost. And while Qwen3.6 35B is small next to GLM-5.2 740B or even GPT OSS 120B, it’s well tested with Decode and works well enough for our examples.
After you’ve completed the basic setup on Modal, you can start a new endpoint just by running:
modal endpoint create --model Qwen/Qwen3.6-35B-A3B-FP8 --env mainWhile trying it out, to avoid the cold start problem, we recommend setting the autoscaling limits to a minimum of 1 container:
🧑💻 Find the full setup docs in our GitHub repo.
But between Modal and OpenRouter, you can easily swap between hundreds of models. You can try out whatever you’re interested in. The only requirement is that it supports tool calling.
The System Prompt
The entire base system prompt is one paragraph:
You are Decode, a terminal coding agent that helps a developer in their working
directory. You are concise and precise: answer directly, prefer running the work
over describing it, and never invent file contents or command output you have not
seen. When you do not have a tool for something yet, say so plainly rather than
pretending.
The team behind Pi started this minimalist mentality, where you keep your system prompts, tools, and features to a minimum, to avoid filling your context window with noise that confuses the model more than it helps. This also makes maintaining and understanding the prompts, for us as humans, a lot easier. In the past months, OpenAI and Anthropic followed, trimming their system prompts by up to 70%, as more and more functionality around coding gets baked directly into the model’s weights.
Still, this paragraph is only the baseline. Pydantic AI builds a schema from every tool’s signature, which is added to the system prompt. Thus, each tool comes with a cost, meaning that the more tools you use, the more context window you consume, and the model becomes more confused about which one to pick. This becomes even more problematic when we start adding memory and skills into the mix, as we will see in future lessons.
Whichever model answers, it can only touch your repo through the tools.
The Core Tools
In reality, the tools are 90% of why this is a coding agent and not any other kind of AI agent. The agent needs to read files, execute programs, make HTTP requests. Pi ships exactly read, write, edit, and bash — under 1,000 tokens of prompt plus definitions, still respectable — top 10 on Terminal-Bench 2.0.
read   path, offset?, limit?   → file contents; first 2,000 lines by default
write  path, content           → create or overwrite; makes parent dirs
edit   path, oldText, newText  → exact-match surgical replace (whitespace included)
bash   command, timeout?       → run it in the cwd; returns stdout + stderr
On top of these 4 core tools, we have more specialized I/O tools such as glob and grep. Then there’s todo_write, used to decompose the goal into a plan of TODOs, web_fetch to fetch web pages, and ask_user to interact with the user.
💡 Pi doesn’t have a
todo_writetool because it considers that the best way to store your plan is directly in a Markdown file, not in an in-memory TODO list the agent has to keep track of — a PLAN.md on disk beats an in-memory list.
Every snippet below opens with ctx: RunContext[AgentDeps]. RunContext is Pydantic AI’s per-run context object: the framework injects it as every tool’s first parameter and hides it from the model’s tool schema. The model calls edit(path, old_string, new_string) and never knows ctx exists.
AgentDeps is in our harness. We declare it once as deps_type=AgentDeps in build_agent, pass it into agent.iter(deps=...), and Pydantic AI hands it to every tool call. RunContext[AgentDeps] reads as “this run’s context, whose .deps is an AgentDeps.” It is the harness state, arriving by injection (from src/decode/agent/deps.py):
@dataclass(slots=True)
class AgentDeps:                                   # every tool's ctx.deps — the harness, injected
    cwd: Path                                      # the jail: file tools + bash resolve paths here
    emit: EventSink                                # push an event → the TUI renders it
    gate: PermissionGate                           # the allow / ask / deny policy (Section 6)
    resolve_permission: PermissionResolver         # a gate "ask" → the human's verdict, awaited
    resolve_user_question: UserQuestionResolver    # ask_user's answer, on the SAME channel
task_store: list[Task] = field(default_factory=list) # what todo_write rewrites in placeemit, resolve_permission, and resolve_user_question are used for dependency injection, so tools reach the terminal without importing the TUI, and they make this code easily testable by swapping in a different AgentDeps.
To keep things short and sweet, I will skip how read and write work and go straight to edit (see them at src/decode/tools/files.py). edit is a find-and-replace with one rule: load the file’s text, find old_string inside it, dump new_string into that exact spot, write the file back. But the devil is in the details. To make this replace work, it first needs to normalize away the invisible formatting the model was never shown — a file’s line-ending convention, a leading byte-order mark — so a match never fails on characters the model had no way to guess. Then it looks for old_string, and only when that misses does it retry with whitespace collapsed on both sides. Either way, the match must be unique: 0 hits returns not found, 2+ returns ambiguous, N matches, and both end up with ModelRetry:
def edit(ctx: RunContext[AgentDeps], path: str, old_string: str, new_string: str) -> str:
    if needs_approval(ctx):
        raise ApprovalRequired
    target = _resolve_in_cwd(ctx.deps.cwd, path)
    raw = target.read_bytes().decode("utf-8")
    final = _apply_edit(raw, old_string, new_string)
    _atomic_write_bytes(target, final.encode())

    return f"Edited {path!r} (replaced 1 occurrence)."
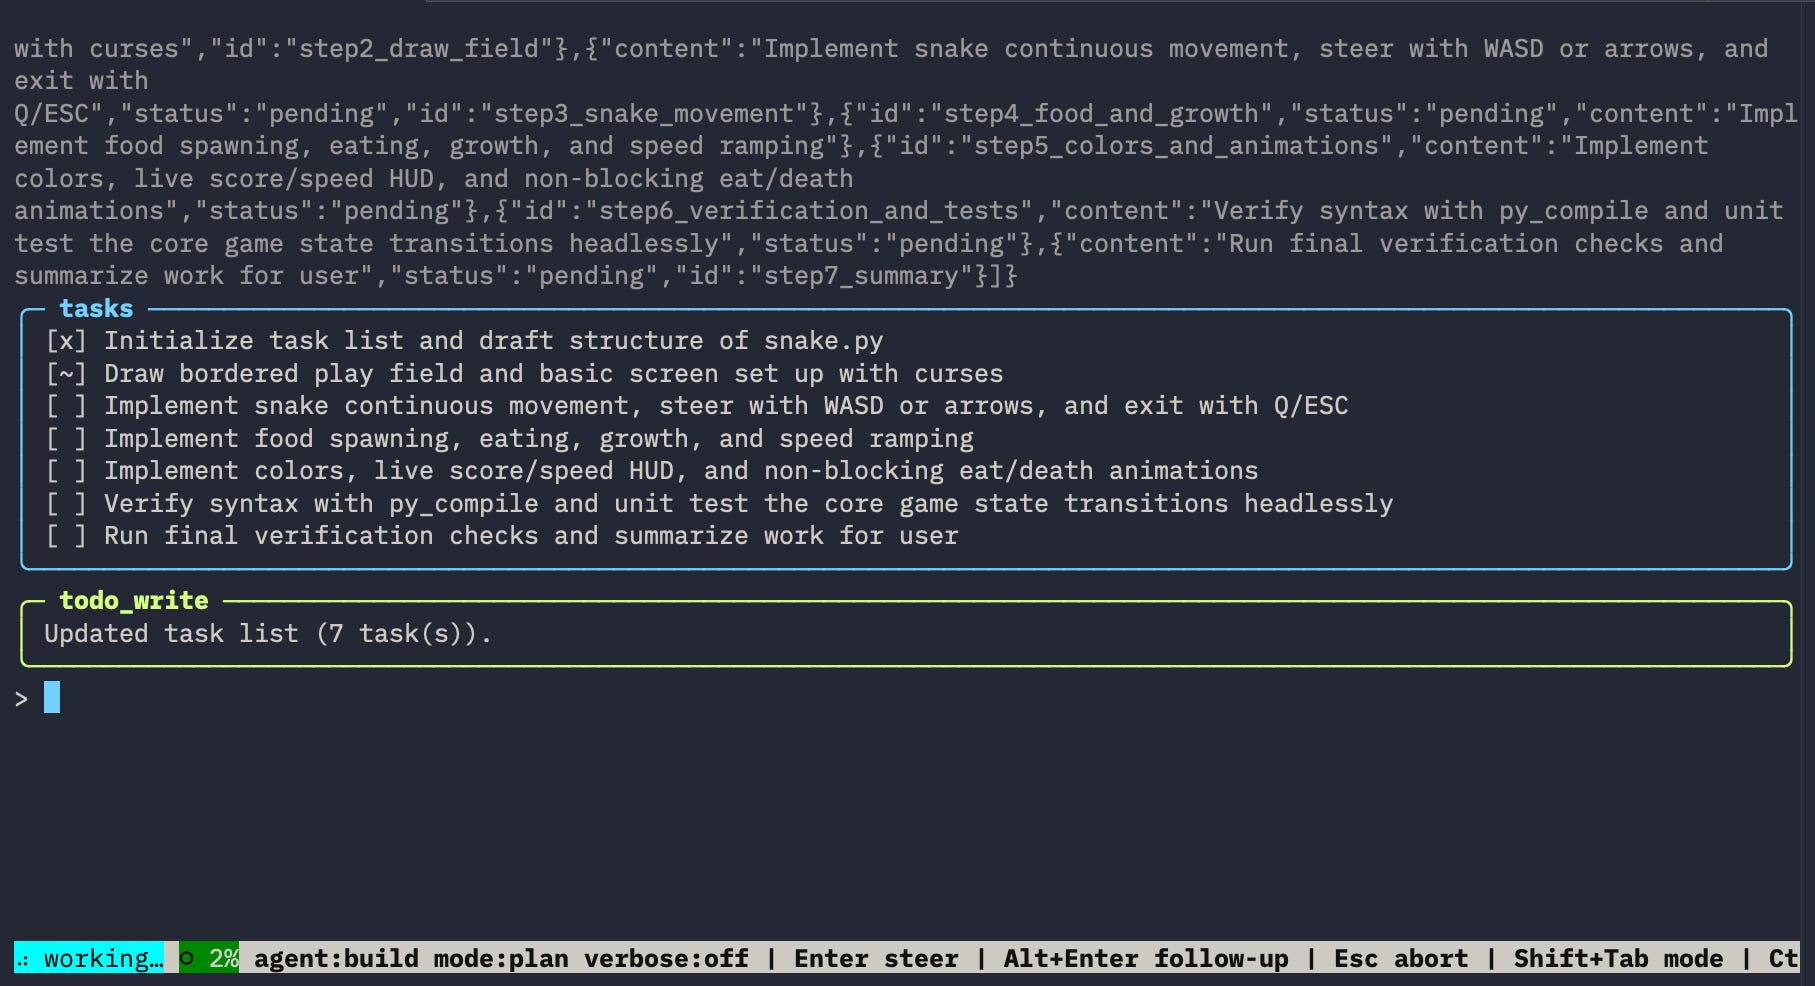
Within todo_write, the model sends the full desired list on every call and the tool overwrites the whole list — which is exactly what stops the plan from drifting out of the context window. The overwrite is in place ([:] = tasks, not a rebind) so the loop and the TUI keep pointing at the same list object, and every item is validated by the Task Pydantic model on the way in. It then emits one TaskListUpdated event carrying pre-rendered checklist lines: the tool maps pending / in_progress / completed to [ ] / [~] / [x] itself, so the renderer never has to learn the status vocabulary. The store is in-memory and per-run — nothing about the task list outlives the process (from src/decode/tools/tasks.py):
def todo_write(ctx: RunContext[AgentDeps], tasks: list[Task]) -> str:
    if needs_approval(ctx):
        raise ApprovalRequired
    ctx.deps.task_store[:] = tasks
    ctx.deps.emit(events.TaskListUpdated(tasks=_checklist_lines(tasks)))

    return f"Updated task list ({len(tasks)} task(s))."
That emit line is the harness’s entire UI protocol. events is the decode.entities.events module of frozen dataclasses (TurnStarted, ToolCallStarted, ToolResult, TaskListUpdated, ...) joined into one union known by the renderer.
Event = (
    TurnStarted
    | TurnFinished
    | AssistantTextDelta
    | ThinkingDelta
    | ToolCallStarted
    | ToolResult
    | PermissionRequested
    | AskUserRequested
    | TaskListUpdated
    | ContextCompacted
    | ContextMicrocompacted
    | AgentError
)
ctx.deps.emit is a synchronous event-based sink, injected into the harness to communicate with outer layers, in this case the TUI. This is clean architecture 101. The tool describes what happened as a typed value, and the TUI decides how to draw it.
web_fetch makes an async httpx GET request. What comes back is filtered twice before the model sees it — non-text content types are refused outright, and the decoded body is hard-capped at 2 MB, so an enormous page can never eat your entire context window. HTML is then mapped to Markdown keeping mostly the body and other metadata such as the title. Every failure path — non-2xx, timeout, connection error, wrong content type, HTML nested too deep to parse — throws a ModelRetry error, so a bad fetch is an observation the model has to handle explicitly and not ignore (from src/decode/tools/web.py):
async def web_fetch(ctx: RunContext[AgentDeps], url: str) -> str:
    if needs_approval(ctx):
        raise ApprovalRequired
    _validate_url(url)
    response = await _get(url)
    body = _render_body(response, _decode_body(response))

    return f"HTTP {response.status_code} {response.url}\n\n{body}"
ask_user lets the agent request input from the user. It emits AskUserRequested so the TUI renders the question, then awaits ctx.deps.resolve_user_question. Two things can go wrong: the agent loop can run in headless mode, where there is no interactive user at all, or the question can be dismissed (turn aborted, REPL shutting down). Both become ModelRetry text telling the model plainly to proceed without an answer (from src/decode/tools/askuser.py):
async def ask_user(ctx: RunContext[AgentDeps], question: str) -> str:
    ctx.deps.emit(events.AskUserRequested(question=question))
    try:
        return await ctx.deps.resolve_user_question(question)
    except NoInteractiveUserError as exc:
        raise ModelRetry(str(exc)) from exc
bash is the most powerful. Via bash the agent can execute any shell command such as ls, cd, mkdir, rm, cp, mv, and echo. Plus, piping and everything else you can run in a terminal. Which means that via bash the agent can run Python, TypeScript, Rust, or any other language. Via bash it can manipulate all the CLIs you give it access to.
Via
bashit gets that magical feeling of being able to interact with the operating system and run any command.
But this also makes it the most dangerous one. rm -rf ~/ is always only a few tokens away. That’s why running your agent in a sandbox environment becomes so important. In a future lesson, we will get into the executor and how to run commands in local Docker and remote Modal containers.
Bash plus code execution is a big step toward giving the model a computer (from src/decode/tools/bash.py):
async def bash(ctx: RunContext[AgentDeps], command: str, timeout: float | None = None) -> str:
    if needs_approval(ctx):
        raise ApprovalRequired
    timeout_s = _resolve_timeout(timeout)
    result = await _get_executor().run(command, cwd=ctx.deps.cwd, timeout_s=timeout_s)

    return _render(result, timeout_s=timeout_s)
As we’ve seen at the beginning, the lifecycle of the agent is based on running these tools in order: todo_write plans, read / glob / grep explore, write / edit apply, bash executes (bash‘s exit code is the observation that starts the next pass).
When running .decode/skills/demo-6-article-kg that asks the agent to scrape 3 web pages and build a knowledge graph, the agent creates a 4-step plan, keeps track of it via todo_write, fetches the data via web_fetch, extracts the KG triplets directly, then via write saves them to graph.json. Next, it writes the HTML and CSS code that displays the KG triplets into kg.html. Ultimately, via bash it checks that the HTML code renders correctly. If not, the model edits the code and retries.
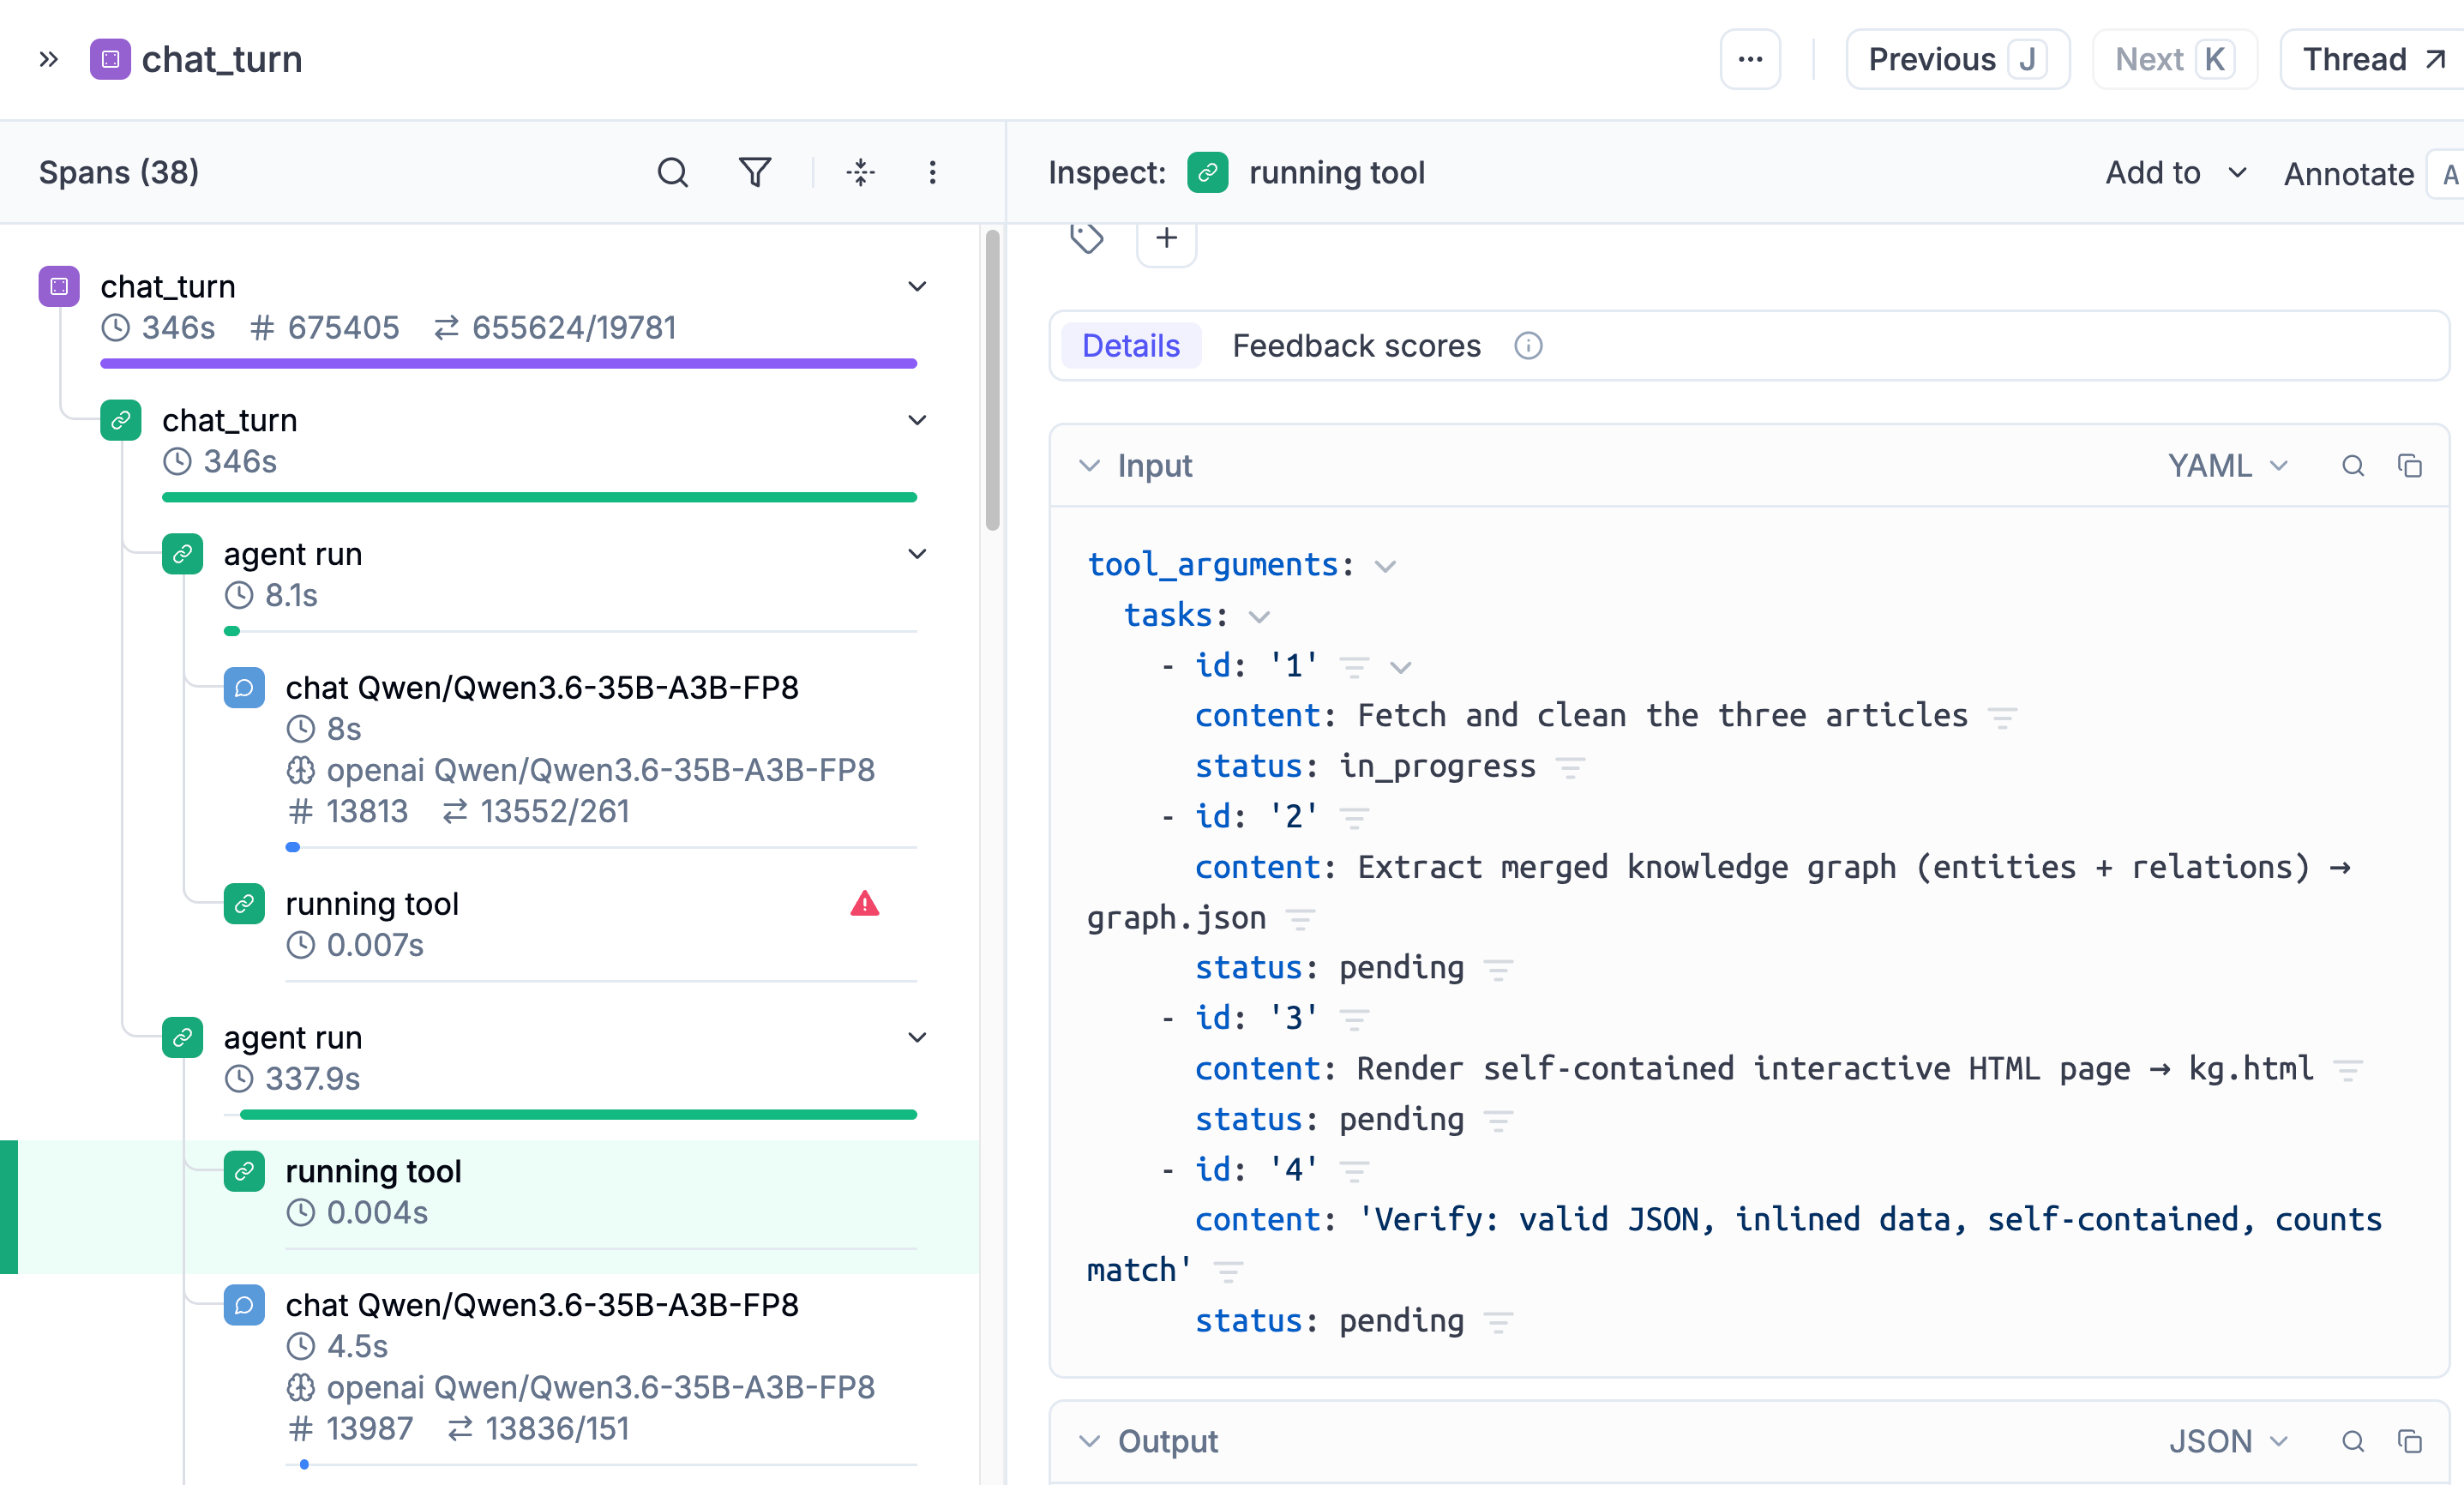
Adding Tracing to Understand What Is Going On
We’ve seen above how the agent calls the todo_write tool to bake the plan into its state. The trace is logged via Opik. Let’s see how easy it is to plug it into your own code.
Debugging your agent via the terminal is terrible. Not only is reading the full traces hard, sometimes it’s impossible, as you just don’t have access to all the spans, plus other essential metadata such as configs, token counts, tool inputs and outputs — and the list goes on. That’s why you need to plug in an observability tool like Opik from day 0 to get visibility into your agent’s behavior.
As we use Pydantic AI, it has native support for tracing via Logfire, the observability tool made by Pydantic. Logfire, like most observability tools, supports OpenTelemetry (OTLP) out of the box, which is the standard wire protocol for tracing. Thus, hooking up Opik is as easy as defining the OTLPSpanExporter to point to Opik’s managed servers via the endpoint parameter, plus authentication headers. As Opik is open-source, this would work exactly the same if you were hosting it yourself (from src/decode/observability/tracing.py).
def init_tracing() -> bool:
    key = settings.opik_api_key.get_secret_value()
    if not key:
        return False

    exporter = OTLPSpanExporter(
        endpoint=f"{base}/v1/traces",
        headers={"Authorization": key, "Comet-Workspace": settings.opik_workspace,
                 "projectName": settings.opik_project_name})
    logfire.configure(send_to_logfire=False, console=False,
        additional_span_processors=[BatchSpanProcessor(CostAnnotatingExporter(exporter))])
    logfire.instrument_pydantic_ai()

    return True
You can find the full setup on how to get started with Opik in our GitHub repository. Opik is optional to get through the course, but note that it has a generous freemium plan with 25k spans/month free. You can run the whole course for free.
In the GIF below, you can see an end-to-end trace of how the agent executed the .decode/skills/demo-6-article-kg skill that builds the KG from 3 articles. It consists of 47 spans, covering 6 steps, 15 model calls, and 18 tool executions over ~6m.
With the following token usage (no cost per token as we ran it via Modal):
cache_read.input_tokens: 631424
completion_tokens: 19781
details.cache_read_tokens: 631424
details.reasoning_tokens: 2912
prompt_tokens: 655624
total_tokens: 675405
The TUI and the Queues
You can build a TUI in 2 ways. Full-screen takes over the terminal’s viewport as a grid of cells (Amp, OpenCode): total layout control, but you lose scrollback, search and have to implement a bunch of features from scratch. Append-to-scrollback writes like an ordinary CLI (Claude Code, Codex, Pi). Decode takes the second approach.
As Python packages, we use prompt_toolkit to read the input and Rich to render output in append-style. Below you can see the loop that takes events from the harness and renders them on the TUI (from src/decode/tui/app.py).
with patch_stdout(raw=True):
    while True:
        submitted = await session.prompt_async(_PROMPT)   # one pinned input line
        intent, text = _interpret(submitted)              # Enter / Alt+Enter / Esc
        if decisions.pending:                             # mid-turn question? answer it
            decisions.resolve(text)
            continue
        await runner.submit(text, intent)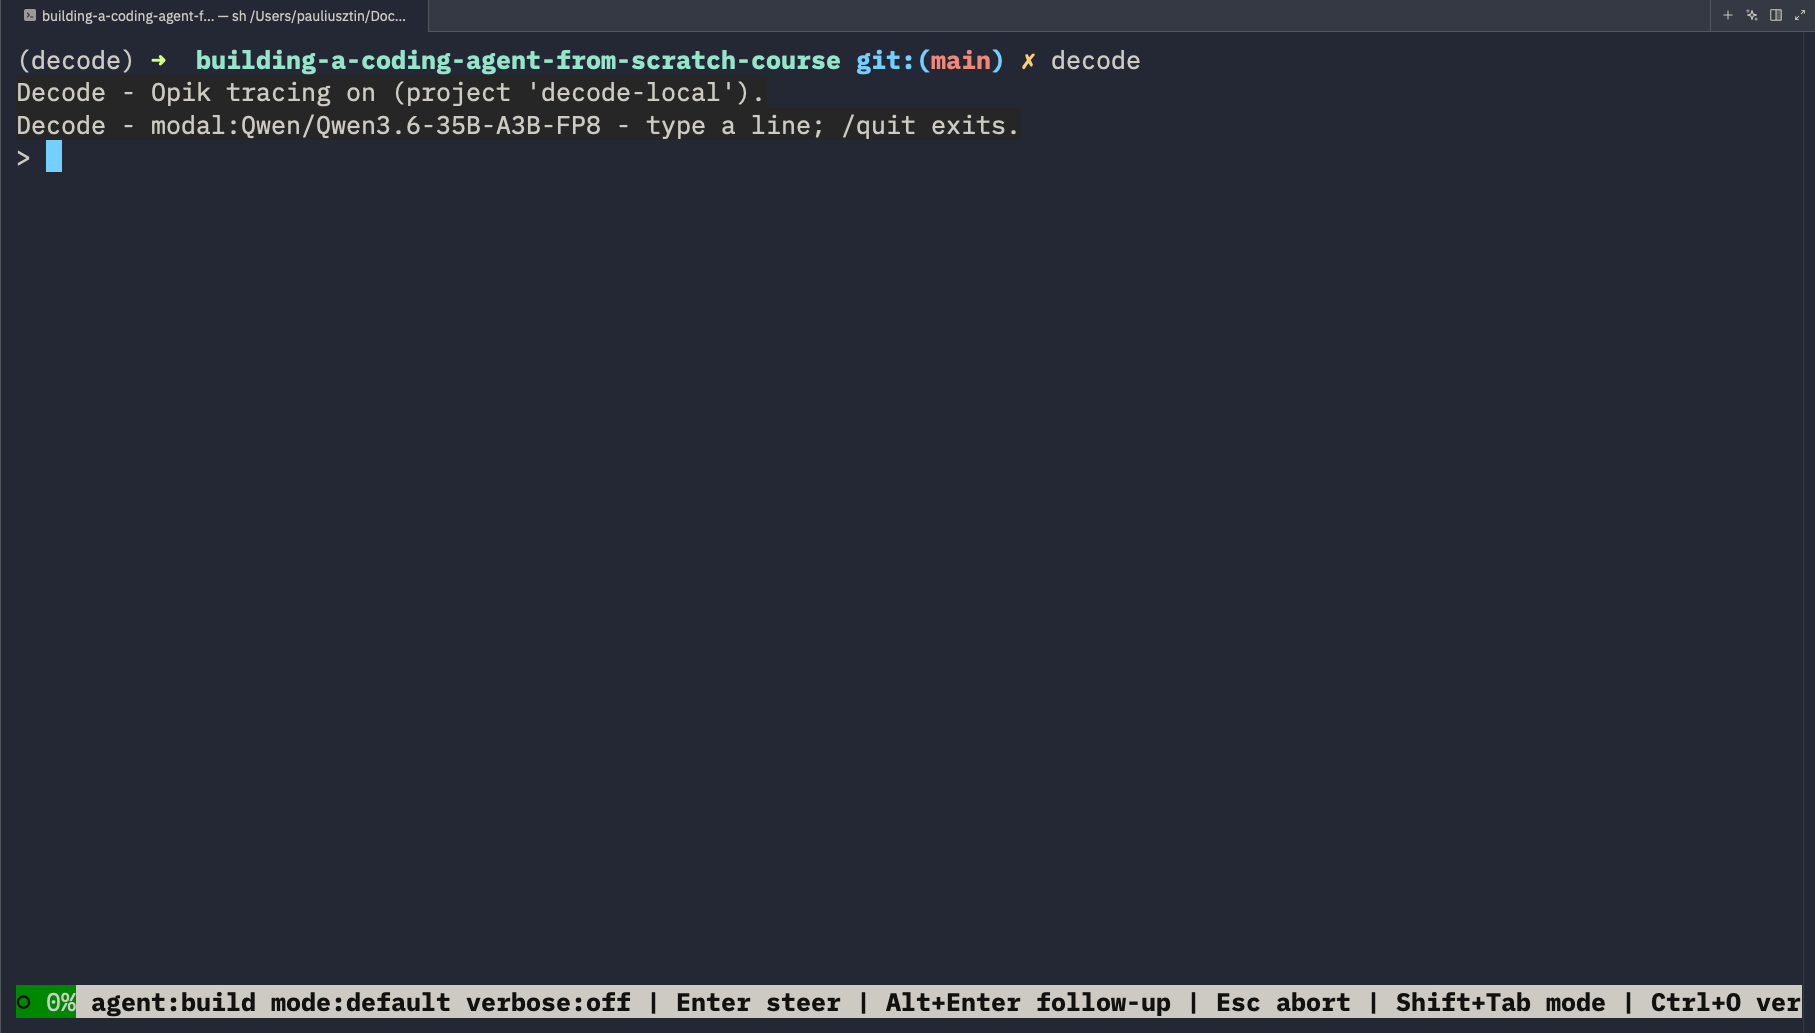
But what happens when you type a new command mid-turn, while the agent is still running your previous one? Injecting it instantly would corrupt the current tool call. Thus, you need to buffer your input on arrival and inject it only at boundaries, such as after a tool finishes running or a whole turn ends.
The input can arrive in 3 modes.
Steering (plain
Enter): the Runner executes it within a model turn, between tool calls.Follow-up (
Alt+Enter): the Runner holds it until the turn stops, then runs it as one more step.Cooperative abort (
Esc): sets a flag to stop the agent turn at the next boundary. Next, it clears both queues. This avoids corrupting the history.
As seen within the InteractionQueues class, for steering and follow-ups we use two different in-memory queues (from src/decode/harness/queue.py).
@dataclass(slots=True)
class InteractionQueues:
    steering: asyncio.Queue[str] = field(default_factory=asyncio.Queue)
    follow_up: asyncio.Queue[str] = field(default_factory=asyncio.Queue)
    def drain_steering(self) -> list[str]:  return _drain(self.steering)
    def drain_follow_up(self) -> list[str]: return _drain(self.follow_up)
    def clear(self) -> None:                # on abort: drop everything pending
        _drain(self.steering)
        _drain(self.follow_up)
This loop belongs to the Runner, which is the facade between the TUI and the agent. Its job is to keep the agent alive as long as the TUI session is running. It also takes care of draining the queues at the right moments and sending them to the agent (from src/decode/harness/runner.py).
class Runner:

    ...                 # single-flight: one turn in flight, ever

    async def _run_turn(self, turn_id: int, prompt: str) -> None:
        agen = self._turn_handler(ctx)
        boundary = await agen.asend(None)
        while True:
            if self._abort:
                aborted = True
                break                                 # Esc: stop at the boundary, keep history
            if boundary is Boundary.MODEL_REQUEST:
                sent = self.queues.drain_steering()   # steering: before every model call
            elif boundary is Boundary.WOULD_STOP:
                sent = self.queues.drain_follow_up()  # follow-up: only when the turn would end
            try:
                boundary = await agen.asend(sent)     # resume the loop; get the next boundary
            except StopAsyncIteration:
                break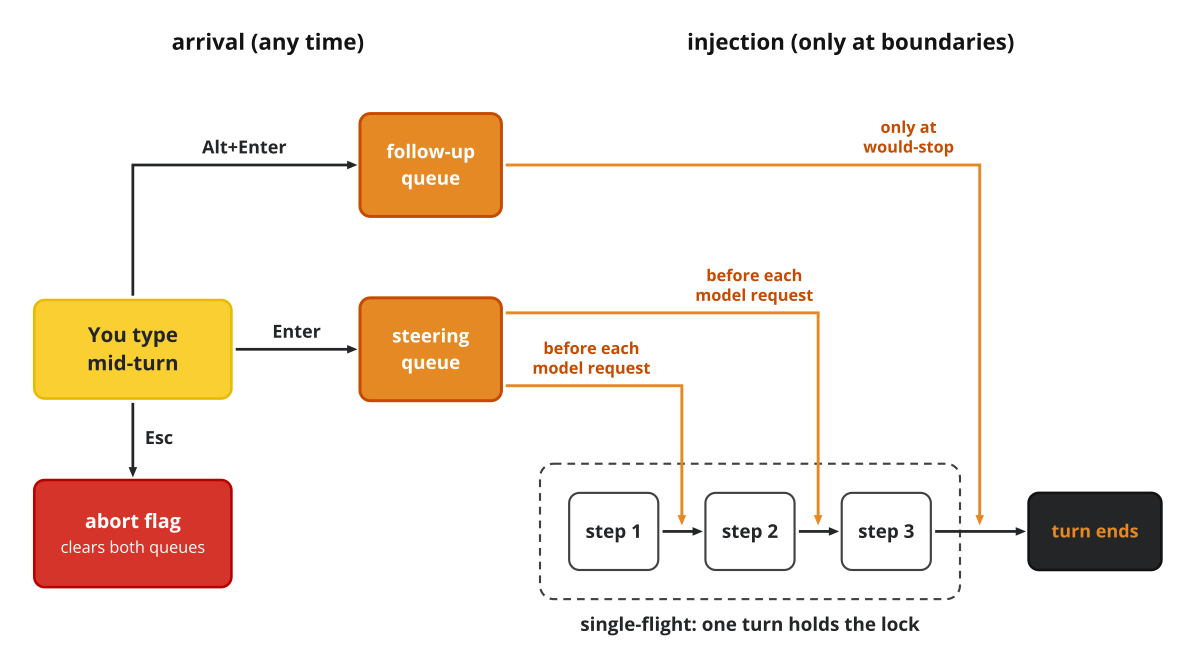
This is the approach implemented in Pi. Another option, implemented in OpenCode, is to keep track of the session in your database, which means you can use your database as the queue as well. But that also means that you need to complicate your solution with a database. Which raises the question, how do we keep track of sessions?
The Session Log
In the interactive mode the conversation is the working state. To keep track of sessions, we create a session log — an append-only JSONL file per session under .decode/sessions/. This simple approach kills the need for a database entirely. This is how Claude Code implements their session management.
.decode/sessions/
├── 20260620T132411Z_d710a5b9-28af-418b-9a15-936942a8db12.jsonl
├── 20260620T132419Z_058cddc8-1d0f-406d-a754-098703c07cb5.jsonl
├── 20260622T110408Z_7114fe38-d294-4c78-bbc3-c454be57082b.jsonl
├── 20260622T111609Z_4bbf140e-3495-4d69-9a88-c7014fd77742.jsonl
├── 20260625T152011Z_7594e9b0-6c62-421a-ad74-9918c4d0291e.jsonl
└── ...
Every completed turn appends one messages line to the log. An aborted or crashed turn persists what it finished (from src/decode/context/session_log.py).
def append_turn(self, new_messages: list[ModelMessage]) -> None:
    if not new_messages:
        return

    payload = json.loads(ModelMessagesTypeAdapter.dump_json(new_messages))
    entry = {"type": "messages", "messages": payload}
    with self.path.open("a", encoding="utf-8") as handle:
        handle.write(json.dumps(entry) + "\n")
Based on the knowledge-graph example, here is how the log entries look:
{"type": "session", "version": 1, "session_id": "48900d84…", "cwd": "…/building-a-coding-agent-from-scratch-course", "created_at": "2026-07-16T19:32:01Z"}
{"type": "messages", "messages": [
    {"role": "user", "content": "The hardcore one: turn three live articles into a knowledge graph…"},
    {"role": "tool", "name": "web_fetch", "content": "HTTP 200 …/keep-knowledge-graph-clean\n\nHow to Keep a Knowledge Graph Clean…"},
    {"role": "tool", "name": "bash", "content": "Exit code: 0.\n\nstdout:\nNode count: 28 (should be 20-35)\nEdge count: 29…"},
    {"role": "assistant", "content": "## Knowledge Graph Visualization — Complete…"}]}
To resume the state, you can run decode --resume <session_id> to kick off a new TUI from an existing session log.
Next Steps
In this lesson, we’ve implemented a bare-bones version of the coding agent, adding the right tools, a TUI, and a way to manage sessions. More or less, at this point, we are at feature parity with Pi.
But as a course on harness engineering, we want to push it further. Any agent needs a headless mode (along with running it from the terminal), essential context engineering features such as memory, compaction, skills and guardrails such as the permission layer and sandboxes. That’s essentially harness engineering. So far we’ve built the agent loop. Now the real harness engineering begins.
🧑💻 We encourage you to clone our course repo, open your terminal, type decode and test out the coding agent.
In the next lesson, we’ll build the sandbox layer locally via Docker and remotely via Modal.
Here is the course roadmap, lesson by lesson (see all in GitHub):
The Bare-Bones Coding Agent Loop ← You are here
Or the video lecture supporting the first two lessons:
But here is what I’m wondering:
From your perspective, as we’ve been using Claude Code, Codex, etc. for general productivity stuff, what makes a general-purpose agent a coding agent?
Click the button below and tell me. I read every response.
Enjoyed the article? The most sincere compliment is to restack this for your readers.
Special thanks to Modal, Opik (by Comet), and Kitaru (by ZenML) for sponsoring this open-source course and keeping it free!

Whenever you’re ready, here is how I can help you
Go from agent user to agent builder. Master the foundations of AI agents and turn fragile demo code into reliable, production-ready systems with my course, Agent Engineering: Building Multi-Agent Systems (made with Towards AI).
35 lessons. Pure foundations from scratch. 4 mini-projects. 2 production systems. A certificate and direct access to me & industry experts in our Discord.
Built for software and data professionals transitioning into AI engineering. Rated 5/5 with 300+ students. The first 7 lessons are free:
Not ready to commit? Start with our free Agent AI Engineering Guide, a 6-day email course on the mistakes that silently break AI agents in production.
Images & Videos
If not otherwise stated, all images are created by the author.
This maps cleanly to clinical agents because a bare loop makes the action boundary inspectable.
In an OR-adjacent workflow, I would want the first version to stay just as small: read a known source, detect one mismatch, route it to a role, and stop before it claims readiness.
The loop is useful only if each tool call shows what it observed, what it was allowed to touch, and what stayed forbidden.
Bare-bones is the right place to start. The loop stays this small forever, everything after it is tools, gating, and context.
I built awesome-agent-architecture on that idea, each section adds one mechanism to the same runnable loop.
https://github.com/hardness1020/awesome-agent-architecture