

Building Production ReAct Agents From Scratch Is Simple
I read LangGraph's implementation so that you can build your own, as AI frameworks just bloat your code.

Welcome to the AI Agents Foundations series: A 9-part journey from Python developer to AI Engineer. Made by busy people. For busy people.
Everyone’s talking about AI agents. But what actually is an agent? When do we need them? How do they plan and use tools? How do we pick the correct AI tools and agentic architecture? …and most importantly, where do we even start?
To answer all these questions (and more!), We’ve started a 9-article straight-to-the-point series to build the skills and mental models to ship real AI agents in production.
We will write everything from scratch, jumping directly into the building blocks that will teach you “how to fish”.
What’s ahead:
ReAct Agents From Scratch ← You are here
By the end, you’ll have a deep understanding of how to design agents that think, plan, and execute—and most importantly, how to integrate them in your AI apps without being overly reliant on any AI framework.
Let’s get started.
Opik: Open-Source LLMOps Platform (Sponsored)
This AI Agents Foundations series is brought to you by Opik, the LLMOps open-source platform used by Uber, Etsy, Netflix, and more.
But most importantly, we are incredibly grateful to be supported by a tool that we personally love and keep returning to for all our open-source courses and real-world AI products. Why? Because it makes escaping the PoC purgatory possible!

Here is how Opik helps us ship AI workflows and agents to production:
We see everything - Visualize complete traces of LLM calls, including costs and latency breakdowns at each reasoning step.
Easily optimize our system - Measure our performance using custom LLM judges, run experiments, compare results and pick the best configuration.
Catch issues quickly - Plug in the LLM Judge metrics into production traces and receive on-demand alarms.
Stop manual prompt engineering - Their prompt versioning and optimization features allow us to track and improve our system automatically. The future of AutoAI.
Opik is fully open-source and works with custom code or most AI frameworks. You can also use the managed version for free (w/ 25K spans/month on their generous free tier).
Writing ReAct From Scratch
When I started building Brown, my writing agent, I decided to use LangGraph to implement the ReAct pattern. I embraced their graph model with nodes and edges, thinking it would make everything cleaner. But what I discovered was frustrating: simple if-else logic and basic loops that should have taken five minutes became hours of work. I had to force my Python code to fit their graph paradigm, modeling everything through edges in ways that felt unnatural. It did not add real value, just complexity.
After struggling with this, I did what I always do when I am stuck: I opened the LangGraph source code and started reading. That is when everything clicked. Seeing how they actually implemented the ReAct loop, the thought generation, tool execution, state management, and control flow, gave me a concrete mental model I could not get from their documentation. Even though I was not going to use their framework in production, understanding their implementation became the foundation for building my own robust ReAct agent from scratch.
People rarely understand what it takes to implement a ReAct solution. Often in production, you end up writing your own agentic layer because AI frameworks can fall short: abstractions limit access to cutting-edge features, and graph models like LangGraph can make simple logic overly complicated. The sweet spot is using lightweight infrastructure that lets you write custom logic while providing production-ready features like retries and monitoring.
The solution is to understand how production-ready frameworks are built. LangChain and LangGraph’s ReAct implementation is one of the most mature out there, so understanding it is one of the best ways to learn how ReAct works. Reading open-source software is my favorite way of learning, so I decided to write this article based on their implementation after it personally helped me understand how a production-ready ReAct Agent should be implemented.
We will walk you through the core elements of LangGraph’s ReAct implementation, step by step, using a Wikipedia research agent as an example. First, we will implement a simple agent using LangChain’s create_agent function. Then, we will dig into what happens under the hood. The full implementation has over 2,000 lines of code, so we will focus only on the core functionality.
Defining Our Research Agent
To ground our exploration of LangGraph’s internals, we will first build a simple Wikipedia research agent. This example will serve as our reference point as we dive into the source code.
We start by defining our tools. The
@tooldecorator makes a Python function available to the agent. We have one tool to fetch content from Wikipedia and another to create a summary.
from langchain_community.retrievers import WikipediaRetriever
from langchain_core.tools import tool
from langchain.chat_models import init_chat_model

@tool
def fetch_wikipedia_content(query: str, max_docs: int = 1) -> str:
    “”“Fetches Wikipedia article content based on the search query.”“”

    retriever = WikipediaRetriever(load_max_docs=max_docs, doc_content_chars_max=5000)
    docs = retriever.invoke(query)
    if not docs:
        return f”No Wikipedia articles found for query: {query}”

    return docs[0].page_content

@tool
def create_summary(text: str, focus: str = “general”) -> str:
    “”“Creates a concise summary of the given text with a specified focus.”“”

    llm = init_chat_model(model=”google_genai:gemini-1.5-flash-lite”, temperature=0.3)
    prompt = f”Please provide a {focus} summary of the following text...”
    response = llm.invoke(prompt)

    return response.content
Next, we define the desired final output structure using a Pydantic model. This ensures our agent returns validated, structured data.
from pydantic import BaseModel, Field
from typing import List

class DeepResearchResult(BaseModel):
    “”“Structured output containing document title, summary, tags, and paragraph count.”“”

    title: str = Field(description=”The title of the document”)
    summary: str = Field(description=”A comprehensive summary of the document content”)
    tags: List[str] = Field(description=”A list of relevant tags or keywords”)
    total_paragraphs: int = Field(description=”The total number of paragraphs in the document”)
We create the agent using LangChain’s high-level
create_agentfunction. We pass the model, tools, a system prompt, and our desired response format.
from langchain.agents import create_agent
from langchain.agents.structured_output import ToolStrategy

agent = create_agent(
    model=”google_genai:gemini-1.5-flash”,
    tools=[fetch_wikipedia_content, create_summary],
    response_format=ToolStrategy(DeepResearchResult),
    system_prompt=”You are a helpful Wikipedia research assistant...”,
)
Finally, we invoke the agent by streaming its execution, which allows us to see each step as it happens.
initial_state = {”messages”: [HumanMessage(content=”Research cognitive behavioral therapy”)]}
for event in agent.stream(initial_state):
    # Process and print each step
    ...
This simple setup hides a lot of complexity. Now, let’s look under the hood to see how LangGraph actually builds and runs this agent.
The ReAct LangGraph Graph
The create_agent function builds a stateful graph using LangGraph. This graph defines the agent’s structure and control flow.
💡 You can find the full implementation of the create_agent in LangChain’s open-source repository. We warn you, there are many abstractions going on. We hope this article will help you get over them.
The graph itself is initialized as a StateGraph object, which is a specialized graph that passes a state object between its nodes. The state contains all the information about the current execution, like the conversation history. In other words, you can think of it as the short-term memory. After initialization, the core model and tools nodes are added.
# Simplified from factory.py
from langgraph.graph.state import StateGraph
# The graph is created with a specific state schema
graph = StateGraph(state_schema=...)
# The two main nodes are added
graph.add_node(”model”, model_node)
graph.add_node(”tools”, tool_node)
# Edges define the flow between nodes
graph.add_edge(START, “model”)
graph.add_conditional_edges(”model”, should_continue, ...)
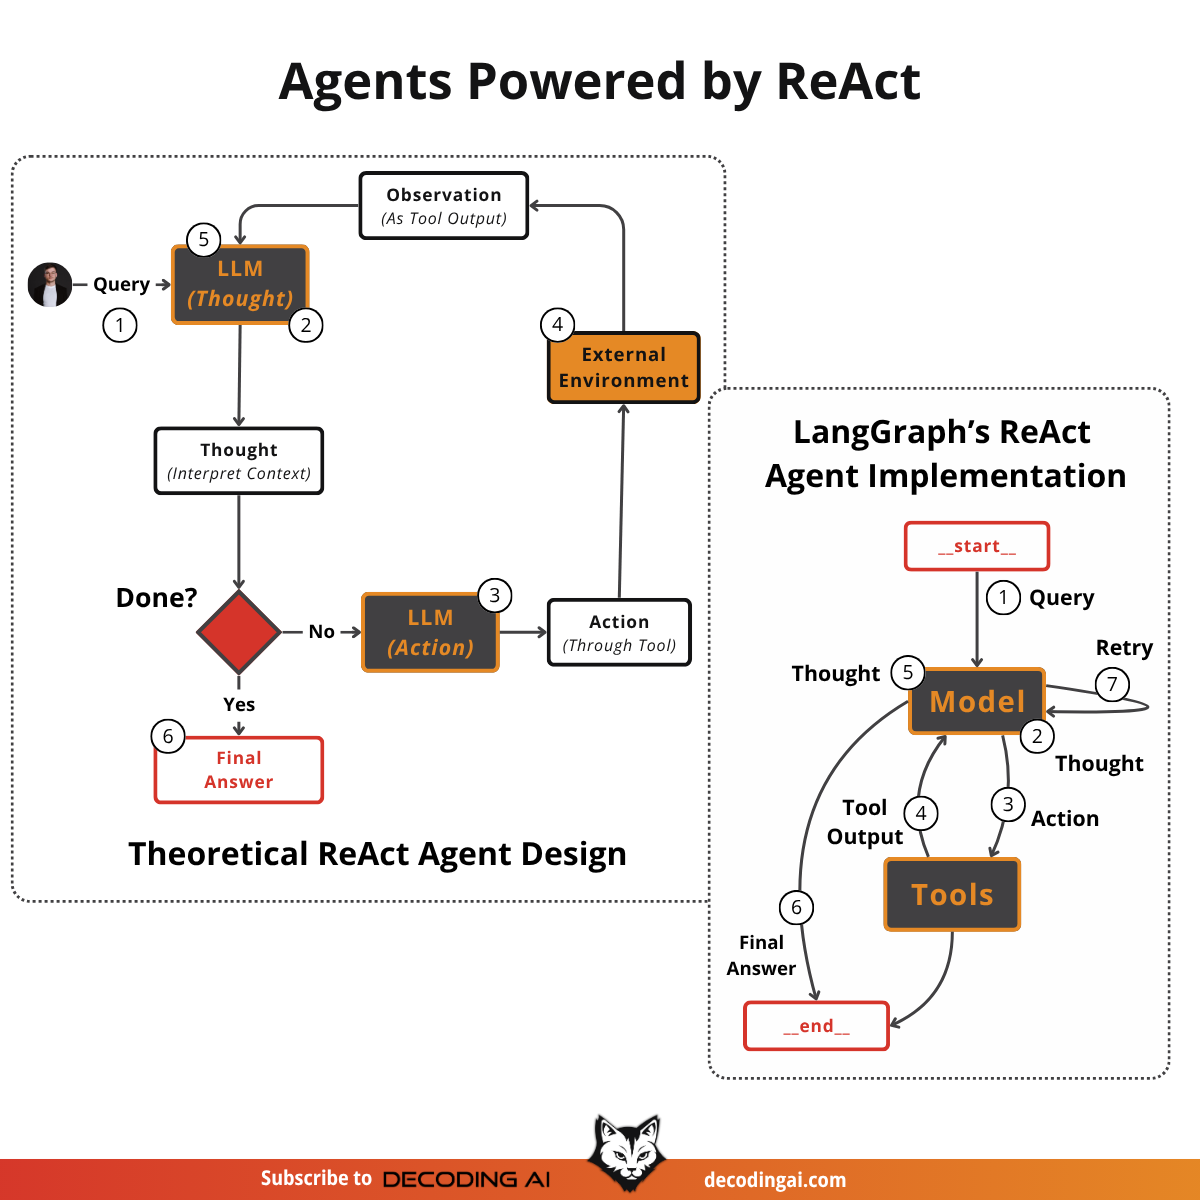
graph.add_edge(”tools”, “model”)This graph structure directly maps to the ReAct pattern. The nodes represent the “Reason” and “Act” phases, the state aggregates all the observations, while the edges create the iterative loop that cycles through these stages until completion.
By looking at Image 1, the mapping between the theoretical version of ReAct and LangChain’s implementation can be reduced to 6 core points:
Query: Enters the system via
START -> Model, routing the initial user input to the model node.Thought: The generation happens within the model node, where the LLM interprets context and plans the next steps.
Action: Executes all the tools within the
Toolsnode.Tool Output: Gathers all the tool outputs as observations and updates the graph state
Thought: Generates a new thought based on the latest state and it either decides it has completed the query or runs another iteration
Final Answer: In case the user query is achieved, it generates the final answer to the user
The state is defined as a TypedDict called AgentState. It holds the list of messages (the scratchpad) and an optional field for the final structured response.
from typing import TypedDict, Sequence
from langchain_core.messages import BaseMessage

class AgentState(TypedDict):
    messages: Sequence[BaseMessage]
    structured_response: ... # Optional
As the agent runs, this state object evolves. For example:
Initial State:
{”messages”: [HumanMessage(...)]}After Model:
{”messages”: [..., AIMessage(tool_calls=[...])]}After Tools:
{”messages”: [..., ToolMessage(content=...)]}Final State:
{”messages”: [...], “structured_response”: DeepResearchResult(...) }
Thought Phase: The Model Node
The “Thought” phase happens inside the model node. This is where the LLM reasons about the task and decides what to do next.
The amodel_node function in factory.py handles this. It prepares a ModelRequest containing the current state, system prompt, and available tools. It then calls the model and updates the state with the response.
async def amodel_node(state: AgentState, runtime: Runtime[ContextT]) -> dict[str, Any]:
    “”“Async model request handler with sequential middleware processing.”“”

    request = ModelRequest(
        model=model,
        tools=default_tools,
        system_prompt=system_prompt,
        response_format=initial_response_format,
        messages=state[”messages”],
        tool_choice=None,
        state=state,
        runtime=runtime,
    )

    response = await _execute_model_async(request)

    state_updates = {”messages”: response.result}
    if response.structured_response is not None:
        state_updates[”structured_response”] = response.structured_response

    return state_updates
The actual model execution happens inside the _execute_model_async function, defined in factory.py. This is where the system binds the tools, prepends the system prompt, and invokes the LLM.
async def _execute_model_async(request: ModelRequest) -> ModelResponse:
    # Get the bound model (with auto-detection if needed)
    model_, effective_response_format = _get_bound_model(request)
    messages = request.messages
    if request.system_prompt:
        messages = [SystemMessage(request.system_prompt), *messages]

    output = await model_.ainvoke(messages)

    # Handle model output to get messages and structured_response
    handled_output = _handle_model_output(output, effective_response_format)
    messages_list = handled_output[”messages”]
    structured_response = handled_output.get(”structured_response”)

    return ModelResponse(
        result=messages_list,
        structured_response=structured_response,
    )
The model knows which tools to use because they are “bound” to it. The bind_tools function converts the Python tool functions into a JSON schema that the LLM can understand. This schema, including the tool’s name, description (from the docstring), and parameters, is sent with every API call.
You might wonder why there is only one model node. Shouldn’t planning and tool-calling be separate steps? Modern reasoning models are designed to perform both in a single pass, as we detailed within the planning lesson.
The model’s “thought” process and its “output” (the action to take) are generated together.
For our Wikipedia agent, a typical thought + planning phase might produce an AIMessage containing a tool call like this:
AIMessage(
    content=”“,
    tool_calls=[
        {
            “name”: “fetch_wikipedia_content”,
            “args”: {”query”: “cognitive behavioral therapy”},
            “id”: “call_abc123”
        }
    ]
)
Action Phase: The Tools Node
The “Action” phase is handled by the tools node. LangGraph uses a pre-built ToolNode for this, which is initialized with all the available tools.
from langgraph.prebuilt import ToolNode

tool_node = ToolNode(tools=[fetch_wikipedia_content, create_summary])
The decision to execute a tool is made by a conditional edge. This edge is a function that inspects the state after the model node runs. The _make_model_to_tools_edge function checks if the last message from the model contains any pending tool_calls.
def _make_model_to_tools_edge(...):
    def model_to_tools(state: dict) -> str | list[Send] | None:
        # ... logic to get the last message ...
        last_ai_message = state[”messages”][-1]

        # Identify tool calls that haven’t been executed yet
        pending_tool_calls = [
            tc for tc in last_ai_message.tool_calls if ... # logic to check if pending
        ]

        # If there are pending tool calls, send them to the tools node
        if pending_tool_calls:
            return [
                Send(
                    “tools”,
                    ToolCallWithContext(tool_call=tc, state=state),
                )
                for tc in pending_tool_calls
            ]

        # Otherwise, end the loop
        return “end”

    return model_to_tools
If there are pending tool calls, the edge function returns a list of Send objects. Send is LangGraph’s mechanism for parallel execution. It directs each tool call to the tools node, and LangGraph runs them concurrently. This is a major advantage for production systems, as it can dramatically reduce latency. For example, if our agent decided to fetch multiple Wikipedia articles simultaneously, the AIMessage would contain three tool calls. The edge would then generate three Send objects to execute them in parallel.
[
    Send(
        “tools”,
        ToolCallWithContext(
            tool_call={”name”: “fetch_wikipedia_content”, “args”: {”query”: “AI Agents”}},
            state=...
        )
    ),
    Send(
        “tools”,
        ToolCallWithContext(
            tool_call={”name”: “fetch_wikipedia_content”, “args”: {”query”: “ReAct Pattern”}},
            state=...
        )
    ),
    Send(
        “tools”,
        ToolCallWithContext(
            tool_call={”name”: “fetch_wikipedia_content”, “args”: {”query”: “LangGraph”}},
            state=...
        )
    )
]
The ToolNode also has built-in error handling. If a tool fails, it catches the exception and returns a ToolMessage containing the error. This prevents the agent from crashing and allows it to reason about the failure in the next thought phase.
For our Wikipedia agent, when the model generates the fetch_wikipedia_content tool call, the ToolNode receives it, looks up the function in its registry, executes it with the provided arguments, and wraps the string output in a ToolMessage.
Observation Phase: Updating the State
The “Observation” phase is not a distinct node but rather the process of updating the graph’s state with the results from the tools node.
The ToolNode automatically formats tool outputs as ToolMessage objects. These messages are then added to the messages list in the AgentState. LangGraph uses a reducer function called add_messages for this, which simply appends new messages to the existing list, preserving the full conversation history.
For example, after the tools node runs, the state update might look like this:
Existing State:
{”messages”: [HumanMessage(...), AIMessage(tool_calls=[...])]}Update from ToolNode:
{”messages”: [ToolMessage(content=”Title: Cognitive behavioral therapy...”)]}Resulting State:
{”messages”: [HumanMessage(...), AIMessage(...), ToolMessage(...)]}
If a tool fails, the ToolMessage will contain the error string. The LLM sees this error message in the next thought phase, just like any other observation, and can decide to retry the tool or try a different approach. This makes the agent resilient to tool failures.
The Control Loop: Conditional Edges
The ReAct loop is defined by the conditional edges that route execution between the model and tools nodes. These edges are functions that inspect the current state and decide where to go next.
The primary loop is formed by two key connections added to the graph.
The edge from the
modelnode to thetoolsnode (orEND) defined at line 1344. It uses the_make_model_to_tools_edgefunction to decide the next step.
graph.add_conditional_edges(
    # Source node is the model (or the last after_model hook)
    loop_exit_node,
    # The edge function decides the destination
    _make_model_to_tools_edge(...),
    # The possible destinations
    {”tools”: “tools”, “end”: END, “model”: “model”},
)
The edge from the
toolsnode back to themodelnode defined at line 1591. It uses the_make_tools_to_model_edgefunction, which typically routes back to the model to continue the loop.
graph.add_conditional_edges(
    “tools”,
    _make_tools_to_model_edge(...),
    {”model”: “model”, “end”: END},
)

def _make_tools_to_model_edge(...) -> Callable:
    def tools_to_model(state: dict) -> str:
        # ... logic to check for tools with return_direct=True ...
        if should_end:
            return “end”
        # Otherwise, always loop back to the model for the next thought phase
        return “model”
    return tools_to_model
The logic for stopping the agent resides in the _make_model_to_tools_edge function. The agent stops when one of two conditions is met:
The model’s last message contains no
tool_calls. This is the classic ReAct exit condition, meaning the agent believes it has the final answer.A
structured_responsehas been generated and added to the state.
If neither of these conditions is met and there are pending tool calls, the loop continues. This simple but powerful logic, encoded in the graph’s edges, orchestrates the entire agentic process.
How Do Structured Outputs Work with AI Agents?
A key feature of production-ready agents is their ability to return structured, validated data. LangChain’s create_agent handles this through the response_format parameter.
The most important design choice is that structured outputs are generated only at the last step. The presence of a structured_response in the state is an exit condition for the loop. This ensures the agent has the flexibility to call various tools during its reasoning process and only enforces the final schema when it is ready to deliver the answer [8].
LangChain offers two main strategies for this:
ToolStrategy: This is what our agent uses. It treats the Pydantic schema as a special tool. The
create_agentfunction convertsDeepResearchResultinto a tool schema and adds it to the list of available tools. When the agent has gathered all necessary information, it “calls” this special tool, providing the final data as arguments. The framework then parses these arguments into aDeepResearchResultobject and places it in thestructured_responsefield of the state, which triggers the loop to end.ProviderStrategy: This strategy uses the model provider’s native support for structured outputs (like OpenAI’s JSON mode). Instead of creating an artificial tool, it instructs the model directly to generate a JSON object matching the schema. This can be more reliable but is only supported by certain models.
The ToolStrategy is a clever and flexible approach that works with any tool-calling model, making it a robust choice for ensuring reliable outputs.
Successful Example
Let’s trace a successful run for the query: “Research cognitive behavioral therapy on Wikipedia.”
Step 1: MODEL (Thought) The agent receives the task and decides it needs to search Wikipedia. It generates a tool call for
fetch_wikipedia_contentwith the query “cognitive behavioral therapy”.Step 2: TOOLS (Action) The
ToolNodeexecutes thefetch_wikipedia_contenttool. The tool returns the content of the Wikipedia page, including the title and full article text.Step 3: MODEL (Observation + Thought) The agent sees the Wikipedia content as an observation. It decides to create a summary of the content and generates a tool call for
create_summarywith the article text and a focus on “cognitive behavioral therapy”.Step 4: TOOLS (Action) The
ToolNodeexecutes thecreate_summarytool, which processes the Wikipedia content and returns a concise summary of cognitive behavioral therapy.Step 5: MODEL (Observation + Thought) The agent now has enough information to create the final report. It generates a tool call for the special
DeepResearchResulttool, populating its arguments with the title, the summary from the previous step, tags, and the paragraph count.Step 6: Exit The framework intercepts the
DeepResearchResulttool call, parses the arguments into the Pydantic model, and adds it to thestructured_responsefield in the state. The conditional edge sees this field and routes toEND. The loop terminates.
The agent successfully completed the task because the tools returned valid data, the model could reason over the observations, and the final structured output passed validation.
Here is the same example, monitored in Opik:
Unsuccessful Example
Now, let’s see what happens with a query that is designed to fail: “Research Paul Iusztin on Wikipedia.”
Step 1: MODEL (Thought) The agent decides to search Wikipedia and generates a tool call for
fetch_wikipedia_contentwith the query “Paul Iusztin”.Step 2: TOOLS (Action) The
ToolNodeexecutes the tool, which returns the string:“No Wikipedia articles found for query: Paul Iusztin”.Step 3: MODEL (Observation + Thought) The agent observes the “not found” message. It now has a choice. It could try another tool, rephrase the query, or admit it cannot find the answer. In this case, it correctly concludes it cannot fulfill the request and generates a final answer stating that no information was found.
This highlights potential failure modes. The agent might hallucinate an answer, or it could get stuck in an infinite loop of retrying the same failed search. A production-ready implementation would include a maximum iteration limit and clear instructions in the system prompt on how to handle tool failures gracefully.
Here is the same example, monitored in Opik:
Conclusion
By diving into the source code of LangChain and LangGraph, we have uncovered the elegant engineering behind a production-ready ReAct agent. We have seen how a stateful graph with just two primary nodes and a few conditional edges can implement the full Thought-Action-Observation loop. This exploration gives us more than just theoretical knowledge, it provides a concrete mental model for how these systems work.
Even if you choose not to use a framework like LangGraph in production, understanding how to built your own solution from scratch is one of the core skills you should master as an AI Engineer.
Remember that this article is part of a longer series of 9 pieces on the AI Agents Foundations that will give you the tools to morph from a Python developer to an AI Engineer.
Here’s our roadmap:
ReAct Agents From Scratch ← You just finished this one.
AI Agent’s Memory ← Move to this one
See you next week.
What’s your take on today’s topic? Do you agree, disagree, or is there something I missed?
If you enjoyed this article, the ultimate compliment is to share our work.
Go Deeper
Everything you learned in this article, from building evals datasets to evaluators, comes from the AI Evals & Observability module of our Agentic AI Engineering self-paced course.
Your path to agentic AI for production. Built in partnership with Towards AI.
Across 34 lessons (articles, videos, and a lot of code), you’ll design, build, evaluate, and deploy production-grade AI agents end to end. By the final lesson, you’ll have built a multi-agent system that orchestrates Nova (a deep research agent) and Brown (a full writing workflow), plus a capstone project where you apply everything on your own.
Three portfolio projects and a certificate to show off in interviews. Plus a Discord community where you have direct access to other industry experts and me.
Rated 4.9/5 ⭐️ by 190+ early students — “Every AI Engineer needs a course like this.”
Not ready to commit? We also prepared a free 6-day email course to reveal the 6 critical mistakes that silently destroy agentic systems. Get the free email course.
Thanks again to Opik for sponsoring the series and keeping it free!

If you want to monitor, evaluate and optimize your AI workflows and agents:
References
(n.d.). ReAct agent from scratch with Gemini 2.5 and LangGraph. Google AI for Developers. https://ai.google.dev/gemini-api/docs/langgraph-example
(n.d.). Agents. LangChain. https://docs.langchain.com/oss/python/langchain/agents
Neradot. (2024, February 19). Building a Python ReAct Agent Class: A Step-by-Step Guide. Neradot. https://www.neradot.com/post/building-a-python-react-agent-class-a-step-by-step-guide
Technofile. (2024, May 22). How to Build a ReAct AI Agent with Python from Scratch. Technofile. how-to-build-a-react-ai-agent-with
Roelants, P. (2023, April 16). ReAct: A simple agent for conversational Python. Peter Roelants. https://peterroelants.github.io/posts/react-repl-agent/
Capabl. (2024, March 11). Agentic AI Design Patterns: ReAct, ReWOO, CodeAct, and Beyond. Capabl. https://capabl.in/blog/agentic-ai-design-patterns-react-rewoo-codeact-and-beyond
Spark Co. (2024, May 28). Mastering Loop-Based Agent Patterns in AI Systems. Spark Co. https://sparkco.ai/blog/mastering-loop-based-agent-patterns-in-ai-systems
(n.d.). Agents. LangChain. https://docs.langchain.com/oss/python/langchain/agents
Daily Dose of DS. (2024, June 10). AI Agents Crash Course - Part 10: ReAct Framework with Implementation. Daily Dose of DS. https://www.dailydoseofds.com/ai-agents-crash-course-part-10-with-implementation/
Brownlee, J. (2024, July 1). Building ReAct Agents with LangGraph: A Beginner’s Guide. Machine Learning Mastery. https://machinelearningmastery.com/building-react-agents-with-langgraph-a-beginners-guide/
LateNode. (2024, August 15). LangChain ReAct Agent: Complete Implementation Guide with Working Examples (2025). LateNode. https://latenode.com/blog/ai-frameworks-technical-infrastructure/langchain-setup-tools-agents-memory/langchain-react-agent-complete-implementation-guide-working-examples-2025
(n.d.). ReAct agent with structured output. LangChain. https://langchain-ai.github.io/langgraph/how-tos/react-agent-structured-output/
Images
If not otherwise stated, all images are created by the author.
Great insights! Have you considered Google ADK as an alternative to Langraph or Langchain? Curious what you think about this.
Incredible breakdown. Seeing the ReAct loop implemented from scratch demystifies agent design and highlights why understanding frameworks at the code level is essential for production-ready AI.